Smoking and grilling are expensive habits.  Not only do you get to cook some prime cuts of meats occasionally but there are lots of gizmos and toys that make smoking so much more cool easier and more consistent.  But perhaps the most important aspect of all of these are those gizmos that help me know when my food is done!  And for that I rely on my thermometer(s).

Smoker Cooking Temperature Thermometer

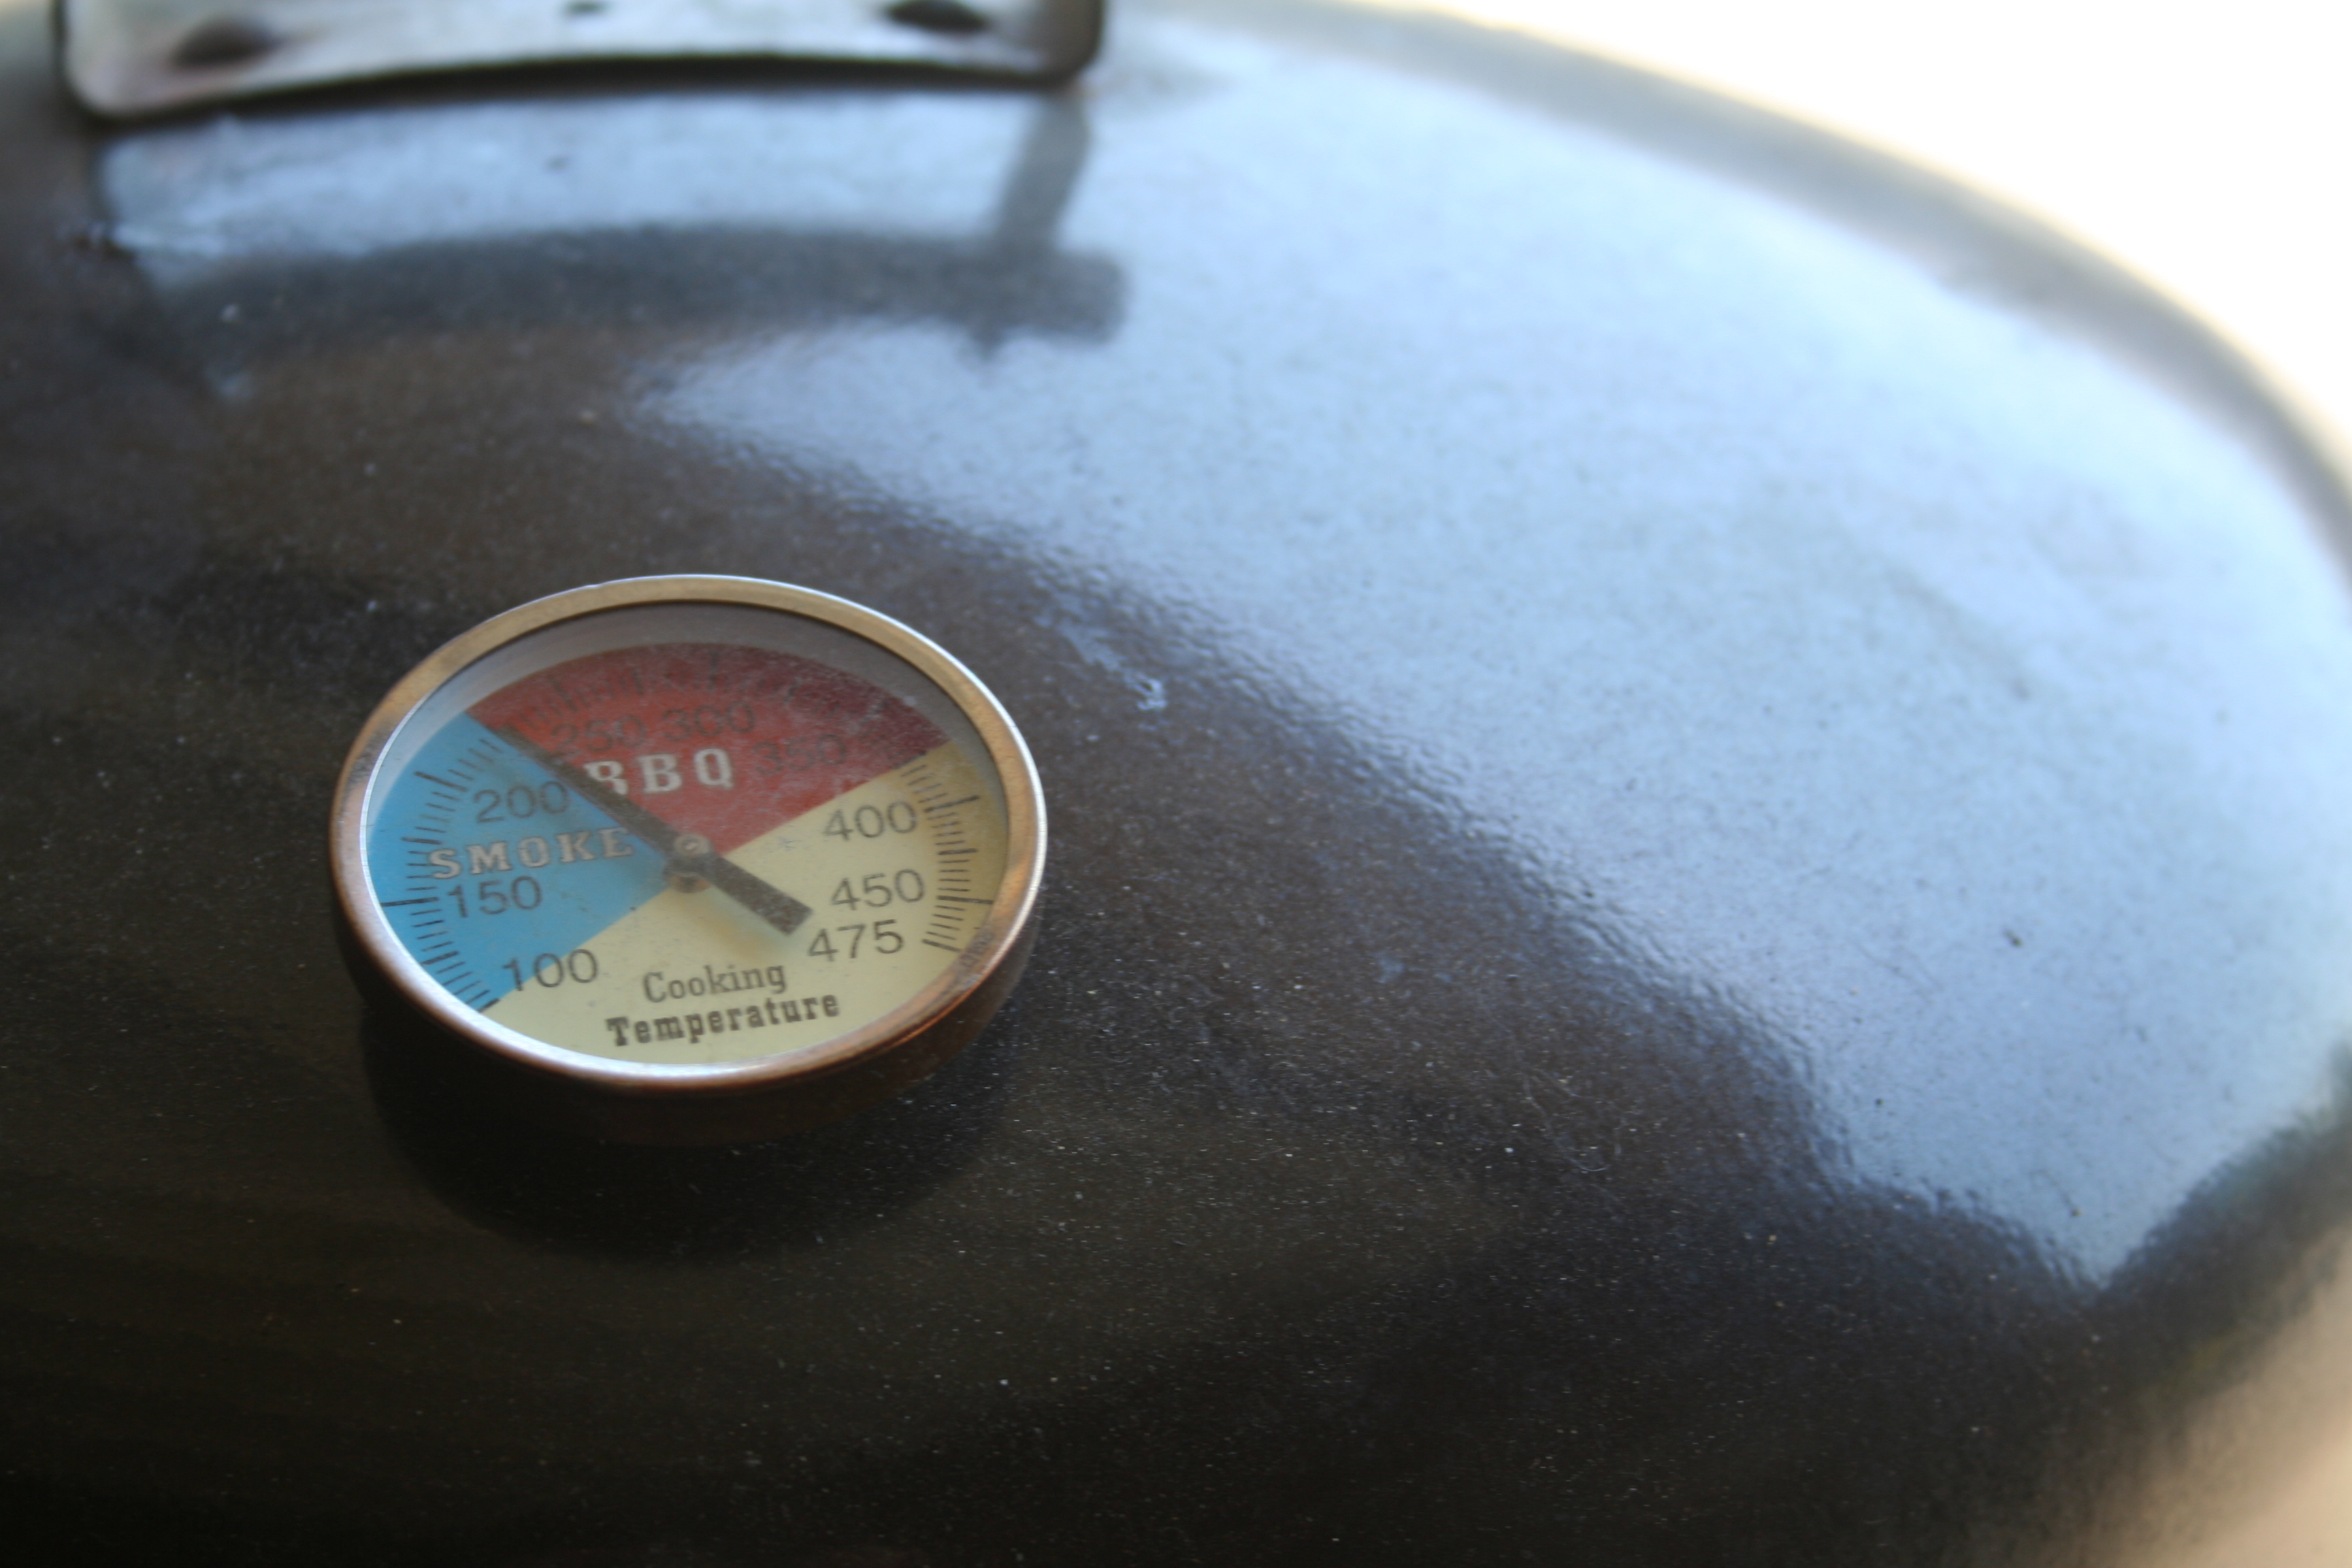
The first and perhaps most important thermometer in my arsenal is the one I have affixed to the top of my smoker.  It is an expensive, non fancy 2″ thermometer I picked up off of Amazon.  It was simple to install just had to drill a hole in the top and of the smoker dome, insert the thermometer and tighten the nut on the back.  When I initially go it I calibrated it with boiling water and it was dead on.  I have been using it for a little over a year with no complaints.  This is a must have in my book.

Maverick ET-84 Thermometer Next on my list is my Maverick ET-84.  For a long time this was my bread and butter thermometer, I have two of them and they both rock.  You can get replacement probes for them with either a silicone encased or braided stainless steel type wire.  It also has a nice back light for outdoor after dark cooking.

The talk of replacement probes may scare some away but I have been using both of mine for well over a year and have had to replace the probes once, as a result of a terrible mishap in the oven.  The silicone probes do not survive extreme temperatures, greater than 500°F.

Ordering new probes was easy and inexpensive via email through the Maverick Industries website.

I use these with meat on the grill, in the smoker and in the oven.  Its nice to be able to see where the meat is at temperature wise without having to lift the lid or open the door.  In addition these thermometers talk, kinda creepy when you aren’t expecting it but they will remind you to baste.  This can also be turned off.

As I said I have used these thermometers for quite a while in hot weather, in cold weather and in nice weather.  Typically in unfavorable I have increased the geek quotient of my smoking operation by adding a wireless webcam to the set up to monitor the smoker from the comfort of my home.  With the proper set up it is possible to monitor both the thermometer on the smoker itself and the ET-84 positioned near it (the probes have a 48″ lead).  With the webcam I am also able to see if the smoker is well smoking, this is a bit more difficult in the bitter cold because you have a bit more steam, but smoking is after all an instinctual thing.

I calibrated or rather made sure they were properly calibrated using the same method as for the grill top thermometer above, dunked it in boiling water and it checked out.  It is important that when calibrating this way you are sure not to touch the probe to the bottom of the pan.  The pan will be much hotter than the water inside of this, you could zap a probe.  Its not nearly as scary as it sounds

Maverick ET-901 Receiver Unit

Finally the latest and perhaps coolest addition to my thermometer arsenal, the Maverick ET-901.  Like the ET-84 above the ET-901 is an electronic thermometer that allows you to monitor the temperature of meat you are cooking without opening the door or raising the lid.  But it has the added benefit of being wireless it consists of two pieces, the transmitter seen below that will sit with the smoker, grill or oven you are cooking with and a receiver you take with you.

Maverick ET-901 Transmitter with smoker

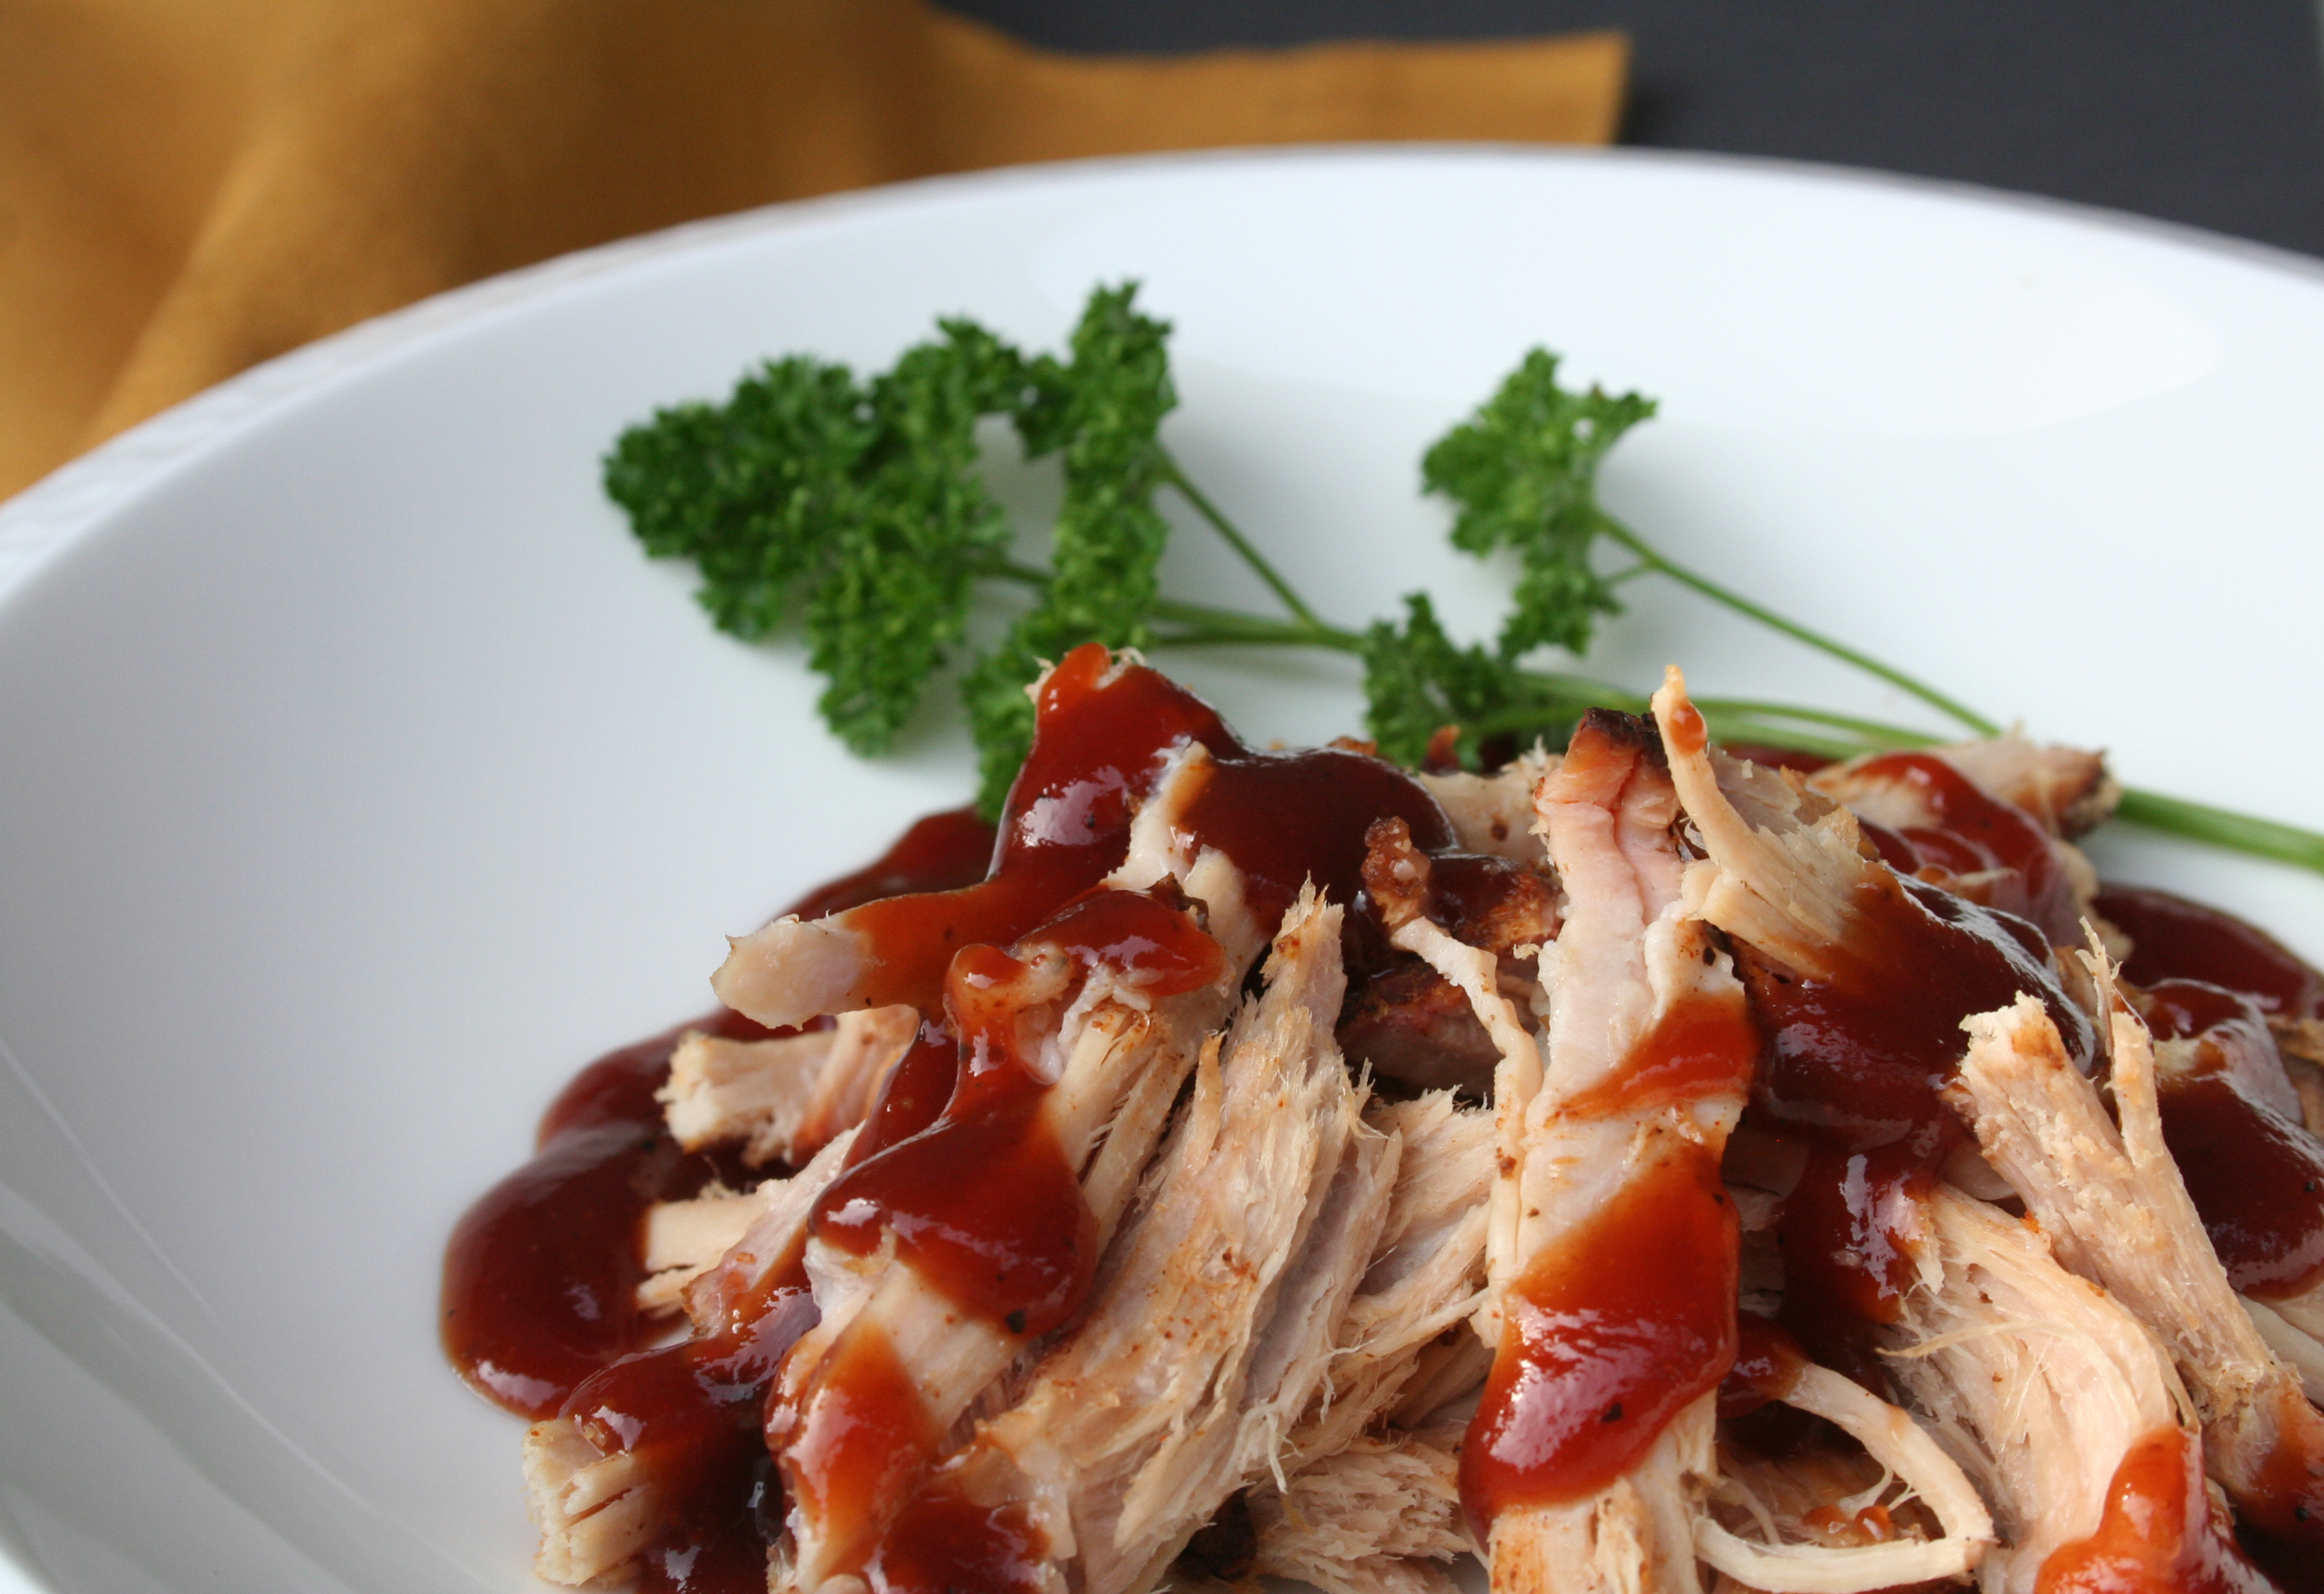
This is the newest addition to my arsenal and it was met with some skepticism.  The internet is full of bad talk about wireless thermometers and their range, so I was quite skeptical when I got it but wanted to give it a try for monitoring temperatures when I am away from a computer or don’t feel like hooking up the webcam and want to know how my food is cooking.  I could not be happier with the results,  this thing is money and well worth the money I spent on it.  I am currently using it as I cook up some pork to pull and it has limited my trips to the smoker drastically.

Maverick Industries ET-901 Transmitter RangeJust to get an idea of the range at which I am using the remote thermometer, the image above is an action shot of my set up today.  The transmitter is sitting next to the smoker outside the garage and I am in the house with the receiver.  I am well within the 150′ range touted by the manufacturer, I am passing through a brick wall and have had no problems thus far.  It also works well from behind my condo, which suggests it would work great next to my bed for overnight cooks, more sleep less worrying.

In addition being wireless the ET-901, like the ET-84, has a back light for after dark cookouts and like the ET-84 it has user programmable doneness levels.  So for instance when cooking pulled pork to 205°F, I can set it for 205°F and it will alert me when my food has finished cooking, instead of at a preset doneness level, of which it also contains several.

Like the ET-84 replacement probes are available for this model from Maverick Industries.

So after all that which one do I use the most?  Well that is a tricky question, inevitably the thermometers mounted directly to the smokers and grill get used the most.  But of the electric ones it is a trick question, they wireless ET-901 is the newest and will get used the most on single piece of meat cook I imagine.  But like today where I have two pieces of meat on the smoker the ET-901 is in the smaller of the two pieces of meat to give me a heads up when they are getting close to being done; while the ET-84 is in the larger piece of meat just so I can periodically check on its progress.

With that I will leave you with a picture of my setup today and a question.  Do you have a thermometer you you can’t live without and why?

The smoker thermometer setup today

Tagged with: , , , , , , , ,

Sometimes its not about what you cook, its about how and where and with what challenges.  Well today, much like cooking breakfast on an open fire, the challenge was not in what I was cooking or how I was cooking, it was the element of nature that produced the biggest source of problem in my cook.  In the midst of a blizzard warning this morning I fired up the smoker to smoke up some rosemary and brown sugar rubbed Boston butts (3) for some pulled pork.

Smoking in a blizzard

In spite of the snow and the massive drifts and the sometimes strong winds, I prevailed the smoked stayed going and the pork is now ready for some pulling.  Its not new, its not special but it was a challenge.  And if I do say the results look, smell and taste fantastic.

My apologies for the picture quality, they came from my phone. 🙁

Tagged with: , , , , , , , , , , , , , , , ,

Well they are finally gone, and sadly so, the last rack of ribs we had in the freezer was dinner tonight.  But not without some trying something new first.  In the past I have been a fan of jerk chicken, and have made some completely from scratch…more about that later.  I have also used some store bought ‘jerk’ rubs in the past and they are alright but wanted to go out and try something new.  So that is what I did, I found a jerk rub and complimenting glaze I liked and tweaked it a little and it was a bit spicy, so if you are not necessarily for spice, you might want to back it off on the pepper a little.

Jerked Pork Ribs

The little strange yellow color in the picture is the pineapple glaze that didn’t get absorbed, its tasty even if it does look a little strange.  Using the recipe for the rub below, I rubbed the ribs and sealed them in plastic wrap in the fridge over night.  This morning I took them out and let them set out for about an hour before I fired up the smoker.  I then smoked the ribs using the 3-2-1 method using pecan wood.  During the final hour I began brushing the glaze onto the ribs and did so three times, it could have really used one or two glazings.

When it was all said and done I let them rest covered with foil and a towel for about a half hour then it was eating time.  They were sweet and spicy and had a nice jerk flavor, not quite authentic but still very good.  We will be making these again.

Jerk Rib Rub
Ingredients
3 tbsp dark brown sugar
2 tbsp kosher salt
1 tbsp ground black pepper
2 tbsp ground coriander
2 tsp garlic powder
2 tsp onion powder
2 tsp dried thyme
2 tsp ground allspice
1 tsp ground cinnamon
2 tsp cayenne pepper (remember it was spicy)

Instructions
Combine all until mixed uniformly.  Rub into meat.

Pineapple Glaze
Ingredients
2 c pineapple juice
2 tbsp cider vinegar
1 tbsp red wine vinegar
3 tbsp dark brown sugar
3 tbsp butter
1/2 tsp ground black pepper

Instructions
Combine all ingredients in a sauce pan.  Heat to a boil and cook, stirring occasionally, until mixture is reduced to about half.

Like I said they were tasty, I am glad I have leftovers for tomorrow.  They should make a fine lunch.

Tagged with: , , , , , , , , , , , ,

Ribs, everybody wants to make some and a lot of people are not sure how.  Well like most meat low and slow will give you a juicy and fall off the bone tender result.  But with ribs there is something special that needs to happen.  I like typically like to stick with larger cuts of meat but no man could claim to be even a novice of the BBQ without having ribs tucked away firmly in his belt.

Rack of ribs

Like most chunks of meat I smoke the ribs started out the night before with a trimming, which I historically do a less than professional job at.  From there I wash the ribs and pat them dry with paper towels and then rub them.  Typically rubbing is a two part process.  The first is to coat them in mustard or some other liquid to help the rub stick and the second is the rub them with your rub.  How much is up to you, ribs have a delicacy to them that is easily over powered with too much rub.  Once this is all done is into the fridge in a sealed container to think about what they have done.

Freshly rubbed spare ribs

The meat (ribs) in the picture above were rubbed with two different rubs.  After a nights worth of sitting in the rub or a couple hours if that is all that is available I get the smoker ready.  I boil some water in my kettle for my water pan to speed up the preheating process and get my wood for the day ready.  Once the smoker has reached that magical temperature of 225°F it is ready for some meat.  So I lube my grate with some oil, its a habit and then throw the meat on and let the smoke start rolling.

Ribs just on the smoker

When smoking ribs I use the 3-2-1 Rib method, which is not my invention but seems to work quite well and is easy to remember.  The first stage is to smoke the ribs for about 3 hours.  The time is not nearly as important as is the appearance at this point.  Once the meat begins to pull away from the bone and has pulled back about a 1/4 inch it is time to move onto step two.

Ribs at the end of stage 3

Once your ribs are looking like these it is time to move on to step two.  Stage two is kinda hard to swallow at first, I mean I just wanna continue to flood my ribs with smokey flavor but its time to pull back for a few.  In stage two its all about time, take the ribs off the smoker and wrap them in foil with a little apple juice.  I am not sure how much apple juice I use it depends on the meat and what looks good.  You could certainly substitute some other liquid here the goal is just to provide the ribs with some moisture while they are in the foil.  Throw the ribs wrapped in foil back on the smoker for two hours and let the magic happen.  During this time the ribs are soaking up the juice and getting their fall of the bone tender status.  There is no need to supply smoke during this period.

Ribs after stage 2

After two house in stage two remove the ribs from the foil and place them back on the smoker grate and get the smoke rolling again.  It might be time to check that water pan too.  The ribs should look like those above at this point, shrinkage has occurred and they looking kinda mushy.  That is where the final stage of the 3-2-1 method comes in smoke them until they reach 172°F in the thickest part of the meat.  This should take an 45 minutes to an hour.  If you would like to add BBQ sauce during the last 15 minutes on the smoker is the time to do this.

Ribs cooked to perfection

Once the ribs are done pull them off the smoker and let them rest for 15 minutes on the counter.  During this time the juices will redistribute and you will be glad you waited.  Serve and enjoy.

The 3-2-1 method assumes you are dealing with spare ribs.  If you find yourself with baby back ribs you will be looking at something more like the 2-2-1 method, just be sure to be more attentive to the meat an hour earlier with baby backs.

As with most other pork I prefer to mix apple and hickory for my ribs, gives them an excellent flavor.

Tagged with: , , , , , , , , , , ,

So today I made pulled pork, again.  But it was not nearly as dreadful as I make it sound, as an avid connoisseur of all things smoked, pulled pork is a staple.  Its fairly easy to make, requires a slight flexing of the smoking muscle and is almost impossible to screw up.   Today was no different, I had a ham roast in the freezer that was just begging for some smoker time and as it ends up I also had a rosemary shortage which prohibited me from making my preferred Brown Sugar and Rosemary Rub, so it was back to the drawing board.

BBQ Pulled Pork

In the end I ended up with an excellent stand in using some ready made rubs and and brown sugar.  And a spritz with some molasses, cranberry juice, bbq sauce and seasoning, again we didn’t have any apple juice.  The day was full of improvising. You will find the recipes for the rub and spritz below.

I threw the meat on the smoker about 7:30 AM and it smoked at 225ºF with apple and hickory wood until it reached 165ºF, at which point I wrapped it in foil and threw it back into the heat until it reached an internal temperate of 205ºF.  Then it was, while still wrapped in foil, wrapped in old towels and thrown into the cooler for 2 hours to rest.  I then pulled it, put it on a sandwich and enjoyed.  It was most tasty not quite as tasty as the Brown Sugar and Rosemary Rub but it is certainly still edible, and will likely be the source of lunch room envy tomorrow.

Mix and Match Pork Rub
Ingredients
brown sugar
bbq3000
bad byron’s butt rub
mustard

Instructions
Mix together 2 parts brown sugar to 1 part each bbq3000 and butt rub.  When thoroughly mixed, spread mustard on meat in evenly.  Then rub meat liberally with bbq rub created above.  Wrap in plastic wrap and refrigerate over night or cook immediately.

Spritz Recipe
Ingredients
1 tbsp molasses
2 tbsp bbq sauce
1 c cranberry juice
1/4 c white sugar
1 tbsp bbq3000

Instructions
Combine all ingredients until mixed well.  Mop onto meat every hour until meat reaches 165°F.

Tagged with: , , , , , , , ,