Wow, its been that long since my last post?!  I have been sorely neglecting my poor blog and almost as much my taste for food!  Well alot has happened since September, for one, last December we packed up all of our stuff and put it in a storage unit (or three) and that includes my beloved smokers – so I have been without my arsenal for nearly 7 full months now and it has been difficult.  We find ourselves living with my in-laws while we are in limbo between our condo and our future home (which we are still looking for) and our stuff is far away.  But, lucky for me my father in law has a nice gas smoker, unlucky for me today’s weather calls for severe storms and strong winds all day.

But let me back up, what in the world do I even need a smoker for today?  Well as it turns out my brother is getting married next weekend (congratulations Dan) and I being ever so thoughtful forgot he may need a stag party before he enters into wedlock and so we find ourselves in need of some grub.  So I find myself up against the wall we are out with friends tonight and then tomorrow its stag party time.  Dan is pretty simple in his tastes but ribs are one thing he likes and one thing I like to make.  So ribs it is, nothing special, usual rub and smoked using the 2-2-1 method (they are baby backs, for regular ribs the 3-2-1 method) but with the stinking gale happening outside my window using the gasser was out of the question, I would spend more time relighting the burner than actually cooking.  So that left me with the charcoal, which would take more care than I could give it today or the gas grill…winner winner chicken pork dinner.

Now I have heard that some of you (you know who you are) will take a rack of ribs and put it into a crock pot and turn it into gray mush and then top with some sauce, the words I have are not kind.  Well no more!  There are no longer excuses, today we will learn how to make ribs on the grill that are just a fuzz less awesome than those off a smoker, after all the one on the smoker get cool points.

Before we can figure out how to cook them on a grill we need to know what makes ribs so special in a smoker, there are a couple of things they are low heat for a long period of time, moisture from the water pan (personal opinion here) and smoke – after all it is a smoker.  These are the things we will need to replicate in the grill.

Ribs on a gas grill, smoked

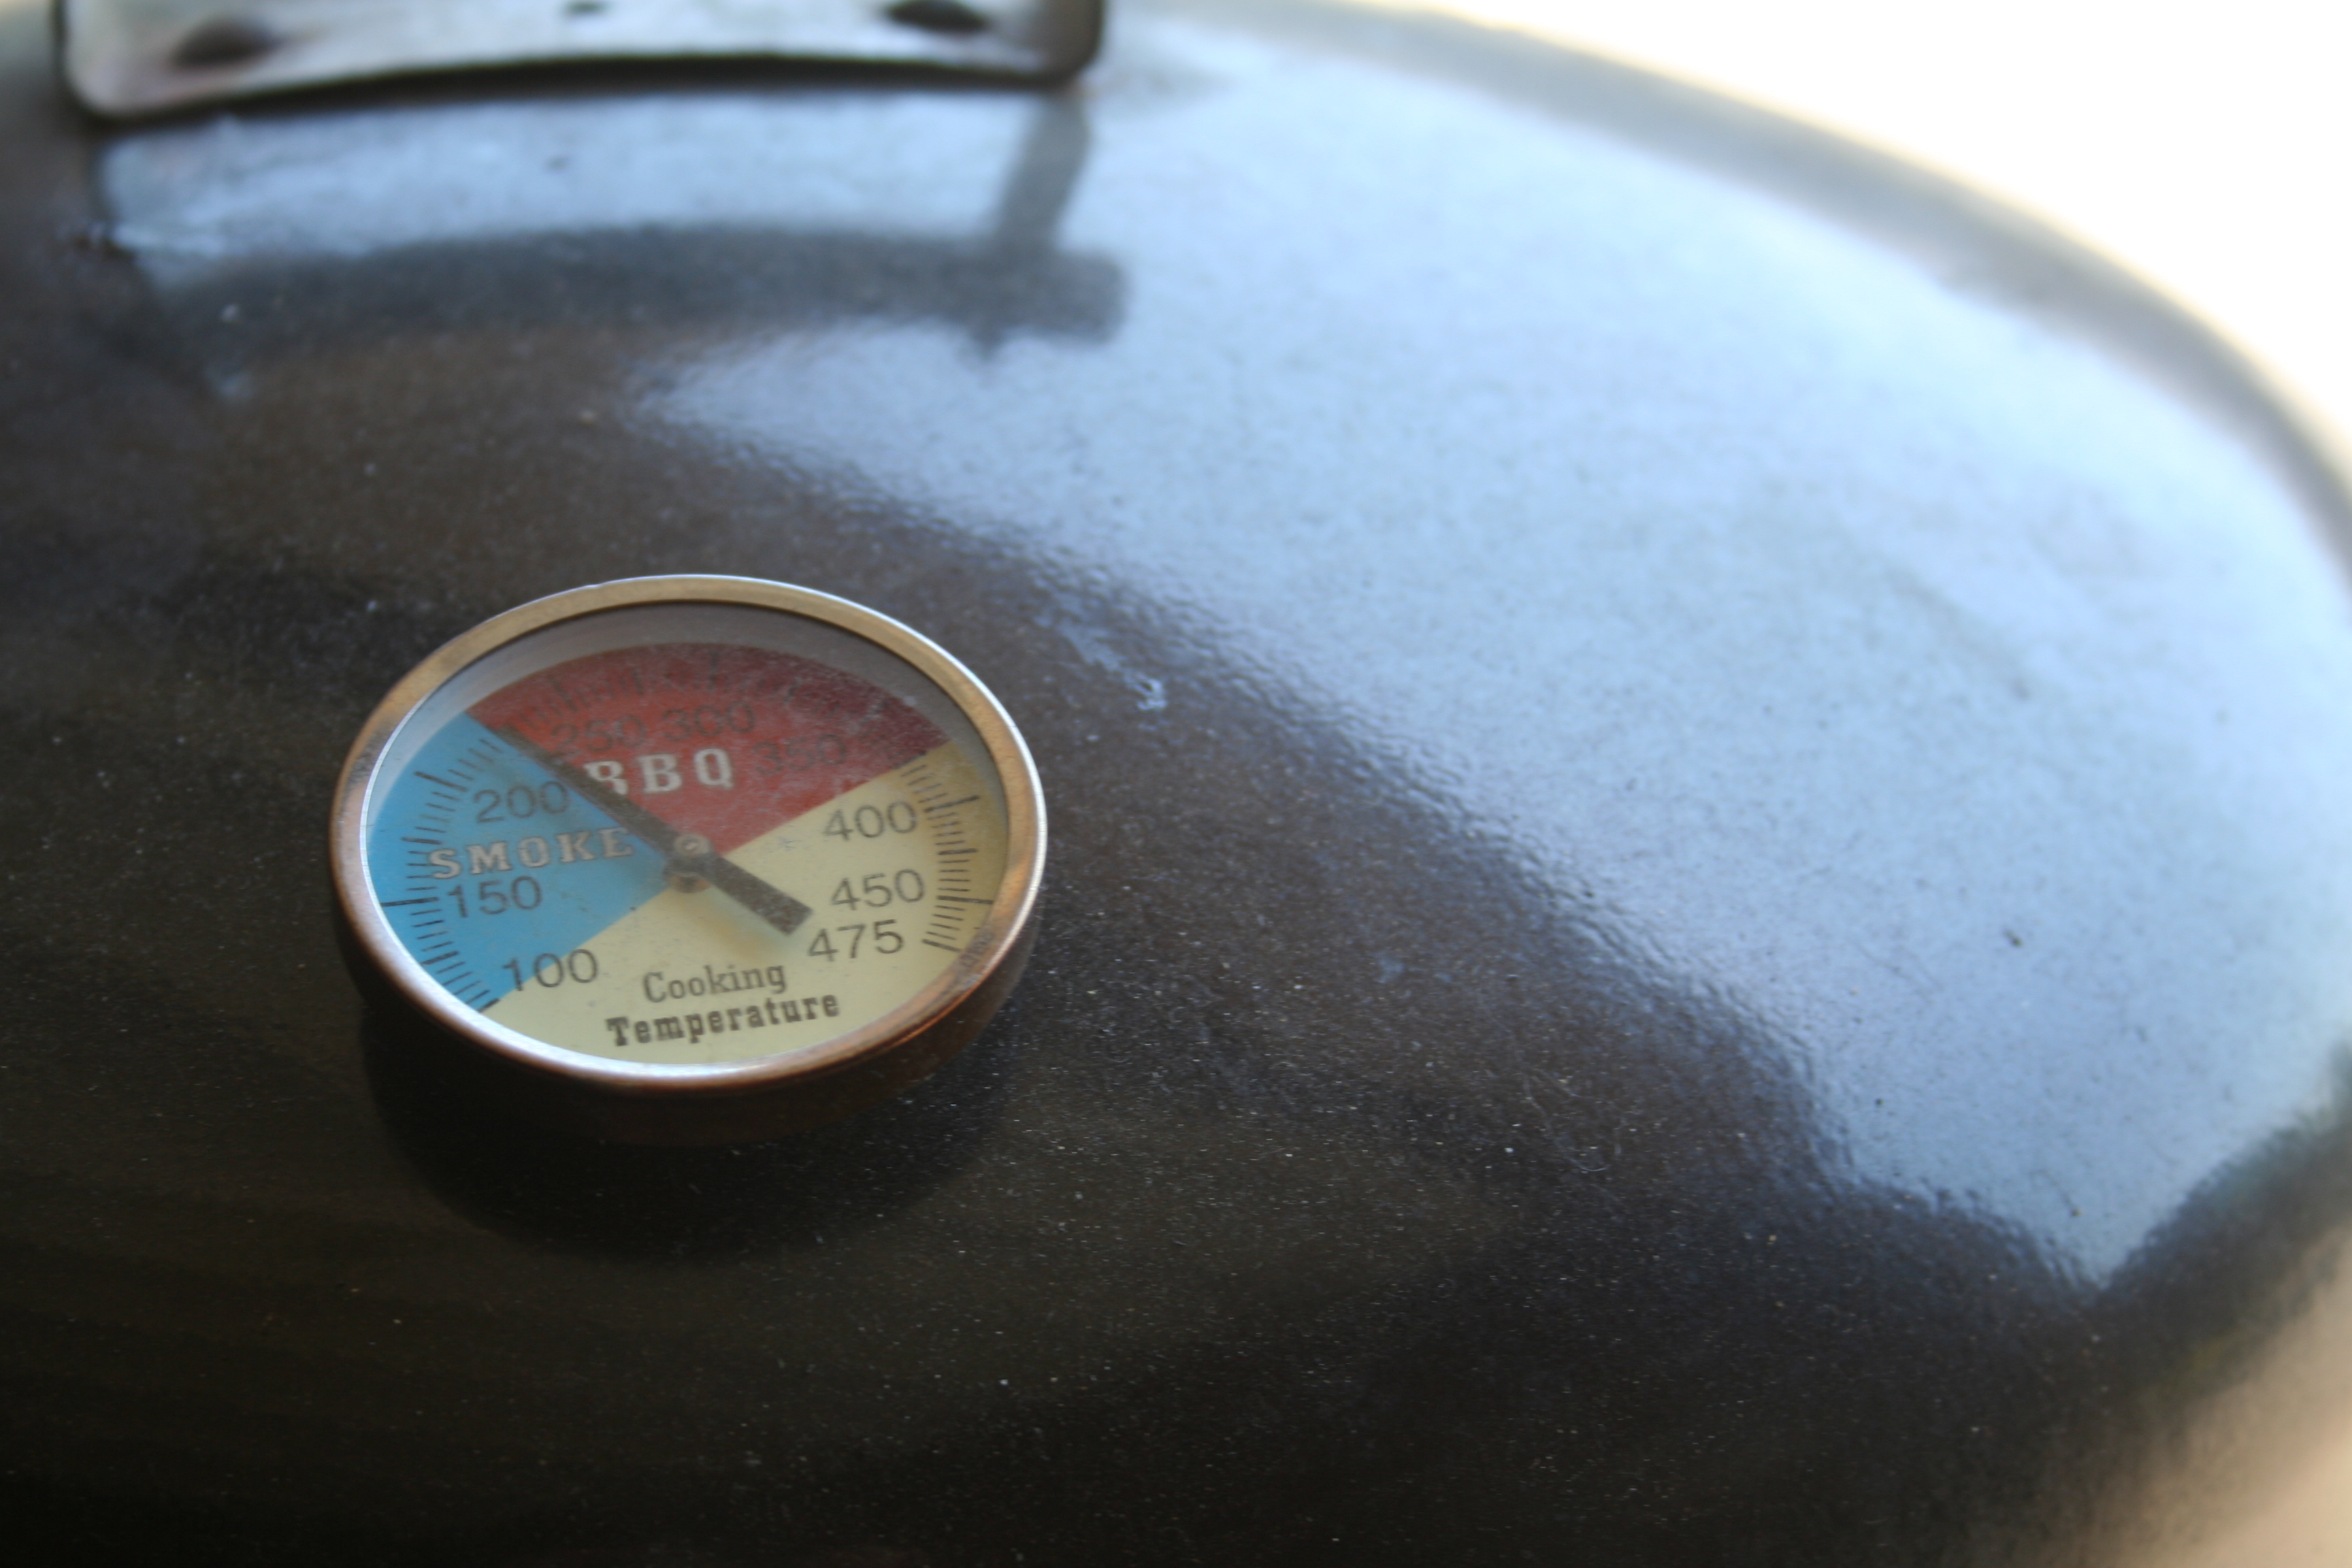
The first and arguably the most important, or at least a close second piece of the equation to replicate is the low heat for long periods of time – I can hear you now, “…in a crockpot…” Gross!  Anyways so to do that we will only be using one burner (your grill may be different), you will notice in the picture above that the two burners closest to the camera are turned off and just the one is on.  Doing this I am able to maintain a nice 225-250°F cooking temperature (stinking wind, it would be easier without the gales) without much effort.  So that was easy figure out where the grill can happily hold our temperature and leave it there, or at least until you are positive you need to adjust and KEEP THE LID CLOSED!

Grill smoked ribs, water pan and chips

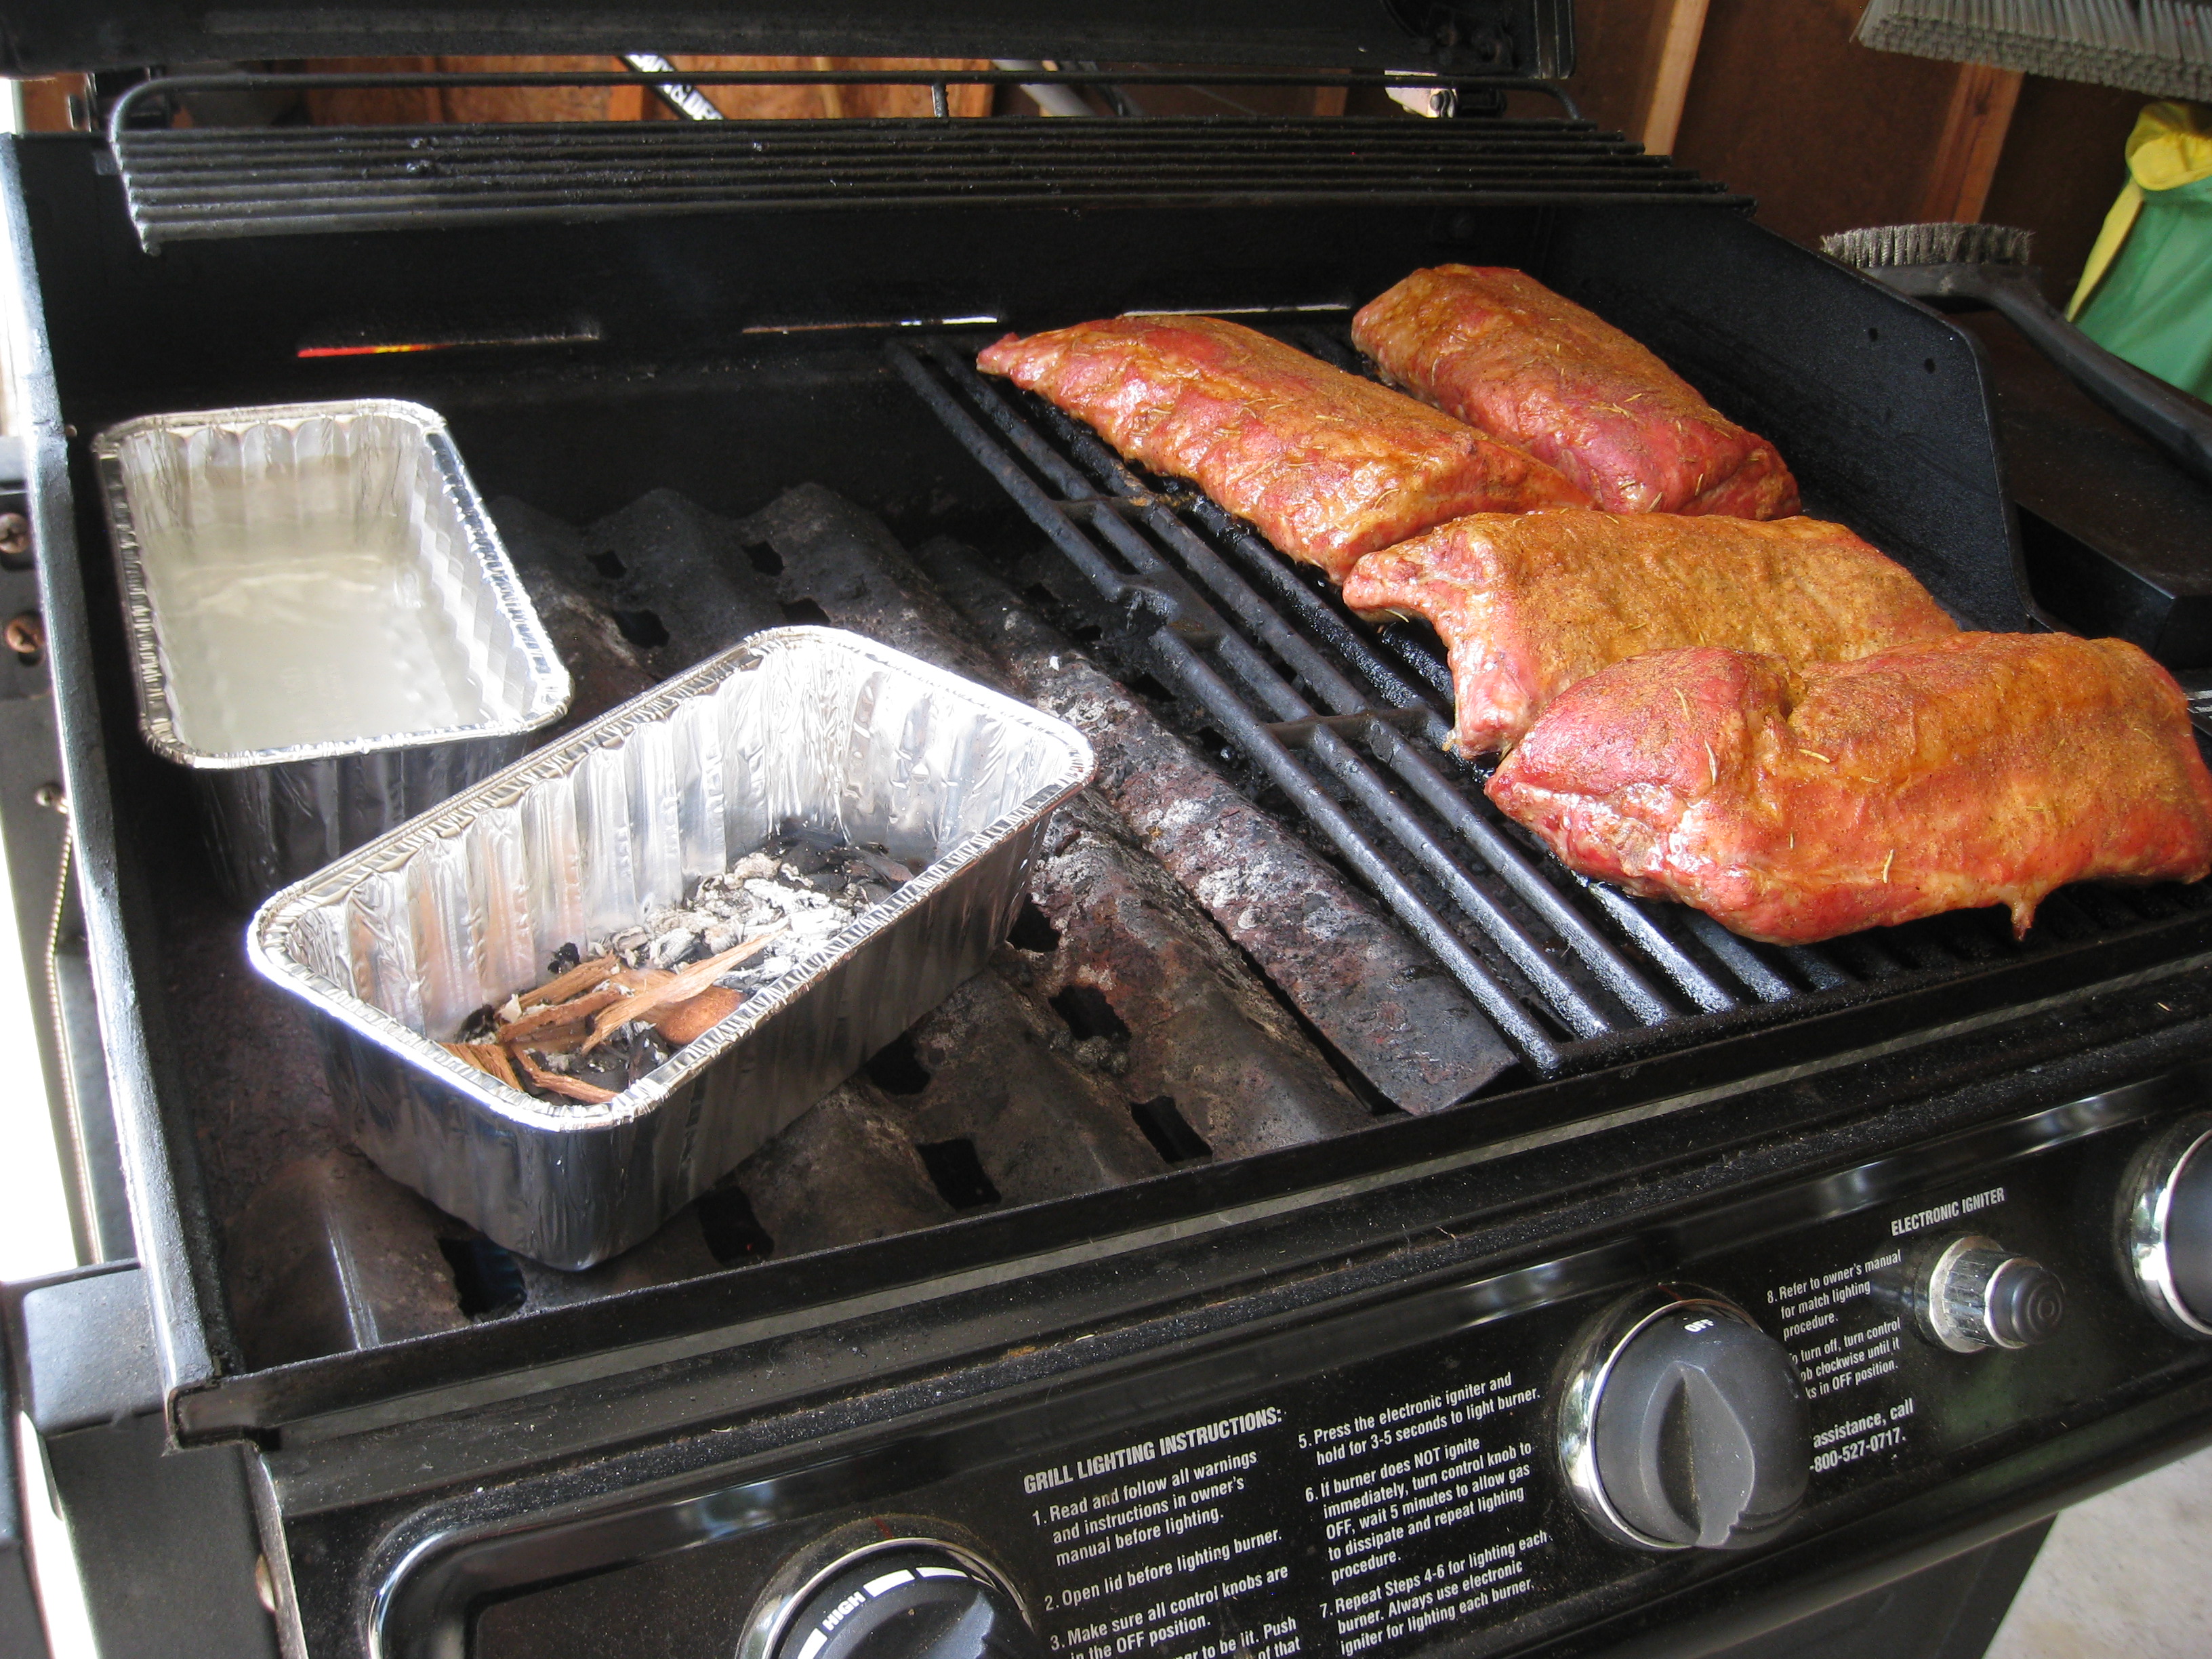
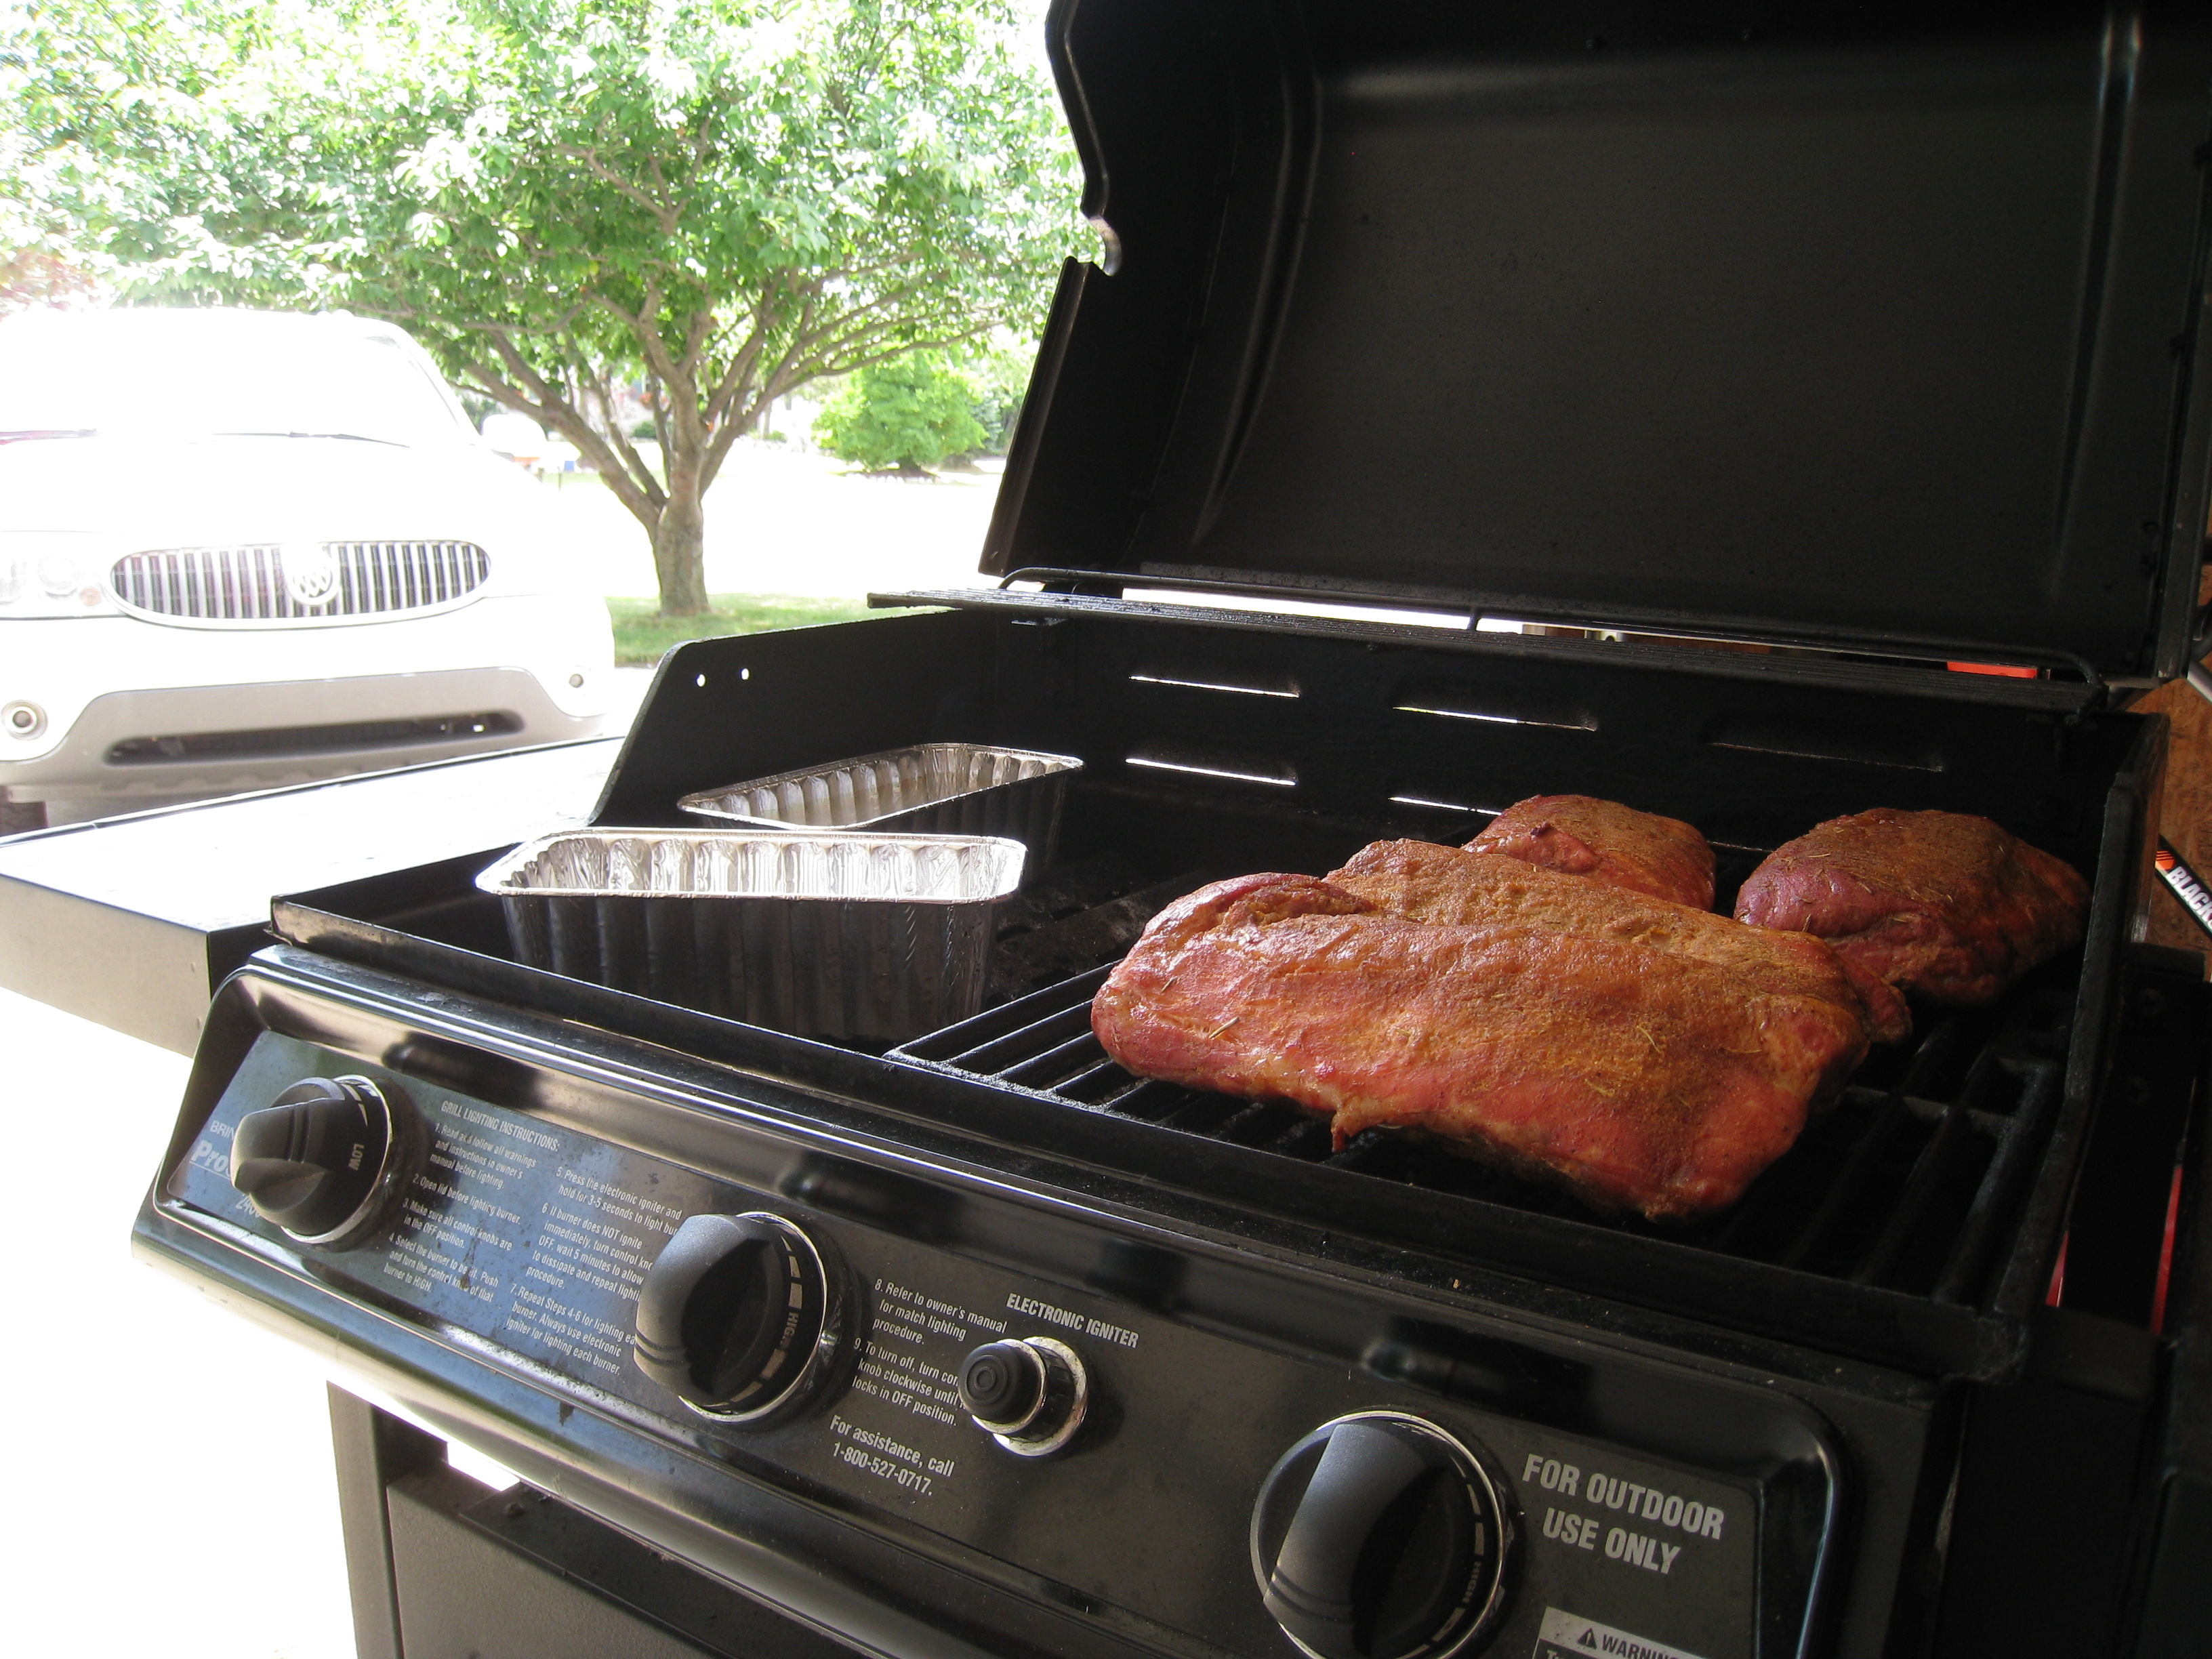
Next there is the smoke and well the water, they are pretty similar so I will cover them together.  The first thing you will need are a couple of foil pans that will fit in your grill, unless you want use your good pans then by all means cast iron would be better.  Take the grate out of your grill if it has the little under grate, sometimes called flavor bars, and set the foil pans directly over the burner you will be cooking with – fill one with water and line the bottom of the other with wood chips soaked in water.

Finally add ribs and cook as if it were on a smoker.  Just like a smoker you will have to refill the water and the smoker chips as needed.  Cook and enjoy, use your crockpot for soup and taking things to potlucks, where with any luck someone will steal it.

Tagged with: , , , ,

Smoking and grilling are expensive habits.  Not only do you get to cook some prime cuts of meats occasionally but there are lots of gizmos and toys that make smoking so much more cool easier and more consistent.  But perhaps the most important aspect of all of these are those gizmos that help me know when my food is done!  And for that I rely on my thermometer(s).

Smoker Cooking Temperature Thermometer

The first and perhaps most important thermometer in my arsenal is the one I have affixed to the top of my smoker.  It is an expensive, non fancy 2″ thermometer I picked up off of Amazon.  It was simple to install just had to drill a hole in the top and of the smoker dome, insert the thermometer and tighten the nut on the back.  When I initially go it I calibrated it with boiling water and it was dead on.  I have been using it for a little over a year with no complaints.  This is a must have in my book.

Maverick ET-84 Thermometer Next on my list is my Maverick ET-84.  For a long time this was my bread and butter thermometer, I have two of them and they both rock.  You can get replacement probes for them with either a silicone encased or braided stainless steel type wire.  It also has a nice back light for outdoor after dark cooking.

The talk of replacement probes may scare some away but I have been using both of mine for well over a year and have had to replace the probes once, as a result of a terrible mishap in the oven.  The silicone probes do not survive extreme temperatures, greater than 500°F.

Ordering new probes was easy and inexpensive via email through the Maverick Industries website.

I use these with meat on the grill, in the smoker and in the oven.  Its nice to be able to see where the meat is at temperature wise without having to lift the lid or open the door.  In addition these thermometers talk, kinda creepy when you aren’t expecting it but they will remind you to baste.  This can also be turned off.

As I said I have used these thermometers for quite a while in hot weather, in cold weather and in nice weather.  Typically in unfavorable I have increased the geek quotient of my smoking operation by adding a wireless webcam to the set up to monitor the smoker from the comfort of my home.  With the proper set up it is possible to monitor both the thermometer on the smoker itself and the ET-84 positioned near it (the probes have a 48″ lead).  With the webcam I am also able to see if the smoker is well smoking, this is a bit more difficult in the bitter cold because you have a bit more steam, but smoking is after all an instinctual thing.

I calibrated or rather made sure they were properly calibrated using the same method as for the grill top thermometer above, dunked it in boiling water and it checked out.  It is important that when calibrating this way you are sure not to touch the probe to the bottom of the pan.  The pan will be much hotter than the water inside of this, you could zap a probe.  Its not nearly as scary as it sounds

Maverick ET-901 Receiver Unit

Finally the latest and perhaps coolest addition to my thermometer arsenal, the Maverick ET-901.  Like the ET-84 above the ET-901 is an electronic thermometer that allows you to monitor the temperature of meat you are cooking without opening the door or raising the lid.  But it has the added benefit of being wireless it consists of two pieces, the transmitter seen below that will sit with the smoker, grill or oven you are cooking with and a receiver you take with you.

Maverick ET-901 Transmitter with smoker

This is the newest addition to my arsenal and it was met with some skepticism.  The internet is full of bad talk about wireless thermometers and their range, so I was quite skeptical when I got it but wanted to give it a try for monitoring temperatures when I am away from a computer or don’t feel like hooking up the webcam and want to know how my food is cooking.  I could not be happier with the results,  this thing is money and well worth the money I spent on it.  I am currently using it as I cook up some pork to pull and it has limited my trips to the smoker drastically.

Maverick Industries ET-901 Transmitter RangeJust to get an idea of the range at which I am using the remote thermometer, the image above is an action shot of my set up today.  The transmitter is sitting next to the smoker outside the garage and I am in the house with the receiver.  I am well within the 150′ range touted by the manufacturer, I am passing through a brick wall and have had no problems thus far.  It also works well from behind my condo, which suggests it would work great next to my bed for overnight cooks, more sleep less worrying.

In addition being wireless the ET-901, like the ET-84, has a back light for after dark cookouts and like the ET-84 it has user programmable doneness levels.  So for instance when cooking pulled pork to 205°F, I can set it for 205°F and it will alert me when my food has finished cooking, instead of at a preset doneness level, of which it also contains several.

Like the ET-84 replacement probes are available for this model from Maverick Industries.

So after all that which one do I use the most?  Well that is a tricky question, inevitably the thermometers mounted directly to the smokers and grill get used the most.  But of the electric ones it is a trick question, they wireless ET-901 is the newest and will get used the most on single piece of meat cook I imagine.  But like today where I have two pieces of meat on the smoker the ET-901 is in the smaller of the two pieces of meat to give me a heads up when they are getting close to being done; while the ET-84 is in the larger piece of meat just so I can periodically check on its progress.

With that I will leave you with a picture of my setup today and a question.  Do you have a thermometer you you can’t live without and why?

The smoker thermometer setup today

Tagged with: , , , , , , , ,

Perhaps my favorite way to have pork is like this, grilled and rubbed with dijon mustard and a rosemary/garlic concoction.  It was the first way I had cooked pork in out of my Dutch tradition and has been one of my favorites.  Its simple and the combination of the flavor of pork, rosemary and dijon are always a win.

So in typical fashion in getting ready to put this on the blog I made the pork, tried to stage it nicely and took a bunch of pictures.  Then in my moment of brilliance I decided I needed to organize the pictures before writing this post.  There in lies the problem…I deleted them having thought they were copied off somewhere else.  So you will have to take my word for it the pictures were something to behold, they did the meat such justice.

So without further ado and before I lose the recipe with the pictures here it is.

Ingredients
1 pork loin (4lbs-ish)
2 tbsp dijon mustard (or more)
2 tbsp chopped red onion
2 tsp kosher salt
1/2 tsp black pepper
1 clove garlic minced or pressed
2 tbsp finely chopped rosemary leaves

Instructions
Several hours before grilling time, mix all ingredients except pork loin and dijon.  Then you have a choice to make either flatten the loin by cutting into it the long way while rotating it to come out with one large and consistently thick piece of pork, like a piece of rolled out dough or just use it whole, both ways are superb.  Rub entire piece of meat with dijon and then the rub the entire piece of meat with the rub made above.  If you did not flatten the meat you can simply wrap it in saran wrap and throw it back in the fridge tell you are ready to cook it.  If you did flatten it you will not need to roll it back up, like a long line of cinnamon rolls and then proceed to wrap it in saran wrap and toss it in the fridge tell cook time.

Once cook time comes around, prepare the grill for indirect cooking.  With charcoal like below or with gas preheat the grill with both burners and turn the one you will be cooking over off.  For gas grills place the loin on a grill rack over a drip pan.  For charcoal you will have a drip pan filled with water in the center of the grill with charcoal on either side.  Just toss the meat on the pre lubricated grate being sure if you flattened and rolled the meat it does not come unrolled.  Cook indirectly until the center of the loin reaches you desired done-ness.  I pulled mine at 148ºF and let it rest for 10 minutes before slicing into it.

Indirect cooking over charcoal

Cooking indirectly over charcoal is easy and quite rewarding.  Just prepare a normal amount of charcoal for your grill using a chimney or other method.  Fill a foil pan with boiling water and place it in the center of the grill and tuck the charcoal on opposing sides of the pan.  Be sure to add a half dozen briquettes every 45 minutes or so to keep a consistent fire.  You can also toss on a chunk or two of wood to give it a little smoke flavor.

You will notice that the openings on my grill grate are strategically positioned over my charcoal pockets, this allows for easy replenishment.

Tagged with: , , , , , , , ,

Well, yesterday we decided to grill Chuckie or rather a chuckie, more precisely a chuck roast from a happy cow and it was delicious.  Along the way I think there were a few learnings we picked up especially when our one hour cook time went to one and a half hours then two.  In spite of all of that what came off the grill was superb.  We started with a nearly 6 pound chuck roast we marinated overnight in Lawry’s Steak and Chop marinade in a zip lock in the fridge.  I turned the meat over several times.  Using my new hinged stainless cooking grate on my Weber 22.5″ charcoal grill with some Royal Oak lump charcoal and a couple of chunks of Hickory wood, we first attempted to sear the meat before placing it on the roasting rack suspended over a pan of beer, cracked black pepper,  a couple chopped onions and a couple cloves mashed garlic.  We cooked it this way on the opposite side of the grill, indirectly, for about an hour basting with a mixture of boiled left over marinade and a couple ounces of beer.  We turned the meat at 30 minutes.

Cooking a roast indirectly.

After about an hour and half of this we got well, really not that far, we got a lot of good smells and up to about 115ºF, when impatience set in and we decided to flop the roast of the roasting rack and onto the grate, at which time we grilled it for about 20 minutes rare until it was just shy of medium rare. We pulled it and dug in.  It was incredible, it was just like a giant steak and really quite tender.  Somehow we managed to make nearly six pounds of meat into a four serving dish.

Chuck roast drizzled with Au Jus and topped with onions

We devoured a steak drizzled with our beer, onions and drippings au jus and topped with the cooked onions and a potato on the side.  It was a tasty steak and an excellent learning experience.   Next time I do this I will either set aside more time to anticipate cooking if I want to use the indirect method of cook the entire duration of the cook directly on the grate but still indirectly and speed things up.

So for those of you who wanted to know how Chuckie fared, he fared well enough to have a Chuckie the second sooner or later on the grill and definitely in the smoker.

Tagged with: , , , , ,

In the spirit of the Digital Chef, “cookin’ with what you got”, I cooked up a cupboard cleaner meal.  Actually it was more of a fridge cleaner, but none-the-less we got rid of some almost empty stuff.  It was also a beautiful day so I cooked all this mess on the grill over cherry wood, no charcoal just straight cherry wood, had an awesome flavor in the chicken, the taters were sealed in foil.

Potatoes and BBQ Chicken Breast

All in all it tasted good, it hit the spot and cherry wood usually make any meat a little better and chicken breast on the grill is no exception.

The chicken was place in its foil boat atop a bed of onions, a mashed clove of garlic and sprinkled with BBQ 3000.  It was then smothered in BBQ sauce, we had a little bit of three different kinds in the fridge and I used all of them.  Three more bottles out of the way.

The potatoes were canned potatoes (which I had never even seen before, let alone ate) and they were placed in a foil boat with a couple tablespoons of margarine, some chopped onion, some mashed garlic, some parsley, some steak sauce and a little cheese.

Both dishes were pretty dang good and even better for not having planned at all, a last might grill meal for the win.

Tagged with: , , , , , ,