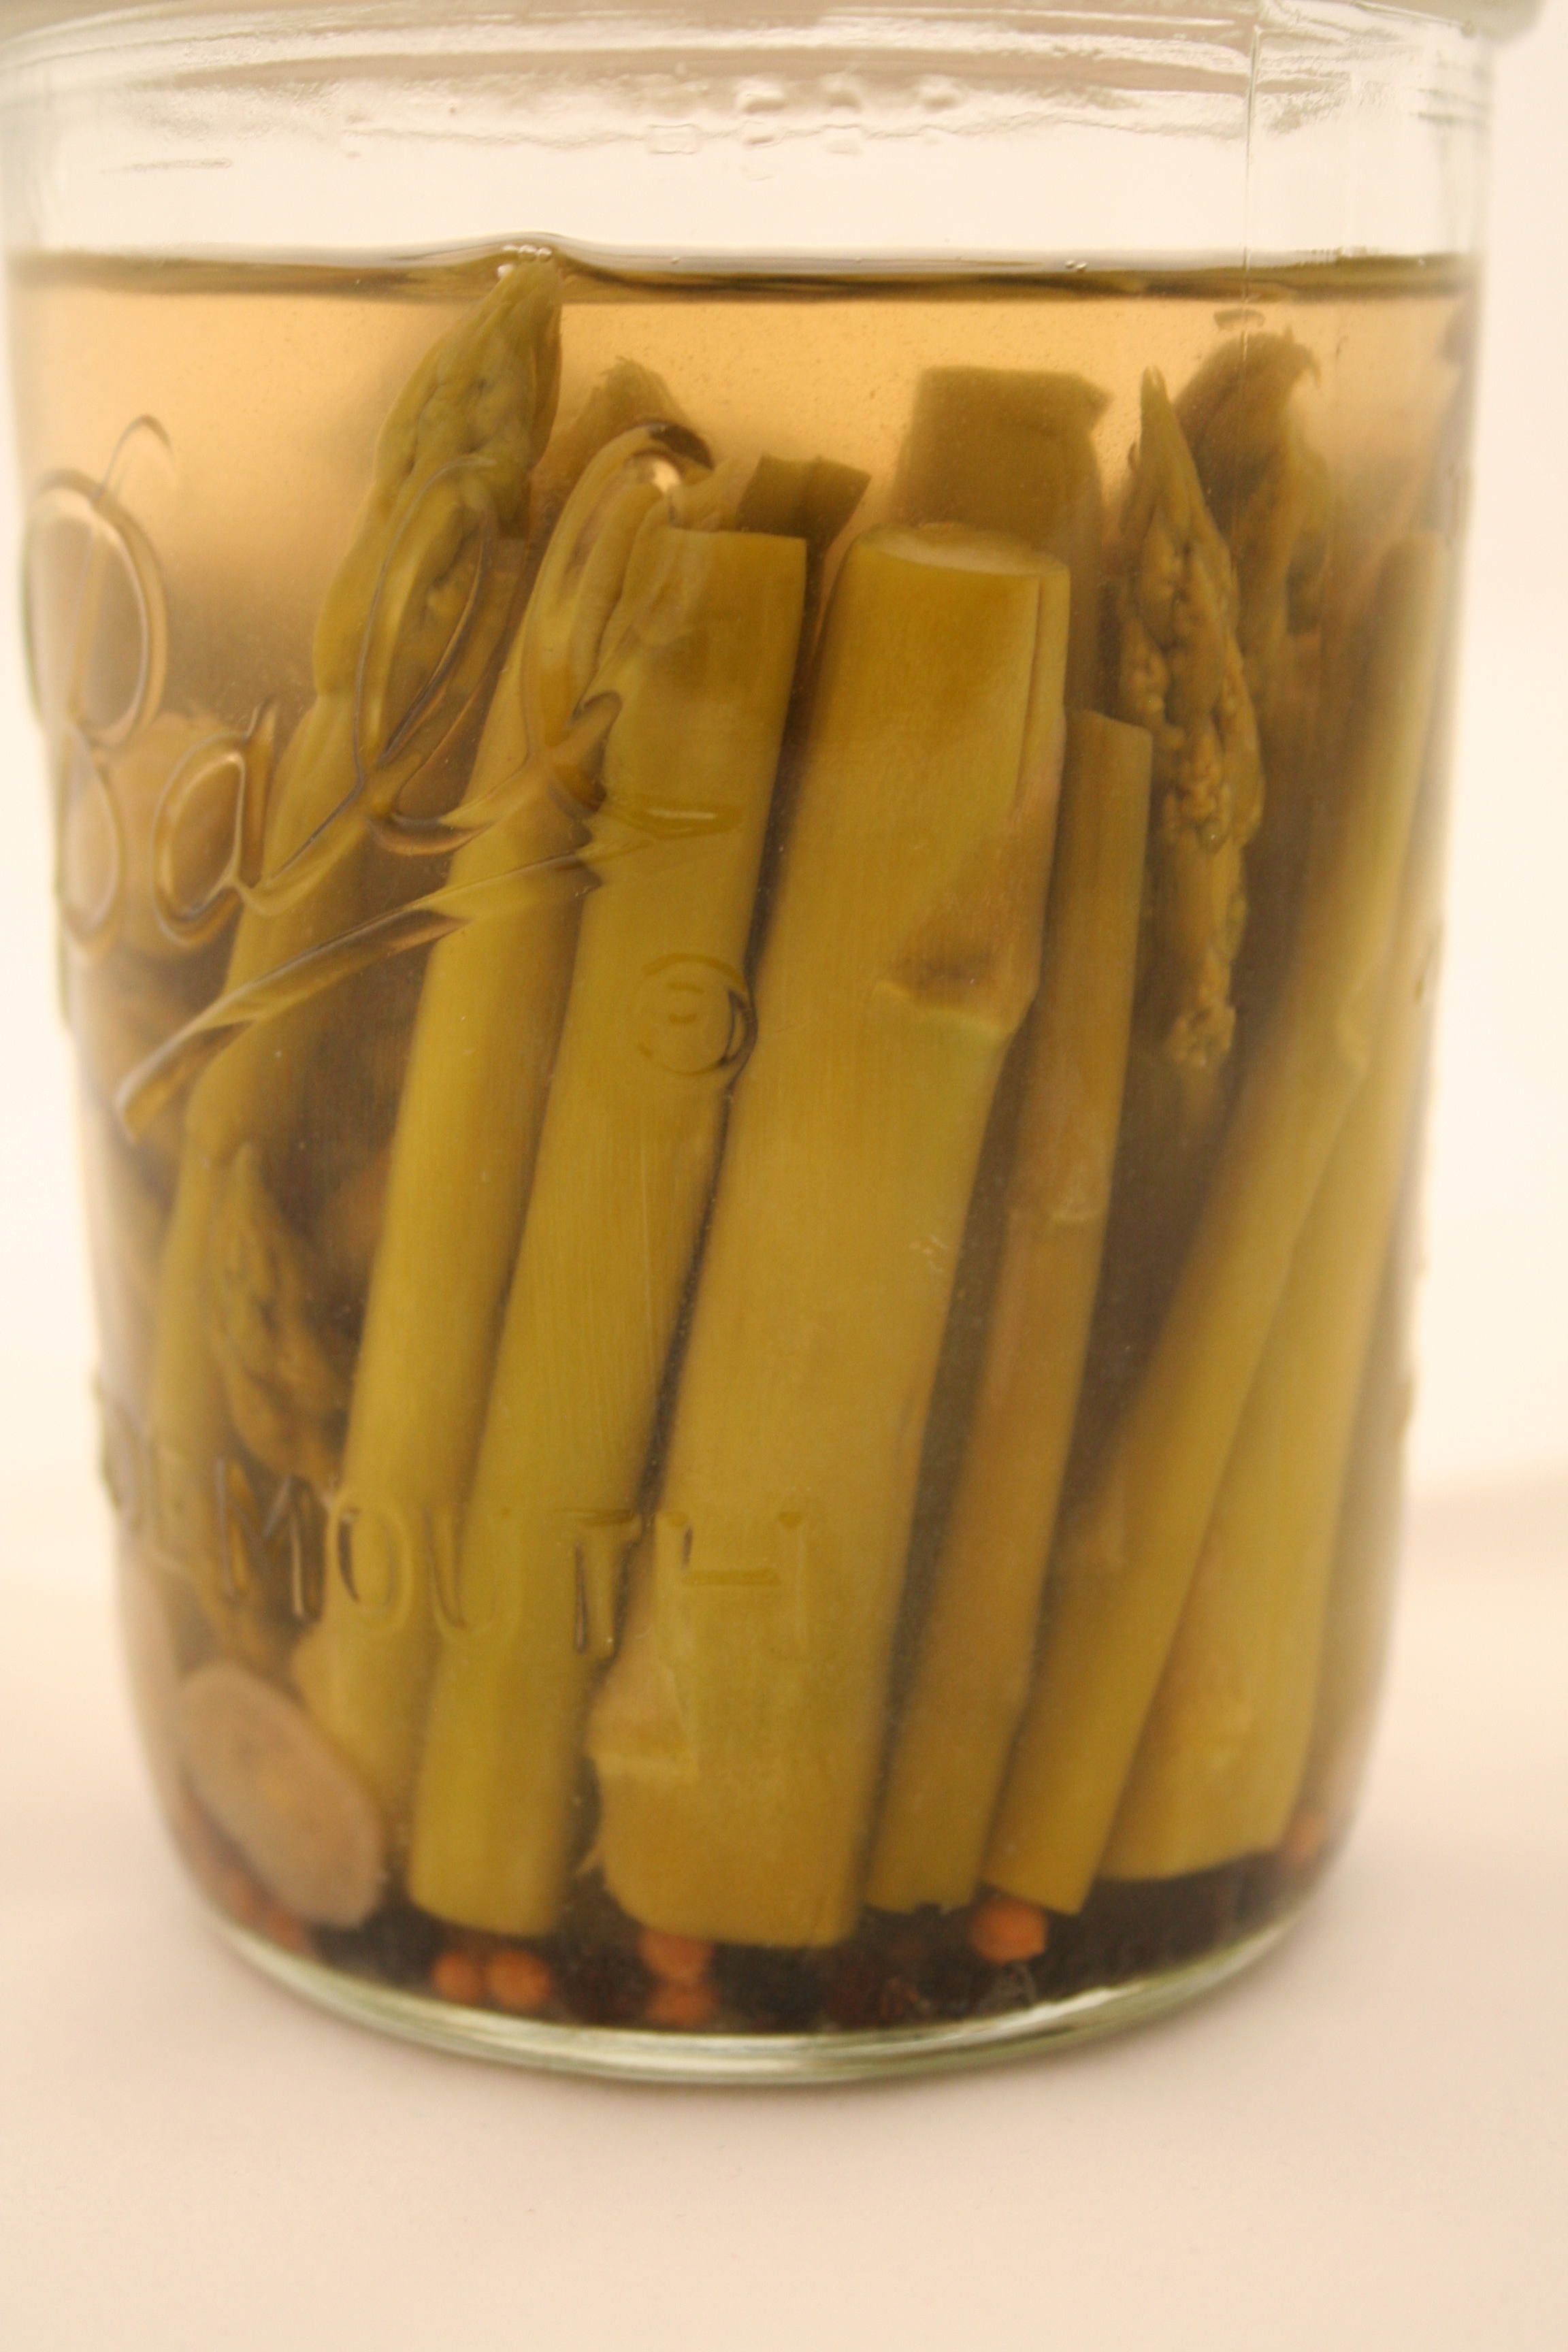
Okay.  So some things are not quite natural to me yet, like putting a bunch of stuff in a jar with no lid and letting it sit and come alive for a couple weeks, scraping the mold off the top (if it did mold, this doesn’t always happen) and then you are supposed to eat it?  Well the more I do it the more familiar it becomes and it is worth overcoming the mental hurdle this stuff is tasty.

Every spring my parents have an abundance of asparagus from their small garden plot out back, an abundance might be an understatement but it is way more than they could possibly hope to eat and still like it at the end of the season.  As a result I usually end up with a bit of it myself, which is fine with me, asparagus is my friend.  This year I thought I would try something a little different.  I tried pickling some asparagus, I tried three different methods and got three different results.  You will have to check back for the other two types of pickles as I have not yet tried all three.

Lacto-fermented 'pickled' asparagus

The first type of pickled asparagus that I got to try was lacto-fermented pickled asparagus.  It was perhaps the most intimidating of the three batches I did, but I had to know.  Lacto-fermentation is a natural process in which the naturally occurring lactobacilli on the surface and in the vegetables (in this case) convert the sugars and starches in the vegetables in to lactic acid.  This lactic acid inhibits putrefying bacteria and preserves the vegetables.  At first glance.  Scary.

The asparagus pickle recipe I used was adapted from a recipe found over at Awesome Pickle.  Because I was using a pint jar and had enough asparagus to fill the entire jar I adapted the recipe a bit.  I did however find the technique  they used to submerge the asparagus in the jar simple and effective.  You can view that technique at the bottom of the page linked above.

Ingredients
asparagus (enough to fill a 1 pint wide mouth jar)
2 cloves garlic
1/2 tsp coriander seeds
1/2 tsp black peppercorns
1 c water mixed with 3/4 tsp kosher salt

Instructions
Wash asparagus.  Trim asparagus to fit into a 1 pint wide mouth jar, heads down, with about an inch of head space.  Thinly slice garlic cloves and place them in the jar, add in the spices.  Pout in the water until it entirely covers all of the asparagus.  Use the method shown in the third picture here to keep the asparagus from rising up during the process.  Put the jar in a cool place dark place with a towel underneath and another towel draped over the top to keep the dust out and forget about it for a week or two.  Once its ready in a week or two remove the jar, remove any surface mold and store in the refrigerator.

I initially had hoped to try these before I headed out on vacation a week ago but for some reason they just didn’t seem ready.  So instead I just took off and left them be in the basement and another week later they were ready to go.  These little guys are pretty tasty and still had a good crunch so far.  We’ll see how they are by the end of the jar.  If you can get over the initial intimidation of allowing nature to run its course on a jar of veggies.  Lacto-fermentation yields a delicious product that I am told is easier for the body to digest.

Tagged with: , , , , , ,

Perhaps my favorite way to have pork is like this, grilled and rubbed with dijon mustard and a rosemary/garlic concoction.  It was the first way I had cooked pork in out of my Dutch tradition and has been one of my favorites.  Its simple and the combination of the flavor of pork, rosemary and dijon are always a win.

So in typical fashion in getting ready to put this on the blog I made the pork, tried to stage it nicely and took a bunch of pictures.  Then in my moment of brilliance I decided I needed to organize the pictures before writing this post.  There in lies the problem…I deleted them having thought they were copied off somewhere else.  So you will have to take my word for it the pictures were something to behold, they did the meat such justice.

So without further ado and before I lose the recipe with the pictures here it is.

Ingredients
1 pork loin (4lbs-ish)
2 tbsp dijon mustard (or more)
2 tbsp chopped red onion
2 tsp kosher salt
1/2 tsp black pepper
1 clove garlic minced or pressed
2 tbsp finely chopped rosemary leaves

Instructions
Several hours before grilling time, mix all ingredients except pork loin and dijon.  Then you have a choice to make either flatten the loin by cutting into it the long way while rotating it to come out with one large and consistently thick piece of pork, like a piece of rolled out dough or just use it whole, both ways are superb.  Rub entire piece of meat with dijon and then the rub the entire piece of meat with the rub made above.  If you did not flatten the meat you can simply wrap it in saran wrap and throw it back in the fridge tell you are ready to cook it.  If you did flatten it you will not need to roll it back up, like a long line of cinnamon rolls and then proceed to wrap it in saran wrap and toss it in the fridge tell cook time.

Once cook time comes around, prepare the grill for indirect cooking.  With charcoal like below or with gas preheat the grill with both burners and turn the one you will be cooking over off.  For gas grills place the loin on a grill rack over a drip pan.  For charcoal you will have a drip pan filled with water in the center of the grill with charcoal on either side.  Just toss the meat on the pre lubricated grate being sure if you flattened and rolled the meat it does not come unrolled.  Cook indirectly until the center of the loin reaches you desired done-ness.  I pulled mine at 148ºF and let it rest for 10 minutes before slicing into it.

Indirect cooking over charcoal

Cooking indirectly over charcoal is easy and quite rewarding.  Just prepare a normal amount of charcoal for your grill using a chimney or other method.  Fill a foil pan with boiling water and place it in the center of the grill and tuck the charcoal on opposing sides of the pan.  Be sure to add a half dozen briquettes every 45 minutes or so to keep a consistent fire.  You can also toss on a chunk or two of wood to give it a little smoke flavor.

You will notice that the openings on my grill grate are strategically positioned over my charcoal pockets, this allows for easy replenishment.

Tagged with: , , , , , , , ,

Chicken.  Blah.  Ok, maybe I should say we eat more chicken than we rightfully should, I mean we should have way more pork and beef in there somewhere, but chicken it more often times than not is.  So with that we try to spice it up and give some flavor to the unflavorable, so today (actually last night) I set out to make a balsamic glazed grilled chicken.

Balsamic Glazed Grilled Chicken

And I must admit it was rather tasty, albeit quite sweet, which for some reason I was not expecting.  Once I got past the sweet and onto the rest of the chicken it was as I said rather tasty, very tender and juicy; which is always better than dry chicken.

In hindsight I should have cooked my stuffing a little bit before shoving it in the bird.  The breasts and thighs of the bird were ready about 20 minutes before the stuffing reached a safe temperature, which much to my surprise did not dry out the meat or give it even the slightest burnt taste.

I grilled the bird on my Weber kettle over charcoal for about an hour and twenty minutes, the bird was just shy of 4 pounds.  I replenished the charcoal once at about 45 minutes with six fresh briquettes on each side and a handful of apple chips.  Once the breasts were about done I glazed the bird liberally and let it finish out its cooking, which because of the stuffing was longer than anticipated when I applied the glaze.  But it didn’t seem to burn.

Ingredients
1 chicken (or parts if you don’t wanna mess with a whole bird), about 4 pounds
1 medium onion
1 stalk celery
1 clove garlic
1/2 c ketchup
1/4 c balsamic vinegar + extra
6 tbsp dark brown sugar
1 tsp oregano
1 tbsp lime juice
1 tbsp olive oil
2 tbsp paprika
1 tbsp chili powder
1 tbsp cumin
1 1/2 tsp salt
1 tsp pepper + extra
a few stalks of rosemary

Instructions
To make a rub combine 2 tbsp brown sugar with paprika, chili powder, cumin, lime juice, oil salt and pepper.  Mix well and rub all over chicken making sure to get plenty under the skin.  Cover and refrigerate overnight.

On cooking day remove chicken from refrigerator 30 minutes before cooking.  Chop up onions into large pieces, chop celery, rosemary and garlic and combine in a bowl with pepper to taste.  Sprinkle with balsamic vinegar and stuff in bird (if I were to listen to my advice I would likely bake the stuffing at this point prior to stuffing the bird for say 20 minutes in the over).

Prepare the grill for indirect cooking, clean and lube the grate and toss the bird on the grill. Once the chicken is on the grill prepare the glaze by combining ketchup, vinegar, 4 tbsp brown sugar and oregano.

Once chicken is nearly done brush chicken liberally with glaze mixture.  Cook until internal temperature of chicken breasts and thighs is 167°F and stuffing is 165°F.  Once pulled allow chicken to stand for 15 minutes before slicing.  Enjoy

Without the glaze I dare say the chicken would have been quite south western but with the glaze it was sweet and magical.  Now if I can just figure out what to do with the left overs.


Tagged with: , , , , ,

Wednesday night my wife says to me, “We should make Greek burgers with some of the venison we have in the freezer.”  And that is when it was born, the Venison Greek Burger, I became infatuated with the idea for the rest of the week.  All day Thursday, all day Friday, I could not keep it off my mind.  Then finally Saturday came and the burger came to be.  It did not disappoint.  It was tasty, it was worth the thought and the preparation, and truth be told we ate a couple yesterday and are about to eat a couple more.

The Venison Greek Burger

Like so many other recipes, this is just a start, the Greek use any number of seasoning to create their own unique signature when making Gyro meat, which is what this is based off.  So this is more of a template that I used to get going and will likely add in different ingredients each time I make it from here on out.  There is a recipe for the meat, which was excellent and one for the Tzatziki sauce to go on top of the burger as well.

Greek Venison Burger Meat
Ingredients
1 lbs ground venison
1 egg
1 small onion
1 tsp ground oregano
1 tsp ground marjoram
1 tsp kosher salt
2 tsp fine feta cheese crumbles
2 gloves garlic, crushed
1/4 tsp ground black pepper

Instructions
Chop onion and then place in a food processor.  Blend in the processor until the onion is more of an unrecognizable consistent mash.  Remove from blender and place in a couple of pieces of good paper towel.  Squeeze out as much juice as possible.  Add onion as and the rest of the ingredients with the exception of the venison to a bowl.  Mix well.  Add in venison and mix until the seasoning is evenly distributed through the meat.  Form to patties, let set for 30 minutes and grill to desired wellness with light smoke from a few oak chips in the grill.

Should you have no venison you could substitute a half pound of ground beef (lean) and a half pound of ground lamb.

Tzatziki Sauce
Ingredients
1 1/2 c plain greek yogurt
1 cucumber
2 tbsp fresh lemon juice
1/2 tsp dill weed
pinch of kosher salt
pinch of ground black pepper
pinch of sugar
2 cloves of garlic crushed

Instructions
Peel cucumber, slice and half length wise and with a spoon remove the seeds.  Place the remaining cucumber in a food processor and blend until uniform (kind of like applesauce).  Place cucumber in a couple of paper towels and squeeze out the juice.  Combine the drained cucumber with the remaining ingredients and refrigerated overnight.

The sauce will be a little too garlicky the first day, it mellows over night, but keep the breath mints handy!

Once the burgers are cooked slap ’em on a bun with some lettuce (or spinach), tomato, onion, feta, tzatziki sauce and a dusting of ground sumac; these are wicked tasty.  Or as an alternative they are great without the bun but with everything else in a salad.  Either way give it a try, and remember the meat recipe is just a template customize, customize, customize!

Tagged with: , , , , ,

We are on the chicken kick again and I must say I have a new favorite this year, it is honey mustard marinated chicken on spinach with a honey mustard vinaigrette, made from all the left overs from cooking the chicken…so tasty and so easy.

Honey Mustard Marinated Chicken on Spinach

Like most marinades, the beauty is that once its marinating the only thing left to do is cook it up when its time for some chow.  The problem is that we don’t want to eat the same marinade necessarily when we marinate something and end up with 20 bottles of marinade in the fridge.  So we have started making our own, we make just enough for the two of us, using stuff we have around the house and when we are done, we don’t have to worry about a partially used bottle hanging around.  So without further ado here is the recipe:

Ingredients
1/4 c dijon mustard
1 tbsp honey
1 tbsp whole mustard seed
1 tsp red pepper flakes
1 tbsp garlic powder
2 tsp olive oil
1 tbsp soy sauce
salt and pepper to taste

Instructions
Mix all ingredients together well and pour over chicken in a zip lock.  Squeeze air out of zip lock and seal.  Work marinade around chicken and leave to marinate over night in the refrigerator.  Occasionally redistribute the marinade in the bag.  The next day open the bag and take a huge whiff, it smells fantastic.  Cook chicken however you would like, in a pan on the stove, in the oven or my personal favorite grill it.  You could probably even nuke it but I am not sure, I avoid the microwave like the plague.

Enjoy, I have some more chicken to eat.

Looking for more ways to enjoy chicken?  Here are some ideas for chicken.

Tagged with: , , , , , ,