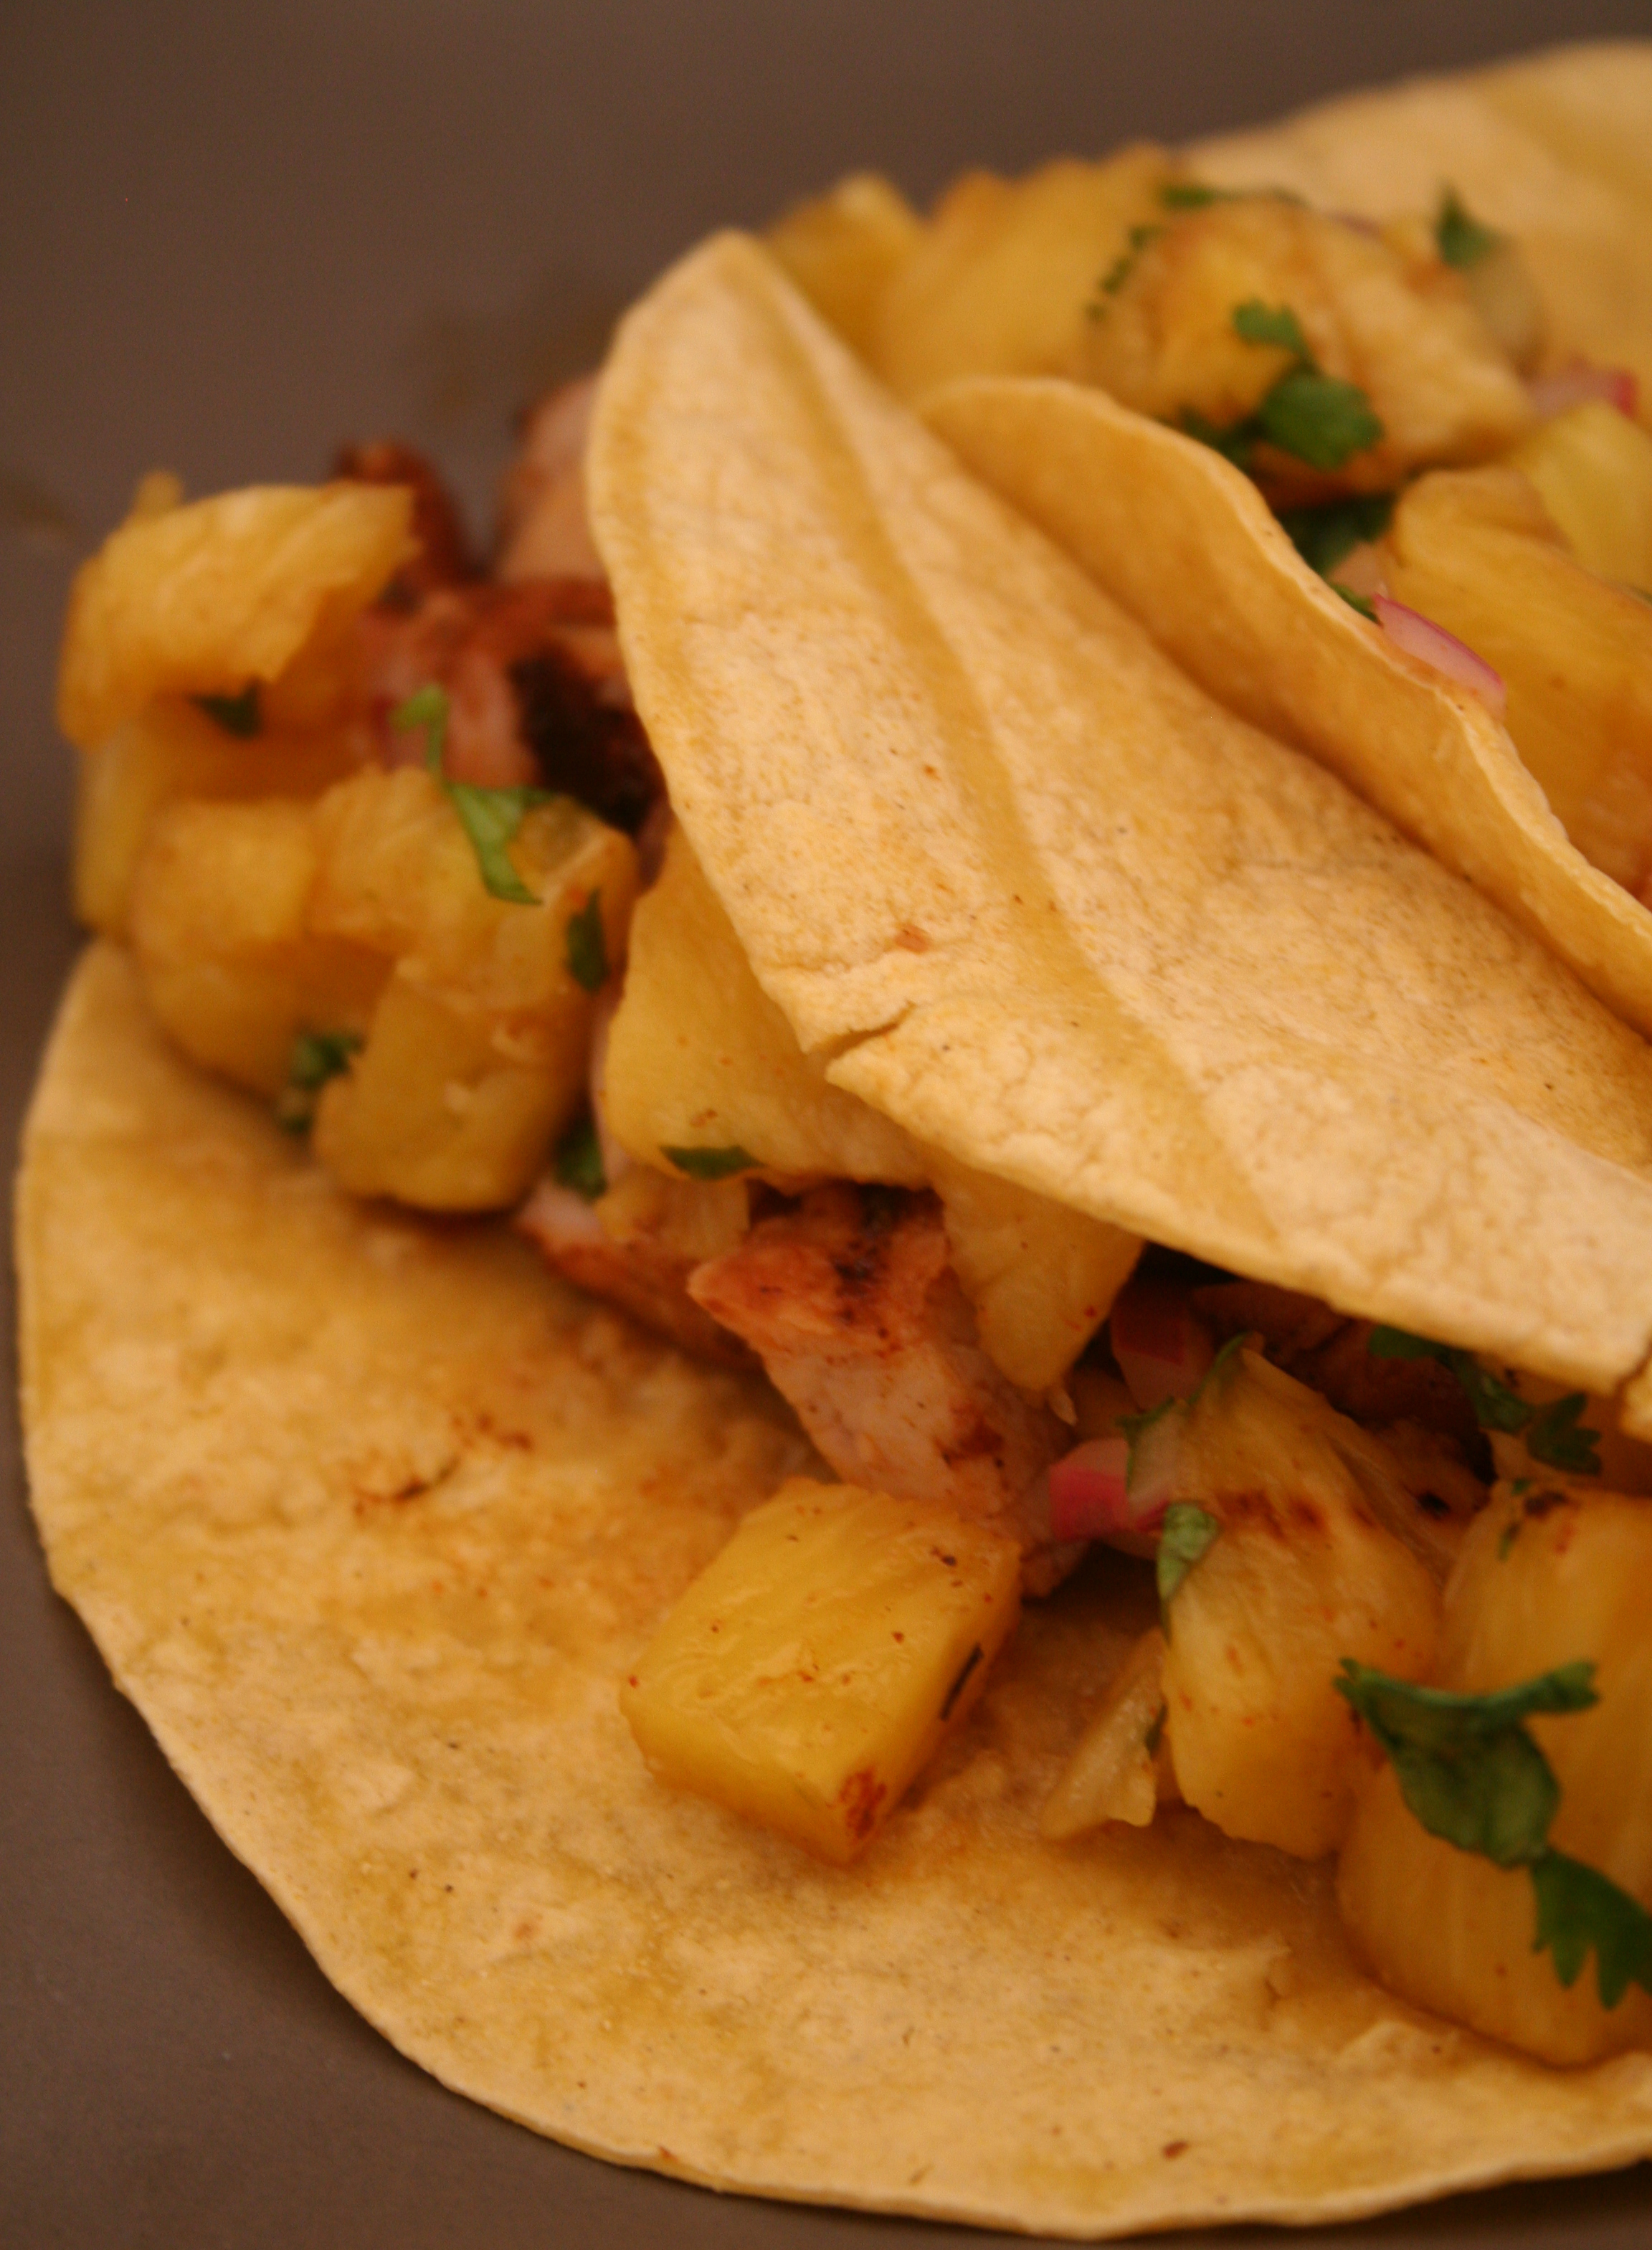
Its been a while since I have been able to really cook, like really break down and cook something.  We have been way to busy.  So finally this week I broke down and decided that no matter what I was going to make these tacos tonight.  They have been on my radar for a while and was looking forward to making them.  Its been a long week knowing this is what I had to look forward to on Thursday.  Well today was Thursday and my stomach is full, almost too full after my repeat visits up to the counter.

chipotle pork tacos with grilled pineapple salsa

I must caution that even though they may look delicious, and they are; they do take quite a while to make, I wish I had thought of that prior to starting them that they would take longer than I thought, by you live and learn I guess.  With that one caution here is the recipe.

Ingredients
1/2 chipotle chile, canned in adobo sauce
1 tbsp olive oil
1 lb pork tenderloin
1 tsp dried oregano
2 tsp ancho chile poder
1/2 tsp cumin
3/4 tsp kosher salt
1/4 tsp ground black pepper
4 slices of fresh pineapple, 1/2″ thick
1/4 c fresh cilantro leaves, chopped
3 tbsp thinly sliced red onion
3 tbsp fresh lime juice
1/2 tsp ground chipotle pepper
soft corn tortillas

Instructions
Begin by mincing chipotle, then combine with olive oil and rub evenly over pork.  In another bowl combine oregano, chile powder, cumin, 1/2 tsp salt and black pepper.  Sprinkle spice mixture over both sides of pork and let pork stand for 30 minutes.  Prepare the grill for a hot fire.  Once the grill is ready oil the grate with vegetable oil or cooking spray.  Once the grate is good and hot throw pineapple on over indirect heat, cook 5 minutes per side.  Once pineapple is cooked chop roughly and combine with ground chipotle pepper, remaining salt, cilantro, lime juice and onions in a medium bowl.  Set aside.  Grill pork over indirect heat until an instant read thermometer reads 145°F.  Remove from grill and let rest for 5 minutes on the counter.  Roughly chop, prepare tortillas according to their instructions.  Pack each with equal parts pork and pineapple salsa.  Enjoy

Its sweet, its spicy and delicious.  This is a recipe I think that will make its way into the rotation, this was a good dinner and will make an excellent lunch tomorrow.

Tagged with: , , , , , ,

Ahh fall is here, with the cool weather here starts the beginning of our soup season here in the Elston home.  Soup is a handy go to dish when our schedules get packed and we need something in a hurry.  We try to make a soup or two every week for a few weeks and we never eat it all at once, so we freeze it and from there we have weeks and weeks where a couple of our meals will be quick and easy and consist of a sandwich and soup or just bread, butter and soup.  We like soup.

 Kielbasa and Kale Soup with Beans

Ingredients
2 tsp olive oil
1 lb kielbasa, chopped
1 large yellow onion, chopped
2 ribs celery, chopped
2 cloves garlic, minced
6 c chicken broth
2 c stock (vegetable, chicken or beef)
2 c water
8 oz kale, stemmed and sliced
3/4 lb red skin potatoes, cubed
1 can kidney beans, drained and rinsed
1/2 tsp smoked paprika
1/2 tsp smoked salt
1/4 tsp ground chipotle

Instructions
Pour oil in stock pot and place on burner over medium heat.  Add kielbasa slices and cook until browned and a little crispy.  Removed kielbasa and set aside.   Add onion and celery to the pot, cook until soft and semi translucent, add garlic cook for about a minute.  Add in kale, broth, stock, water and kielbasa.  Bring to a boil, reduce heat and simmer until kale is wilted, about 10 minutes.  Add everything else except the beans.  Simmer for 30 minutes, stirring occasionally.  Add beans.  Cook until heated through.

If you don’t have any stock on hand, you can always substitute with broth.

This is a tasty soup, its going in the cookbook for a later rendition.

Tagged with: , , , , ,

If that isn’t a mouthful, Korean BBQ Beef Short Rib tacos, I am not sure what is but figuratively and literally there were a mouthful and they were something special.  This was not an original creation but rather a stab at the KogiBBQ shortrib beef tacos they sell our of food trucks in LA.  I was lucky enough to get to sample one of these this past spring on a trip out there and it left such an impression I thought I would like to recreate it at home.  Well I failed to recreate it but I still came up with something amazing that had a flavor and texture set unlike anything I have cooked before.

We started out with the beef shortribs this was perhaps the easiest part.  It was providential almost, I recently began to subscribe to Bon Appetit magazine and the July 2011 edition had a recipe for a Korean BBQ Marinade.  The recipe was good, actually it was really good we tried it a couple of weeks ago on some shortribs just for fun and I think I would be evicted by my wife if I don’t make it again.  It was really good.  We did let our shortribs soak in this marinade for about 16 hours, and the flavor was good, it permeated all the way through but was not too strong.

Next came the condiments, I started by tossing some shredded romaine and cabbage with a Korean Soy Vinaigrette, arriving what was affectionately known as dirty lettuce.  This was really easy to make and I made the vinaigrette the morning of so it had some time to meld and mature.  You can find the recipe below.

Ingredients
2 c shredded napa cabbage
4 c shredded romaine lettuce
1/4 c soy sauce
1 tsp grated ginger
1 clove garlic (finely minced)
2 tsp rice vinegar
3 tsp chili powder
1/2 tsp cayenne
1/2 tsp ancho chile powder
generous squeeze of lime juice
dash of sesame oil
a sprinkling of toasted sesame seeds

Instructions
Combine all but lettuce and cabbage in a bowl and let sit refrigerated at least 8 hours.  Just prior to serving shred cabbage and romaine and toss with vinaigrette.  Only toss as much as you need otherwise it will get soggy.

The last condiment that needed assembly was the Cilantro-onion-lime relish and it was something crazy it was easy to assemble but added such depth to the overall combination of flavors it would be tragic to leave it off.  You can find its recipe below.

Ingredients
1/2 red onion minced
1 tsp rice vinegar
1/2 tsp white wine vinegar
1 tbsp chopped cilantro
juice of 1 lime
pinch of salt

Instructions
Mince onion and combine in a bowl with vinegars, allow to set for 5 minutes.  After five minutes drain, rinse and allow onion to thoroughly drain.  Add remaining ingredients to a bowl with onion, stir to combine.

There was one final condiment we topped these babies with to give them a bit more of a kick, a little bit of a punch in the side of the face, it was a little Sriracha Hot Chili Sauce, you know the stuff in the clear bottle with the green top that is absolutely incredible.

So once the short ribs were grilled, de-boned and shredded, it was assembly time.  We heated up a skillet with little heat in it and warmed our tortillas in there the then piled on the meat and condiments and enjoyed.  These are pretty good, they are worth the effort and are on the menu again soon.

If I pulled one learning from this it would be that corn tortillas may be a bit better than the flour ones for this.  So next time we know.

Tagged with: , , , , , , , , , , , , , , ,

There are few things more rewarding and relaxing then spending an afternoon looking out at a gorgeous view while tending to a dutch oven full of goodness.  It seems that is how this year’s installment of caveman cooking begins.  This year the challenge was not breakfast but spareribs; the only requirement I received was they had to be tender.  Mission accomplished.

Cooking in a dutch oven is not necessarily my forte, I mean it is primitive, but sadly my dutch oven is probably the least used weapon in my cooking arsenal.  Unlike the smoker, you can’t just set it and forget it (more or less), it requires constant devotion, and that presents a challenge at home when I usually do not have hours on end to babysit the pot.  Sadly.

Given the opportunity to give the dutch oven a try, I left the smoker at home and busted out the pot.  It is vacation, days are supposed to be spent doing the stuff you don’t have time to do at home like fishing, relaxing and yes, tending to a dutch oven.

Dutch oven with coals

To get started I had to do battle with the wind. First I dug a hole a few inches deep and a few inches wider than the dutch oven, then, grabbed the neighbors fire ring to act as a wind block.  Wind problem solved.

Dutch oven with the wind break

Next, I fired up 22 coals in the charcoal chimney and got ready to cook.  For every coal I put on the lid I put two underneath the oven in a checkerboard pattern.  From there, every 25-30 minutes, I added 6 to 8 or so fresh coals following the same distribution and rotated the oven half turn and the lid a half turn the other way.  There is a handy dutch oven temperature calculator you can find here.

Dutch oven BBQ Spareribs

After two and a half hours of this madness and the constant whiffs of amazing smells coming from the pot, it was time for phase two, the fire.  This was where we were to finish and give the ribs a nice outward texture.  While maintaining the coals on the pot, I had been building up a nice bed of cherry wood coals to finish the ribs on with a bit of BBQ sauce.

BBQ Spareribs on the fire

Once the ribs had taken on a nice set of grill marks and soaked up some cherry smoke, they were ready and tender!  So, when it was all said and done, there was really no recipe it was a cobbled together bit of whatever came to my mind goodness but here is my best stab at it.

Ingredients
1 1/2 tsp brown sugar
1 1/2 tsp chile powder
1 1/2 tsp sage
1/2 c apple cider vinegar
1/2 c apple juice
1/2 can Coca Cola
1 large onion (chopped)
4 cloves garlic (chopped)
1 tbsp oil
mustard seeds
rosemary
black pepper
2 bay leaves
bbq sauce
spare ribs (bones removed)

Instructions
Make a rub using brown sugar, chile powder and sage.  Mix thoroughly and rub into all the meat.  Set meat aside.  Combine remaining ingredients with the exception of the bbq sauce in the dutch oven with a cup of water add meat and top with a bit of bbq sauce.  Cook meat in the dutch oven until it falls apart over low heat (250-300°F), about 2.5 hours and finish over and open fire or on a grill with some more bbq sauce.  Let rest for about 5 minutes and enjoy.

After another successful yearly installment of caveman cooking, the novelty has not warn off.  Cooking with nothing but fire is rewarding, its natural, its primitive and its time consuming.  But at the end of the day, its worth it. Its a blast and you can almost taste the effort in the food.

Happy Independence Day! I have leftovers to eat!

If you are looking for more dutch oven recipes, get started over at Jen Reviews with 35 Incredibly Easy Dutch Oven Recipes for Camping, personally the cinnamon rolls wrapped in bacon are calling my name.

Tagged with: , , , , , ,

I came into this with high hopes.  I have been infatuated with how tasty it looked.  I kept counting down the days until Wednesday to give it a try.  I found this recipe last week for Grilled Mexican Roadside Chicken, and it looks delicious and sounded interesting.  So I whipped it up today per the recipe, but in lieu of a whole chicken used several drumsticks I had in the freezer, same concept.

Grilled Roadside Mexican Chicken

And I have to say it was not bad chicken, but it wasn’t chicken that left me wanting more either.  It let me down.  It was juicy, but I attribute that more to technique than the recipe.   I had high hopes for it and it just fell short, flat on its face at my feet, I was disappointed but when piled onto of a salad with some taco-ranch dressing it was almost just like any other chicken, but perhaps with just a hair more Mexican flavor and eaten that way it was quite alright.  So here is a copy of the recipe should you wish to try it.  I did use half the amount of cinnamon because that was all I had around.

Ingredients
1 1/2 tsp ground ancho chile pepper
1 tsp dried oregano
pinch of ground cloves
1/2 tsp ground cinnamon
2 garlic cloves pressed
3 tbsp apple cider vinegar
1/4 c fresh orange juice
1 tsp Kosher salt
chicken (parts or a whole)

Instructions
If using a charcoal grill, get some charcoal going in a chimney (I used half a chimney full).  Mix all ingredients except chicken together in a bowl to create a wet rub.  Once the charcoal is ready place all of the coals on one side of the grill to set up a cool zone and a hot zone.  Place the chicken on the cool side of the grill, brush healthily with the wet rub.  Turn chicken and brush the other side with the wet rub.  Cover the grill and cook until a thermometer inserted into the thickest part of the chicken reads 165°F; basting with any remaining rub throughout the cooking period.  Remove chicken from grill and allow to rest for a while 5-10 minutes for parts or 10 to 15 minutes for a whole chicken.

The original recipe called for green onions to be grilled once the chicken was done, maybe this is where I went astray.  It also called for a whole chicken and not for parts, maybe that was the problem.  Either way it wasn’t bad, but like I said it let me down, it wasn’t all I had hoped for and the process of making the rub filled my kitchen with a heavenly familiar aroma of Jerk Chicken and made me think, why am I not making Jerk Chicken?  Well I may just have to do that soon.

Tagged with: , , , , ,