Well they are finally gone, and sadly so, the last rack of ribs we had in the freezer was dinner tonight.  But not without some trying something new first.  In the past I have been a fan of jerk chicken, and have made some completely from scratch…more about that later.  I have also used some store bought ‘jerk’ rubs in the past and they are alright but wanted to go out and try something new.  So that is what I did, I found a jerk rub and complimenting glaze I liked and tweaked it a little and it was a bit spicy, so if you are not necessarily for spice, you might want to back it off on the pepper a little.

Jerked Pork Ribs

The little strange yellow color in the picture is the pineapple glaze that didn’t get absorbed, its tasty even if it does look a little strange.  Using the recipe for the rub below, I rubbed the ribs and sealed them in plastic wrap in the fridge over night.  This morning I took them out and let them set out for about an hour before I fired up the smoker.  I then smoked the ribs using the 3-2-1 method using pecan wood.  During the final hour I began brushing the glaze onto the ribs and did so three times, it could have really used one or two glazings.

When it was all said and done I let them rest covered with foil and a towel for about a half hour then it was eating time.  They were sweet and spicy and had a nice jerk flavor, not quite authentic but still very good.  We will be making these again.

Jerk Rib Rub
Ingredients
3 tbsp dark brown sugar
2 tbsp kosher salt
1 tbsp ground black pepper
2 tbsp ground coriander
2 tsp garlic powder
2 tsp onion powder
2 tsp dried thyme
2 tsp ground allspice
1 tsp ground cinnamon
2 tsp cayenne pepper (remember it was spicy)

Instructions
Combine all until mixed uniformly.  Rub into meat.

Pineapple Glaze
Ingredients
2 c pineapple juice
2 tbsp cider vinegar
1 tbsp red wine vinegar
3 tbsp dark brown sugar
3 tbsp butter
1/2 tsp ground black pepper

Instructions
Combine all ingredients in a sauce pan.  Heat to a boil and cook, stirring occasionally, until mixture is reduced to about half.

Like I said they were tasty, I am glad I have leftovers for tomorrow.  They should make a fine lunch.

Tagged with: , , , , , , , , , , , ,

Making chili is an art, not like all out on your own art but like sewing, where you have a pattern to follow but every time something is a little different.  Cooking in general is like this but chili is a special breed of cooking, it can change quite a bit from time to time.  This time was no exception.

Chili in a bowl stacked with cheese

This was what I would refer as chili its not fancy other than what you put into it but it is full of flavor and spice, not the kind of spice that burns your tongue off and renders you ability to taste broken.  The kind of spice that is pleasant while you are eating it and reminds you when you are done that it was in fact a good spicy bowl of chili, that is the kind of spice I like with my chili.

What made the chili so special this time was the ingredients, mostly the meat if you remember in my last post I smoked a chuck roast in a chili rub just for this pot of chili.  Also what made this pot of chili quite unique was that I was here the entire time I made it, tending to it on the stove.  Usually I cook the meat if it needs to be cooked, drain off the grease and throw everything together in the crock pot and let it go.  But this time I did it in a pot on the stove, a bit more tending but it was much more rewarding and I got to throw in ingredients in phases, for instance I put in some garlic at the start then a little more about an hour before it came off the stove…gives it a bit more of a garlic taste.

So without further ado,  here is the skeleton recipe.  Like I said chili is an art and I use these more like guidelines than an actual recipe.

Ingredients
1 lb meat (beef+bacon, beef+pork, beef+sausage, etc) shredded, cubed or ground
1 medium onion chopped
2 jalapenos seeded and chopped
1 dried jalapeno
1/3 c dried kidney beans
1/3 c dried black beans
3-7 cloves of garlic, peeled smashed and chopped
1 pt chili sauce (we have a home canned variety)
1 can crushed tomatoes
1/3 c brown sugar
1/3 c chili powder
3/4 tsp cumin
1/2 tsp cayenne
3/4 tsp garlic powder
1/2 tsp kosher salt
1 tsp oregano
1 c beef broth
water

Instructions
Once meat is cooked and (if preferred) fat is drained off. Combine all ingredients in a pot add water until liquid covers all ingredients.  It cooking in a crock pot at 1 cup more water and set it on auto or high for 1 hour then down to low for at least 4 hours.  If doing it on the stove (bonus points) or in a dutch oven (double bonus points), bring to a boil then reduce heat and cook at a low simmer for 3-4 hours.  If cooking on the stove stir occasionally and check for flavor, add anything else you feel it requires and also add water if it seems to be getting to thick.  The dry beans will soak up a lot of moisture (and flavor).

So in addition to having the smoked chuck roast as my meat in my chili it was joined by some whole jalapenos I had smoked and dried during the summer.  Chili is a great dish to get creative with, I enjoy trying new things with my chili and changing it up a little every time.  Chili is a very test and tune dish.

Tagged with: , , , , , , ,

A quick tease of things to come.  Today I took the first step in making what will be hopefully some undeniably good chili.  So to get things started I whipped up a rub and rubbed a chuck roast and let is sit in the fridge overnight wrapped snugly in plastic wrap.  Notice no mustard, just rub.

Rubbed and ready chuckie

Once this morning rolled around it was straight onto the smoker at 225°F for about 8 hours over apple wood until it reached 205°F.  I spritzed it with apply juice after about an hour every half hour or so and at about 160°F I brushed it with a ‘glaze‘, a mixture of apple juice, chili powder, onion powder and brown sugar.  Once  it was done, I pulled it off the smoker, wrapped it in foil and towels then let it rest for about an hour.   Once this was done I pulled it and stashed it away until its time to make chili.

Chili rubbed chuckie on the smoker

Ingredients
3 tsp paprika
4 tsp kosher salt
2 tsp garlic powder
1/2 tsp cayenne
5 tsp chili powder
4 tsp ground black pepper
4 tsp onion powder
2 tsp cumin
1 tsp whole mustard seed

Instructions
Combine all ingredients together in a bowl.  Rub evenly and generously over a hunk of meat.  Let it sit wrapped in plastic wrap overnight in the fridge.  Then cook the following day.

So the real intention of the rub and the smoke was to get some meat ready to make chili, but I had to try a piece and it was good.  It kinda tasted like chili at least near the bark but as you moved in it was just good ole tasty juicy beef.  Check back soon for the sequel (the chili).

Tagged with: , , , ,

I am sure this will not be the last episode of Adventures in Jerky but is was certainly a successful one and one with lessons to be learned.  Since the jerky turned out so well last time I made it and all but a hurricane was forecast here today; it seemed like a great day to make jerky. I could turn on the electric smoker, crack the garage door and the window, and let it works its’ magic.

It all started last night looking for what type of jerky to make, I wanted to make sure pepper jerky but I am not sure exactly how I want to go about that yet.  So pepper jerky is back burner-ed, although I think it I have it figured out.   Anyways back to today’s jerky.  Today’s jerky consisted of Teriyaki Sesame jerky and a BBQ jerky.  Both of them came out quite alright.

Once I had figured out what kind of jerky I was making.  It was off to the store to scope out some meat.  This is where I made a mistake, I bought the cheapest bottom round roast I could find.  Big mistake, after I trimmed a 1/4 pound of fat off the roast, you really don’t want any fat in your jerky it will spoil much quicker, I sliced it into fairly uniform slices across the grain about a 1/4 inch thick with a couple of thinner slices that would be done well before the rest for some early on sampling.

Jerky marinating
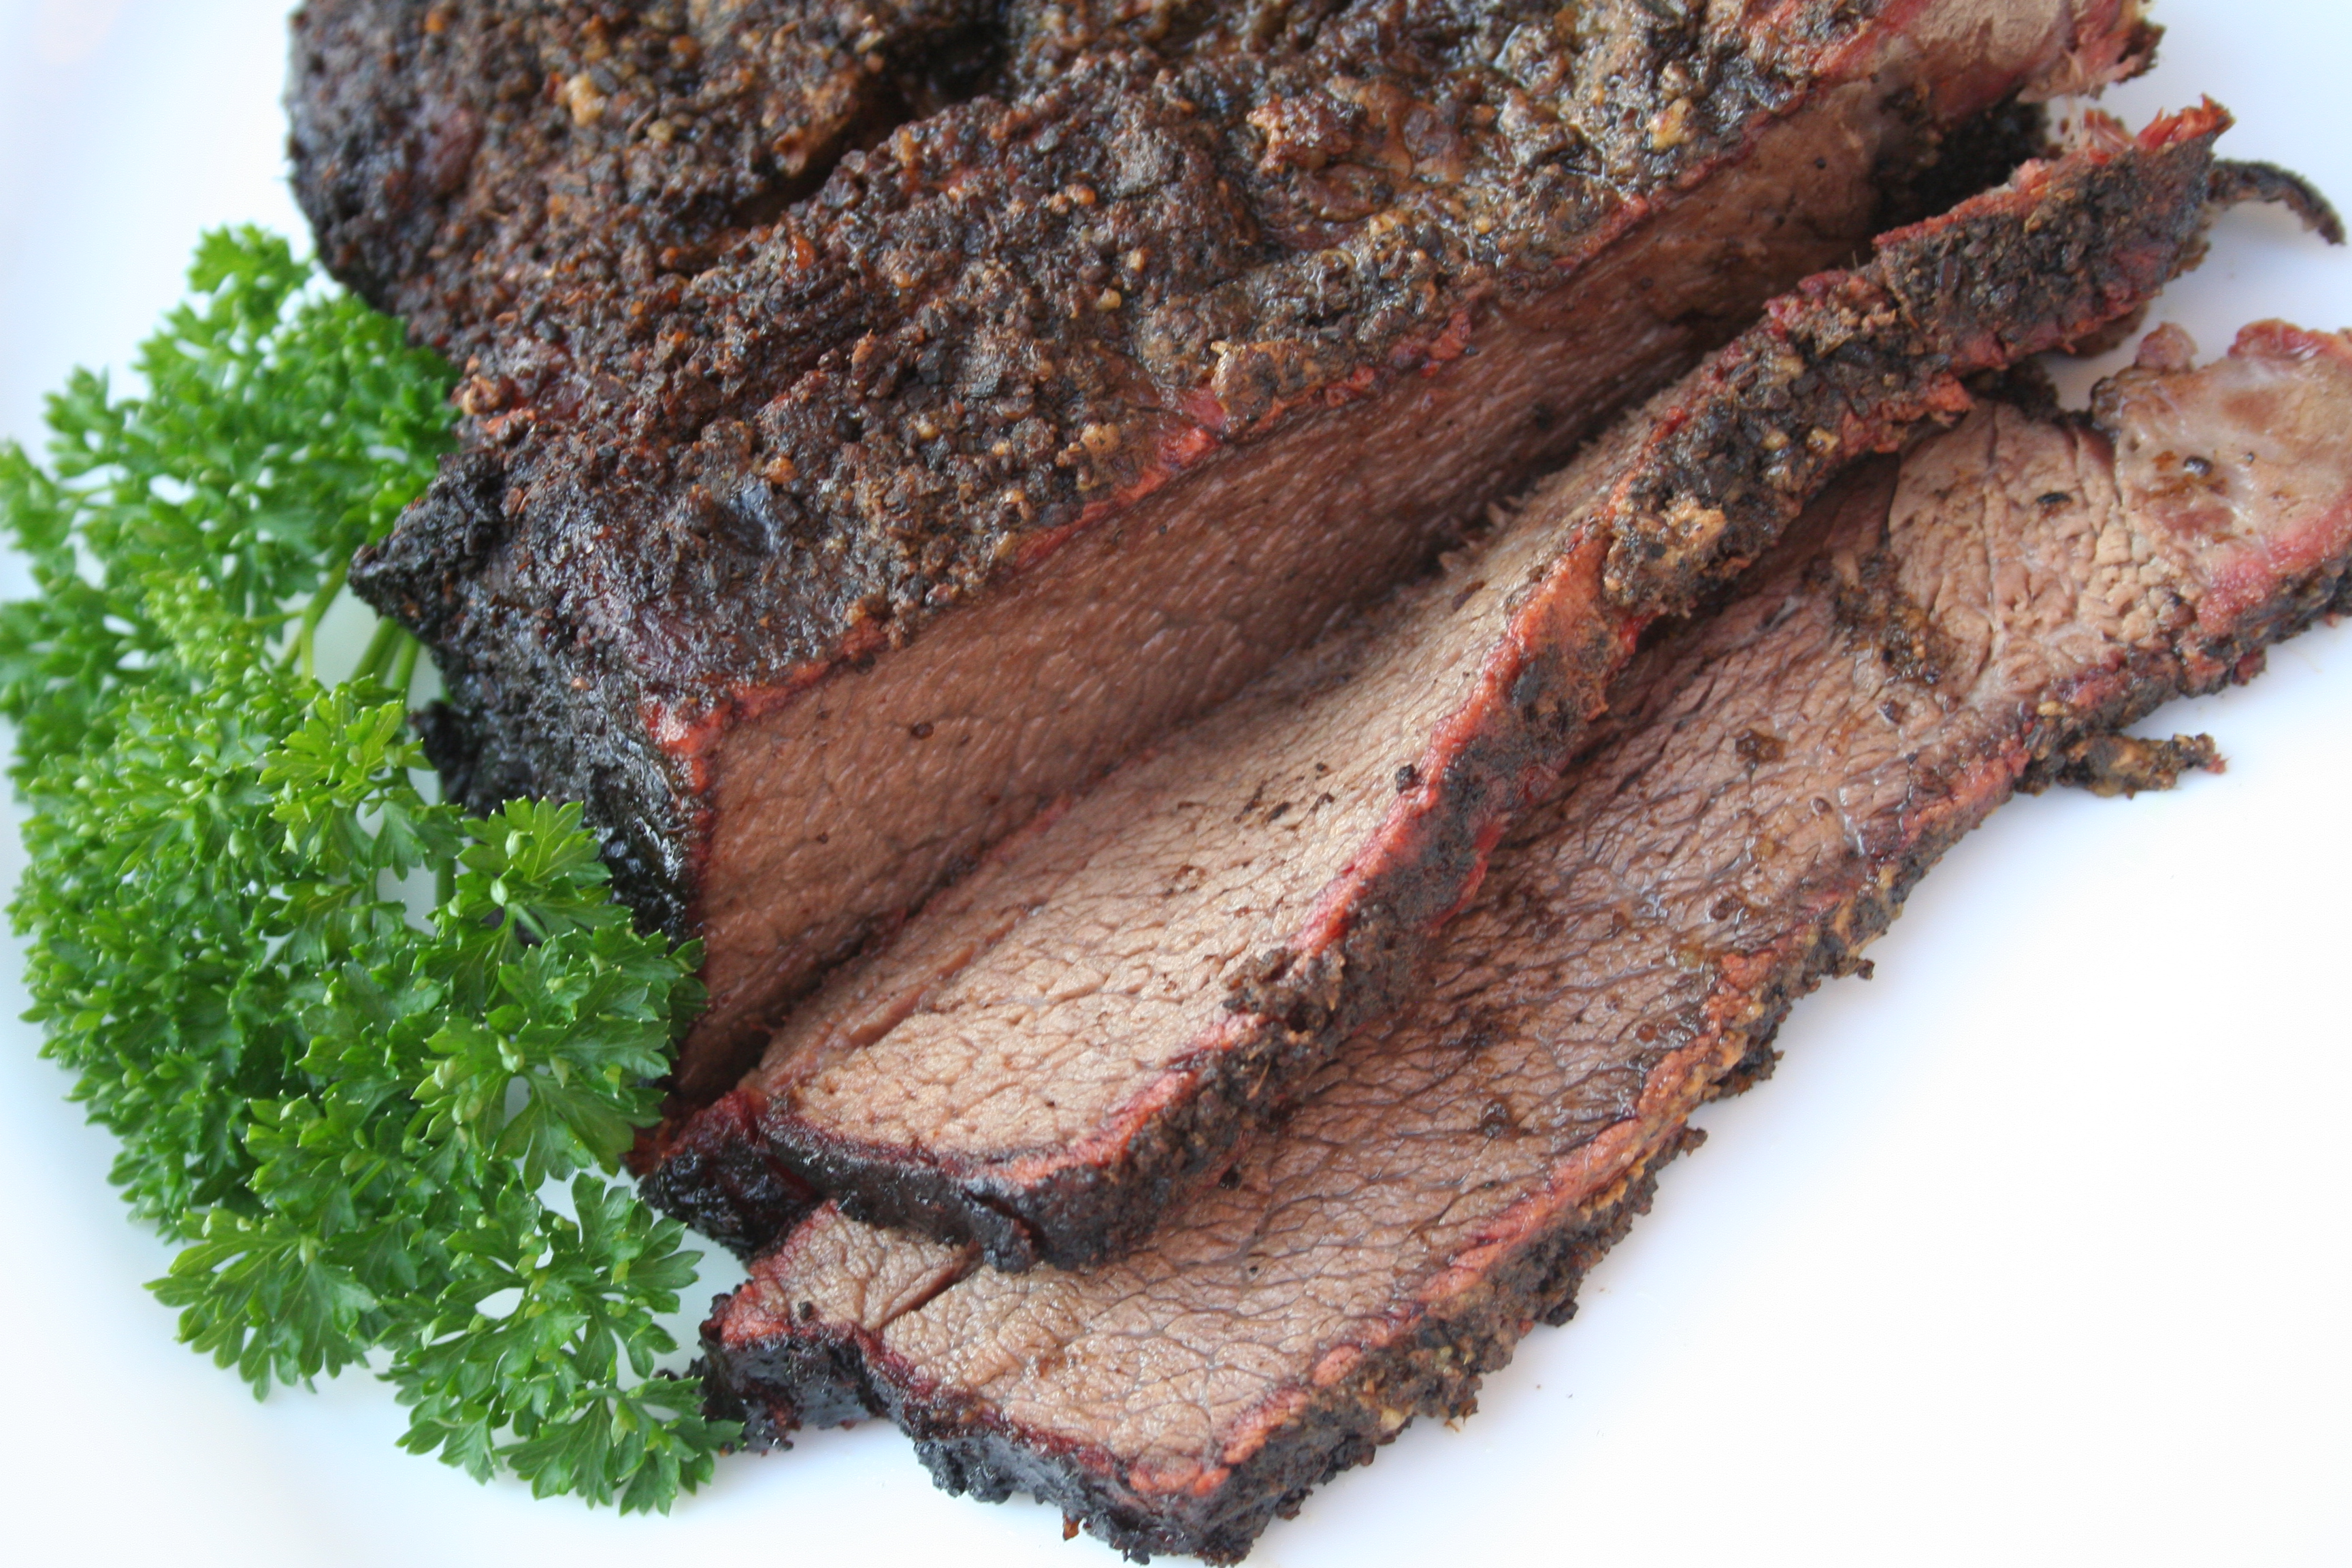
The one on the left is Teriyaki Sesame and the one on the right is BBQ.

Once the meat was sliced up I divided it into two equal parts (about a pound a piece) and put them into two separate zip-lock bags.  Then I whipped up the respective marinades and poured them over the meat in the bags.  Then I squeezed the air out of the bags, worked the marinade into every crevice and void in the bag and let them marinate in the fridge over night.

This morning I pulled the jerky out of the bags and placed the Teriyaki Sesame on one rack and the BBQ on another.

Then I fired up my electric smoker to 155°F, which is quite easy to maintain with my PID controller for the smoker, I used only a couple chunks of hickory wood and a handful of mesquite chips for the entire 6 hour smoke.  I cheated a bit to get good constant smoke, I got a piece of charcoal going and plopped it in my smoker box for my grill and put that in the bottom of the electric smoker and added another piece of charcoal and some wood as needed to keep the smoke going.  This works well and doesn’t impact the temperature significantly.  This would be perfect for smoking some cheese….wink wink, nudge nudge.

After about 5 hours the Teriyaki Sesame jerky from the top rack was done, it was a little drier than I was aiming for but it got left unattended for a while.  I removed it and because I had covered the empty water pan with foil to keep the drippings off the element, the BBQ jerky closest to the pan needed a bit more time so I moved the rack up to the top to give it some better exposure.  About an hour later the BBQ jerky was done as well.  As I removed both kinds of jerky from the smoker I placed them on a cooling rack inside and let them come down to room temperature before putting them in a container and into the fridge.  Realistically if I was going to be keeping the jerky any longer than a day or two I would let it sit in the fridge for a while in the container with no lid on just to make sure all of the moisture that can be out is out.  But the way it gets eaten around here it will be gone tomorrow.

Jerky cooling offAgain Teriyaki Sesame on the left and BBQ on the right.

So how was it?  Both types of jerky had great flavor the Teriyaki Sesame was great, it tasted like I expected.  The BBQ however, I had little hope for but it surprised me, it has a great flavor that seems to be maturing as the jerky sits and it is growing on me quickly.  So at this point both of them are keepers in my book, they might get some modifications down the road but the are good as the are and can only get better.

Teriyaki Sesame Jerky
Ingredients

1 lb thinly (1/4″) sliced beef or other red meat
1 c teriyaki sauce (recipe)
1 tsp sesame seeds + extra

Instructions
Combine teriyaki sauce (if making your own allow to cool) and 1 tsp sesame seeds and pour over thinly sliced meat in a ziplock bag.  Purge air, seal and refrigerate and allow to marinate for at least 8-12 hours.  Then prepare as outlined above.

BBQ Jerky
Ingredients
1 lb thinly (1/4″) sliced beef or other red meat
1/3 c red wine vinegar
1/3 c ketchup
1 tsp salt
3 tbsp brown sugar
1/4 tsp ground black pepper
1/8 tsp cayenne pepper
1 tsp onion powder
1/2 tsp garlic powder
1 tsp dry mustard
bbq rub (such as BBQ 3000 or Bad Byron’s Butt Rub)

Instructions
Combine all but bbq rub and meat in a bowl, mix well.  Pour over thinly sliced meat in a zip lock bag.  Purge air, seal and allow to marinate in the refrigerator for at 8-12 hours.  Remove meat from marinade, place on smoker rack and lightly sprinkle with bbq rub.  Prepare as outlined above.

So far jerky has been a hit, although today’s was a little tougher than I like, I blame the meat.  It was a bad choice and now I have to live with it, although it is not half bad.  Next up, pepper jerky!

Tagged with: , , , , , , , ,

Well I have been holding onto this one for a while, a while back I got some books from the library and one of them featured a Fennel Coriander Rub, which while unique I thought sounded incredible to have on a beef roast or better yet a beef brisket.  Well I was a little unsure so I went with a chuck roast, instead of a whole brisket.  It would be horrible to make a whole brisket that tasted horrible.

Fennel Coriander Rubbed Beef Chuck Roast

Yesterday on the way home I picked up my chuck roast, the selection wasn’t very good so I got a smaller one, about 3 pounds.  Then it was time for the fennel, I had gotten a bag full of fennel heads from my dad so all the seeds needed to be pulled off the heads, this might be alright a tablespoon or two at a time but for a half cup it was a lot of work.  Anyways I rubbed it last night and threw it in the fridge over night and then it was onto the smoker this morning.  I smoked it at 225°F for about 5 hours to about 160°F, basting with apple juice and Worcestershire through the cook about every half hour.  Then I foiled the meat and stuck it back in the heat until the meat reached 200°F.  Then I pulled it and let it rest under a couple of towels for about an hour.

Then we sliced it and ate it with some garlic and rosemary mashed red skin potatoes they are quickly becoming a staple.  But back to the roast, it was cooked to perfection, it was juicy and tender and it had a great smoke ring.  But it wasn’t as good as I had thought it would be.  I didn’t think it was bad but the fennel really comes through, which if fine if you really like fennel (licorice).

Ingredients
1/2 c fennel seeds
1 1/2 tbsp whole coriander
1 tbsp black peppercorns
1 1/2 tbsp kosher salt
2 tsp granulated orange peel

Instructions
Preheat a heavy skillet over medium heat (cast iron if always good).  Once heated add fennel seeds, coriander and peppercorns to the skillet.  Keep them moving by swirling them in the pan, they burn quick.   Cook the seeds until they turn light brown and become fragrant.  Your nose is your guide in this one.  Once they are done pull the skillet off the heat add the salt and mix it in well.  Once the mixture is completely cooled.  Pour mixture and orange peel into a spice (coffee) grinder and grind to a fine powder.

Now for the verdict the meat was good and the rub was alright.  It was very fennelish, which depending on your perspective could be a bad thing.  I really enjoyed it but my wife was not a fan.  She said it tasted too much like licorice.  So would I make it again, I am not sure I might try it on something else maybe lightly on some pork or lightly on some fish even.

Tagged with: , , , , , , ,