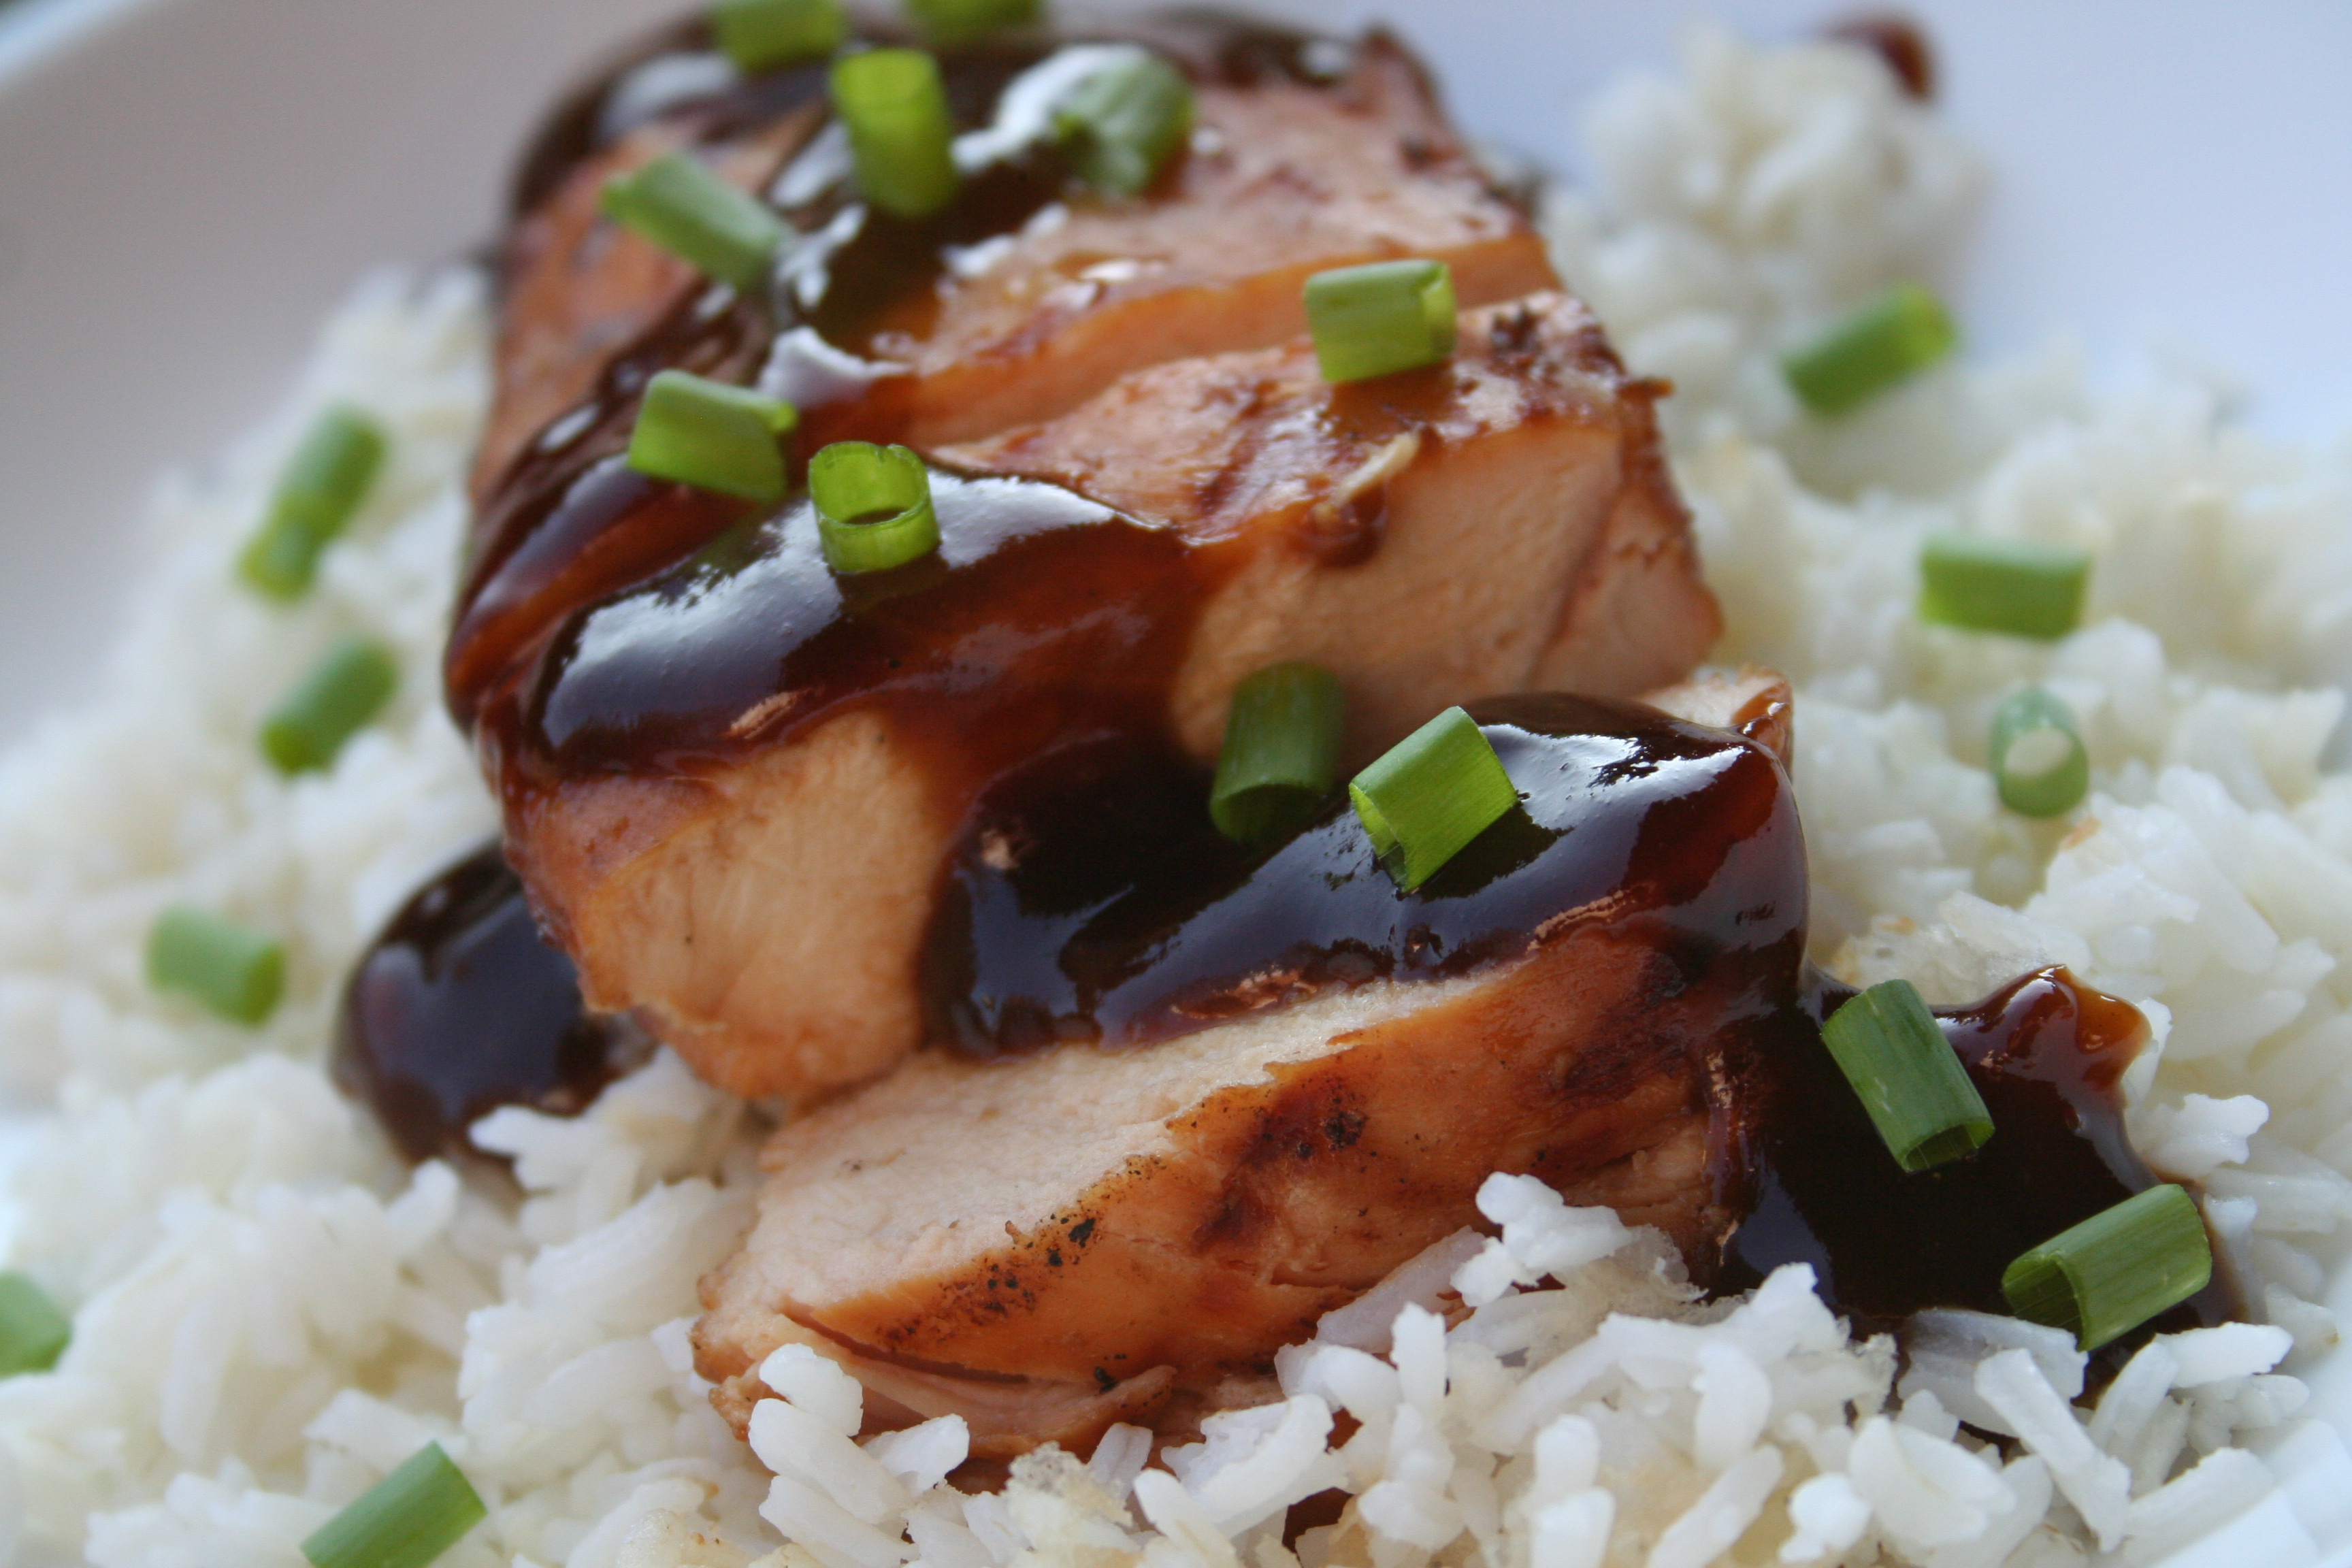
The chicken we had for dinner tonight was good, it tasted like the Teriyaki Chicken you would expect, but the sauce on its own was outstanding.  I made the sauce at lunch today and had to deal with the memories the sweet and savory flavor of it all afternoon.  It was most tasty.

Grilled Teriyaki Chicken

So the grilled part was easy throw it on the grill directly over some hot coals just long enough to get sear marks on both sides and then it was off to the other side of the grill to slow cook them to perfection.

The Teriyaki Sauce from scratch was almost as easy as grilling the chicken breasts, once the sauce was made I marinated the chicken in it for a couple of hours before grilling.

Ingredients
1/3 c reduced sodium soy sauce
1/3 c sugar
1/3 c cold water
1 tbsp garlic powder
2 tsp corn starch
1 tsp grated ginger
1/2 tsp red pepper flakes

Instructions
Combine all ingredients except water and corn starch in a small sauce pan.  Combine corn starch and water separately from the rest of the ingredients.  Mix both together in the sauce pan and heat over medium heat until it reaches a boil.   Remove from heat and use immediately or refrigerate and save for later.

This stuff is good, its really good.  I am thinking some Teriyaki Jerky might make an appearance this weekend.

Tagged with: , , , , ,

Ribs, everybody wants to make some and a lot of people are not sure how.  Well like most meat low and slow will give you a juicy and fall off the bone tender result.  But with ribs there is something special that needs to happen.  I like typically like to stick with larger cuts of meat but no man could claim to be even a novice of the BBQ without having ribs tucked away firmly in his belt.

Rack of ribs

Like most chunks of meat I smoke the ribs started out the night before with a trimming, which I historically do a less than professional job at.  From there I wash the ribs and pat them dry with paper towels and then rub them.  Typically rubbing is a two part process.  The first is to coat them in mustard or some other liquid to help the rub stick and the second is the rub them with your rub.  How much is up to you, ribs have a delicacy to them that is easily over powered with too much rub.  Once this is all done is into the fridge in a sealed container to think about what they have done.

Freshly rubbed spare ribs

The meat (ribs) in the picture above were rubbed with two different rubs.  After a nights worth of sitting in the rub or a couple hours if that is all that is available I get the smoker ready.  I boil some water in my kettle for my water pan to speed up the preheating process and get my wood for the day ready.  Once the smoker has reached that magical temperature of 225°F it is ready for some meat.  So I lube my grate with some oil, its a habit and then throw the meat on and let the smoke start rolling.

Ribs just on the smoker

When smoking ribs I use the 3-2-1 Rib method, which is not my invention but seems to work quite well and is easy to remember.  The first stage is to smoke the ribs for about 3 hours.  The time is not nearly as important as is the appearance at this point.  Once the meat begins to pull away from the bone and has pulled back about a 1/4 inch it is time to move onto step two.

Ribs at the end of stage 3

Once your ribs are looking like these it is time to move on to step two.  Stage two is kinda hard to swallow at first, I mean I just wanna continue to flood my ribs with smokey flavor but its time to pull back for a few.  In stage two its all about time, take the ribs off the smoker and wrap them in foil with a little apple juice.  I am not sure how much apple juice I use it depends on the meat and what looks good.  You could certainly substitute some other liquid here the goal is just to provide the ribs with some moisture while they are in the foil.  Throw the ribs wrapped in foil back on the smoker for two hours and let the magic happen.  During this time the ribs are soaking up the juice and getting their fall of the bone tender status.  There is no need to supply smoke during this period.

Ribs after stage 2

After two house in stage two remove the ribs from the foil and place them back on the smoker grate and get the smoke rolling again.  It might be time to check that water pan too.  The ribs should look like those above at this point, shrinkage has occurred and they looking kinda mushy.  That is where the final stage of the 3-2-1 method comes in smoke them until they reach 172°F in the thickest part of the meat.  This should take an 45 minutes to an hour.  If you would like to add BBQ sauce during the last 15 minutes on the smoker is the time to do this.

Ribs cooked to perfection

Once the ribs are done pull them off the smoker and let them rest for 15 minutes on the counter.  During this time the juices will redistribute and you will be glad you waited.  Serve and enjoy.

The 3-2-1 method assumes you are dealing with spare ribs.  If you find yourself with baby back ribs you will be looking at something more like the 2-2-1 method, just be sure to be more attentive to the meat an hour earlier with baby backs.

As with most other pork I prefer to mix apple and hickory for my ribs, gives them an excellent flavor.

Tagged with: , , , , , , , , , , ,

In a sad but true realization I am separated from my smoker this week, even though I have 3 racks of ribs in the freezer, the smoker is a city away and I will not be smoking anything this week.  So not wanting to let anything go to waste and in true Digital Chef style, we had some pears and it was not until I got into baking the muffins that I realized I did not have any ginger, so let the substitutions begin.

I started out with a recipe I found at Recipe Girl for Pear and Ginger Muffins, but like I said once I got started I realized we have no ginger here.  I debated running home and getting some but decided to wing it and use some cinnamon, nutmeg and ground cloves.  So as precise as I can recall here is the recipe I used.

Ingredients
1 3/4 c flour
3/4 c white sugar
1/2 c brown sugar plus extra
2 tsp baking powder
2/3 c sour cream
1/2 c vegetable oil
1 tbsp honey
2 eggs
3 pears peeled, cored and cubed
ground nutmeg
ground cinnamon
ground cloves

Instructions 
Preheat oven to 400°F.  Put paper muffin cups in a 12 cup muffin pan.  Mix together flour, sugar, 1/2 c brown sugar, baking powder, 1/4 tsp ground cloves, 1/4 tsp ground nutmeg, 1/4 tsp ground cinnamon in a large bowl.  In a separate bowl mix together oil, sour cream, eggs and honey.  Fold wet ingredients into dry ingredients and stir in pears.  Pout into muffin cups.  Mix a small amount of ground cloves, ground cinnamon and ground nutmeg with a couple tablespoons of brown sugar and sprinkle over muffins.  Bake for about 20 minutes.

Sadly along with my smoker, I do not have my camera so you are going to have to take my word.  They are fine looking muffins, something even a coffee shop would be eager to sell.  And well they kinda fall apart right out of the oven not like a bad fall apart but like you would want from a fresh out of the oven muffin.  Besides having an incredible texture they were moist and the fruit was just right.

Now for the real question, the question of the hour, how did they taste?  Well they taste like muffins, when I make them again I will probably add a little more seasoning but they were good.  The pears had a great flavor and were complimented nicely by the muffin.

I can’t wait to make these again.  Next time I will do a batch like this and one with ginger like the original recipe called for.  There is something about ginger and pears that just belongs, so I can’t wait to try that.

Tagged with: , ,

I hate to be the bearer of bad news, but summer is winding down, it is coming to an end and in Michigan that means harvest time.  Gardening will be done in another six weeks at most  here in Michigan and right now the bulk of the harvest from my patio garden is ripening, and it is way more than we could possibly consume  before it goes bad.  That means one thing canning.

Pickled Banana Peppers

This is the first year I have grown Banana Peppers, my mother-in-law introduced them to me on pizza and they have been a must have since then.  So when the rabbits destroyed my plants this year, I went out and bought one from the farmers market and low-and-behold they are resilient little plants.  Soon after potting my plant from the farmers market the other two sprung back to life and have grown like weeds ever since.

Being the first year I have grown Banana Peppers this is also the first year I have canned them, I found some recipes online and did a best of both worlds (at least I hope) of the recipes I found.  What I ended up with was a visually pleasing jar of canned Banana Peppers, that in spite of several warning I tried before the advised 5-6 weeks tasted pretty much like what I expected.  The only difference is my expectations we based on what you get in the store and these have so much more flavor.

So without further ado here is the recipe per pint jar, I canned them as they came in as opposed to one big batch at a time and only wrote down the recipe I used per jar.

Ingredients
4-5 banana peppers (sliced into rings)
1/2 clove garlic (chopped)
1 c white vinegar
1/2 tsp pickling salt
1/8 tsp turmeric (for color)

Instructions
Place turmeric, salt and vinegar in a sauce pan and boil until salt if dissolved.  If you have not done so already, slice peppers into rings.  Pack garlic and peppers into a hot sterile jar, cover with vinegar solution leaving 1/2 inch head space.  Remove air bubbles with a non metallic utensil.  Cap jars and process in a hot water bath for 10 minutes.  Remove and let cool.  Let sit for 5-6 weeks before eating (they are good before that too).

I also did jalapenos the same way, just omitted the turmeric.  They also turned out great.  Check back soon to see what else is cooking.

UPDATE: Make sure you add a pinch of alum powder to each jar or you will have mushy banana peppers, I did not do this with the first batch and they soon turned mushy. 🙁

Tagged with: , , , , , , , ,

Growing up I liked to eat waffles, we had them every Sunday morning it was tradition in our home.  Dad would get up and make waffles every Sunday we would pile them high with way too much brown sugar or drench them in more than enough Maple Syrup, but they were always good.  Well when my wife and I got married we got a waffle maker and I am ashamed to say that until this past weekend I had not touched it, one year had elapsed and we had not so much as made a single waffle.  Well that changed and we will be making waffles more than once in the following years.

Being that I knew absolutely nothing about making any kind of waffle that did not originate in box (I am ashamed to say), I was pleasantly surprised when one day a tweet from @thefoodgeek about waffles from scratch broke my concentration.  Now making waffles is not my specialty, so the recipe looked really simple and we gave it a whirl.

Waffle on a plate

It was almost like making waffles from a box except you have to plan ahead a little the night before and start the batter, then in the morning, add the eggs and cook them like you would cook a box waffle.  It was simple and they were really quite tasty.

Ingredients
2 c flour
2 c milk
8 tbsp butter, melted and cooled (we used margarine, blasted allergies)
1/2 tsp yeast
1 tbsp sugar
1/2 tsp salt
1 tsp vanilla ( the original recipe called for 1/2 tsp)
1/2 tsp cinnamon ( to original recipe called for 1 tsp, but it seemed like to much for my palette)
2 eggs

Instructions
The night before mix dry ingredients.  Stir in milk, butter and vanilla until it is mixed well.  Cover and let it sit out overnight.  The next morning separate the egg whites from yolks, mix the yolks into the batter.  Whip the whites and fold them into the batter.  Pour the batter on a waffle iron and enjoy when cooked.

Adapted from A Year from Scratch – Simply Amazing Waffles

I didn’t change much in the original recipe but I did increase the vanilla and decrease the cinnamon to match my tastes.  It is probably pretty incredible the way it is written up on A Year From Scratch, but I really like my vanilla.  There are some other great recipes and cooking information over at A Year From Scratch that are worth reading through, make sure you check them out.

One last note, these waffles freeze incredibly well, just let them cool throw them in a zip lock and freeze.  Then pull them out and toast like a toaster waffle, they make a pretty wicked toaster waffle.

Tagged with: , , ,