There are few things more rewarding and relaxing then spending an afternoon looking out at a gorgeous view while tending to a dutch oven full of goodness.  It seems that is how this year’s installment of caveman cooking begins.  This year the challenge was not breakfast but spareribs; the only requirement I received was they had to be tender.  Mission accomplished.

Cooking in a dutch oven is not necessarily my forte, I mean it is primitive, but sadly my dutch oven is probably the least used weapon in my cooking arsenal.  Unlike the smoker, you can’t just set it and forget it (more or less), it requires constant devotion, and that presents a challenge at home when I usually do not have hours on end to babysit the pot.  Sadly.

Given the opportunity to give the dutch oven a try, I left the smoker at home and busted out the pot.  It is vacation, days are supposed to be spent doing the stuff you don’t have time to do at home like fishing, relaxing and yes, tending to a dutch oven.

Dutch oven with coals

To get started I had to do battle with the wind. First I dug a hole a few inches deep and a few inches wider than the dutch oven, then, grabbed the neighbors fire ring to act as a wind block.  Wind problem solved.

Dutch oven with the wind break

Next, I fired up 22 coals in the charcoal chimney and got ready to cook.  For every coal I put on the lid I put two underneath the oven in a checkerboard pattern.  From there, every 25-30 minutes, I added 6 to 8 or so fresh coals following the same distribution and rotated the oven half turn and the lid a half turn the other way.  There is a handy dutch oven temperature calculator you can find here.

Dutch oven BBQ Spareribs

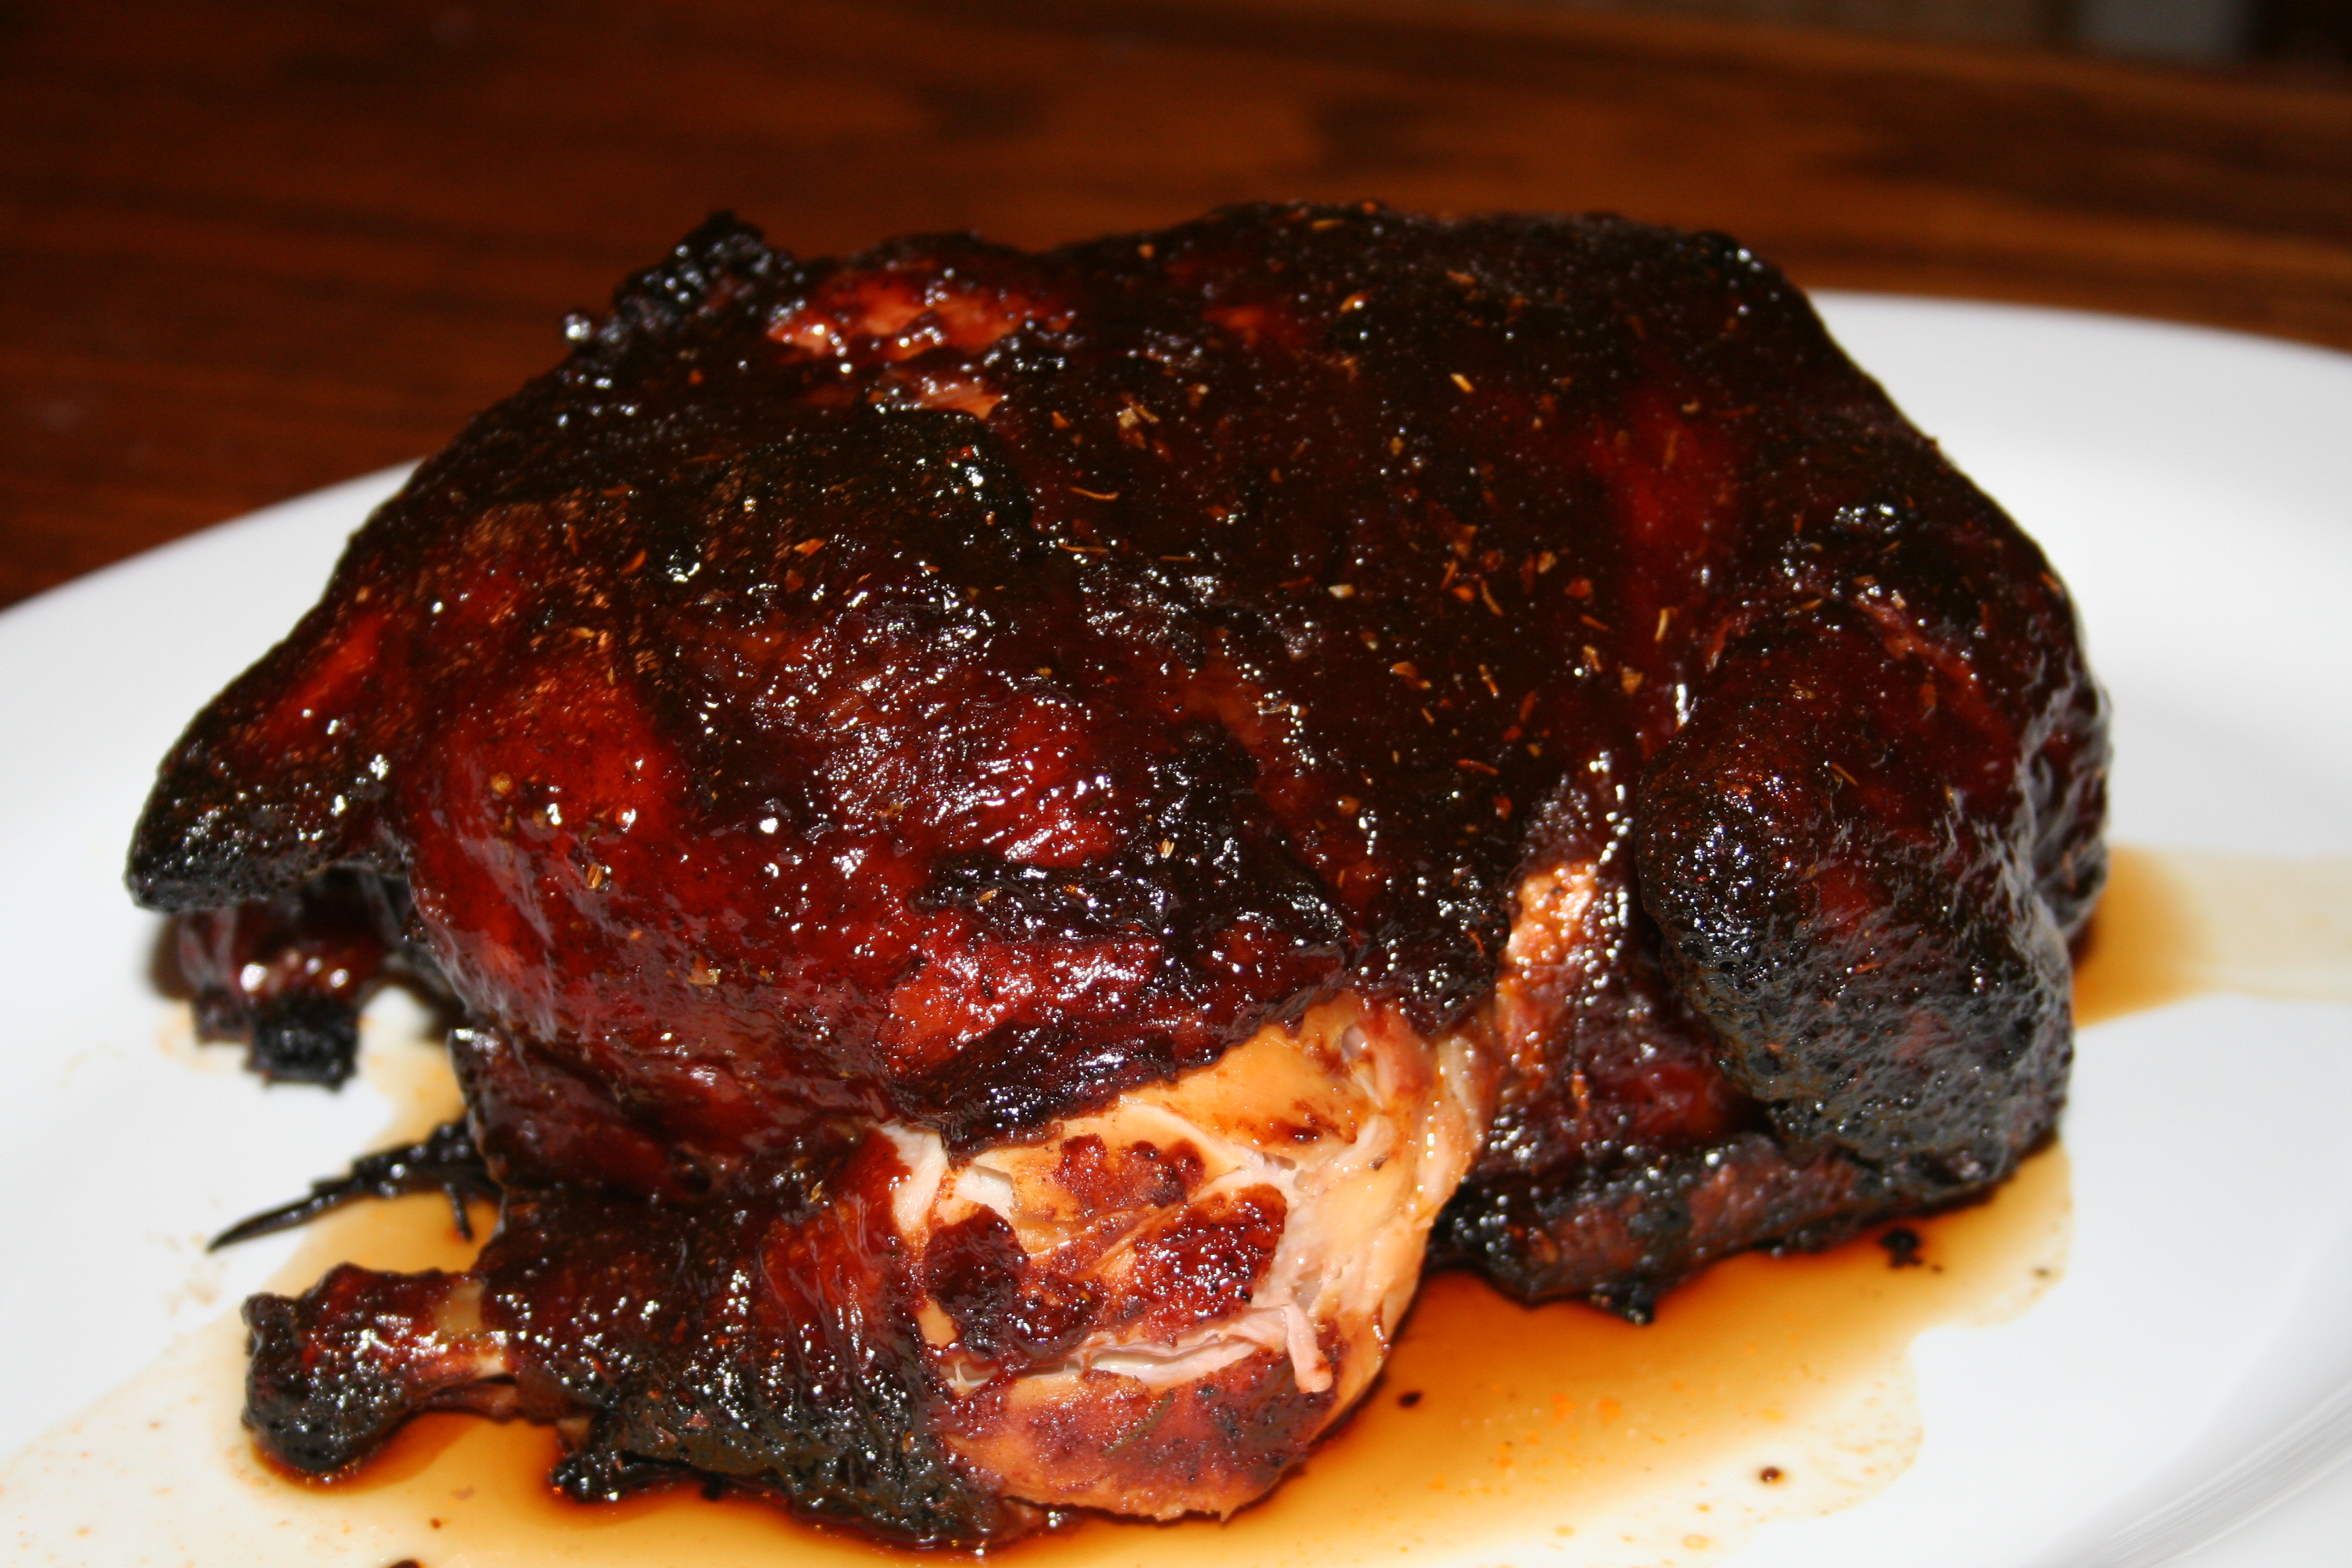
After two and a half hours of this madness and the constant whiffs of amazing smells coming from the pot, it was time for phase two, the fire.  This was where we were to finish and give the ribs a nice outward texture.  While maintaining the coals on the pot, I had been building up a nice bed of cherry wood coals to finish the ribs on with a bit of BBQ sauce.

BBQ Spareribs on the fire

Once the ribs had taken on a nice set of grill marks and soaked up some cherry smoke, they were ready and tender!  So, when it was all said and done, there was really no recipe it was a cobbled together bit of whatever came to my mind goodness but here is my best stab at it.

Ingredients
1 1/2 tsp brown sugar
1 1/2 tsp chile powder
1 1/2 tsp sage
1/2 c apple cider vinegar
1/2 c apple juice
1/2 can Coca Cola
1 large onion (chopped)
4 cloves garlic (chopped)
1 tbsp oil
mustard seeds
rosemary
black pepper
2 bay leaves
bbq sauce
spare ribs (bones removed)

Instructions
Make a rub using brown sugar, chile powder and sage.  Mix thoroughly and rub into all the meat.  Set meat aside.  Combine remaining ingredients with the exception of the bbq sauce in the dutch oven with a cup of water add meat and top with a bit of bbq sauce.  Cook meat in the dutch oven until it falls apart over low heat (250-300°F), about 2.5 hours and finish over and open fire or on a grill with some more bbq sauce.  Let rest for about 5 minutes and enjoy.

After another successful yearly installment of caveman cooking, the novelty has not warn off.  Cooking with nothing but fire is rewarding, its natural, its primitive and its time consuming.  But at the end of the day, its worth it. Its a blast and you can almost taste the effort in the food.

Happy Independence Day! I have leftovers to eat!

If you are looking for more dutch oven recipes, get started over at Jen Reviews with 35 Incredibly Easy Dutch Oven Recipes for Camping, personally the cinnamon rolls wrapped in bacon are calling my name.

Tagged with: , , , , , ,

I came into this with high hopes.  I have been infatuated with how tasty it looked.  I kept counting down the days until Wednesday to give it a try.  I found this recipe last week for Grilled Mexican Roadside Chicken, and it looks delicious and sounded interesting.  So I whipped it up today per the recipe, but in lieu of a whole chicken used several drumsticks I had in the freezer, same concept.

Grilled Roadside Mexican Chicken

And I have to say it was not bad chicken, but it wasn’t chicken that left me wanting more either.  It let me down.  It was juicy, but I attribute that more to technique than the recipe.   I had high hopes for it and it just fell short, flat on its face at my feet, I was disappointed but when piled onto of a salad with some taco-ranch dressing it was almost just like any other chicken, but perhaps with just a hair more Mexican flavor and eaten that way it was quite alright.  So here is a copy of the recipe should you wish to try it.  I did use half the amount of cinnamon because that was all I had around.

Ingredients
1 1/2 tsp ground ancho chile pepper
1 tsp dried oregano
pinch of ground cloves
1/2 tsp ground cinnamon
2 garlic cloves pressed
3 tbsp apple cider vinegar
1/4 c fresh orange juice
1 tsp Kosher salt
chicken (parts or a whole)

Instructions
If using a charcoal grill, get some charcoal going in a chimney (I used half a chimney full).  Mix all ingredients except chicken together in a bowl to create a wet rub.  Once the charcoal is ready place all of the coals on one side of the grill to set up a cool zone and a hot zone.  Place the chicken on the cool side of the grill, brush healthily with the wet rub.  Turn chicken and brush the other side with the wet rub.  Cover the grill and cook until a thermometer inserted into the thickest part of the chicken reads 165°F; basting with any remaining rub throughout the cooking period.  Remove chicken from grill and allow to rest for a while 5-10 minutes for parts or 10 to 15 minutes for a whole chicken.

The original recipe called for green onions to be grilled once the chicken was done, maybe this is where I went astray.  It also called for a whole chicken and not for parts, maybe that was the problem.  Either way it wasn’t bad, but like I said it let me down, it wasn’t all I had hoped for and the process of making the rub filled my kitchen with a heavenly familiar aroma of Jerk Chicken and made me think, why am I not making Jerk Chicken?  Well I may just have to do that soon.

Tagged with: , , , , ,

Perhaps my favorite way to have pork is like this, grilled and rubbed with dijon mustard and a rosemary/garlic concoction.  It was the first way I had cooked pork in out of my Dutch tradition and has been one of my favorites.  Its simple and the combination of the flavor of pork, rosemary and dijon are always a win.

So in typical fashion in getting ready to put this on the blog I made the pork, tried to stage it nicely and took a bunch of pictures.  Then in my moment of brilliance I decided I needed to organize the pictures before writing this post.  There in lies the problem…I deleted them having thought they were copied off somewhere else.  So you will have to take my word for it the pictures were something to behold, they did the meat such justice.

So without further ado and before I lose the recipe with the pictures here it is.

Ingredients
1 pork loin (4lbs-ish)
2 tbsp dijon mustard (or more)
2 tbsp chopped red onion
2 tsp kosher salt
1/2 tsp black pepper
1 clove garlic minced or pressed
2 tbsp finely chopped rosemary leaves

Instructions
Several hours before grilling time, mix all ingredients except pork loin and dijon.  Then you have a choice to make either flatten the loin by cutting into it the long way while rotating it to come out with one large and consistently thick piece of pork, like a piece of rolled out dough or just use it whole, both ways are superb.  Rub entire piece of meat with dijon and then the rub the entire piece of meat with the rub made above.  If you did not flatten the meat you can simply wrap it in saran wrap and throw it back in the fridge tell you are ready to cook it.  If you did flatten it you will not need to roll it back up, like a long line of cinnamon rolls and then proceed to wrap it in saran wrap and toss it in the fridge tell cook time.

Once cook time comes around, prepare the grill for indirect cooking.  With charcoal like below or with gas preheat the grill with both burners and turn the one you will be cooking over off.  For gas grills place the loin on a grill rack over a drip pan.  For charcoal you will have a drip pan filled with water in the center of the grill with charcoal on either side.  Just toss the meat on the pre lubricated grate being sure if you flattened and rolled the meat it does not come unrolled.  Cook indirectly until the center of the loin reaches you desired done-ness.  I pulled mine at 148ºF and let it rest for 10 minutes before slicing into it.

Indirect cooking over charcoal

Cooking indirectly over charcoal is easy and quite rewarding.  Just prepare a normal amount of charcoal for your grill using a chimney or other method.  Fill a foil pan with boiling water and place it in the center of the grill and tuck the charcoal on opposing sides of the pan.  Be sure to add a half dozen briquettes every 45 minutes or so to keep a consistent fire.  You can also toss on a chunk or two of wood to give it a little smoke flavor.

You will notice that the openings on my grill grate are strategically positioned over my charcoal pockets, this allows for easy replenishment.

Tagged with: , , , , , , , ,

Chicken.  Blah.  Ok, maybe I should say we eat more chicken than we rightfully should, I mean we should have way more pork and beef in there somewhere, but chicken it more often times than not is.  So with that we try to spice it up and give some flavor to the unflavorable, so today (actually last night) I set out to make a balsamic glazed grilled chicken.

Balsamic Glazed Grilled Chicken

And I must admit it was rather tasty, albeit quite sweet, which for some reason I was not expecting.  Once I got past the sweet and onto the rest of the chicken it was as I said rather tasty, very tender and juicy; which is always better than dry chicken.

In hindsight I should have cooked my stuffing a little bit before shoving it in the bird.  The breasts and thighs of the bird were ready about 20 minutes before the stuffing reached a safe temperature, which much to my surprise did not dry out the meat or give it even the slightest burnt taste.

I grilled the bird on my Weber kettle over charcoal for about an hour and twenty minutes, the bird was just shy of 4 pounds.  I replenished the charcoal once at about 45 minutes with six fresh briquettes on each side and a handful of apple chips.  Once the breasts were about done I glazed the bird liberally and let it finish out its cooking, which because of the stuffing was longer than anticipated when I applied the glaze.  But it didn’t seem to burn.

Ingredients
1 chicken (or parts if you don’t wanna mess with a whole bird), about 4 pounds
1 medium onion
1 stalk celery
1 clove garlic
1/2 c ketchup
1/4 c balsamic vinegar + extra
6 tbsp dark brown sugar
1 tsp oregano
1 tbsp lime juice
1 tbsp olive oil
2 tbsp paprika
1 tbsp chili powder
1 tbsp cumin
1 1/2 tsp salt
1 tsp pepper + extra
a few stalks of rosemary

Instructions
To make a rub combine 2 tbsp brown sugar with paprika, chili powder, cumin, lime juice, oil salt and pepper.  Mix well and rub all over chicken making sure to get plenty under the skin.  Cover and refrigerate overnight.

On cooking day remove chicken from refrigerator 30 minutes before cooking.  Chop up onions into large pieces, chop celery, rosemary and garlic and combine in a bowl with pepper to taste.  Sprinkle with balsamic vinegar and stuff in bird (if I were to listen to my advice I would likely bake the stuffing at this point prior to stuffing the bird for say 20 minutes in the over).

Prepare the grill for indirect cooking, clean and lube the grate and toss the bird on the grill. Once the chicken is on the grill prepare the glaze by combining ketchup, vinegar, 4 tbsp brown sugar and oregano.

Once chicken is nearly done brush chicken liberally with glaze mixture.  Cook until internal temperature of chicken breasts and thighs is 167°F and stuffing is 165°F.  Once pulled allow chicken to stand for 15 minutes before slicing.  Enjoy

Without the glaze I dare say the chicken would have been quite south western but with the glaze it was sweet and magical.  Now if I can just figure out what to do with the left overs.


Tagged with: , , , , ,

Wednesday night my wife says to me, “We should make Greek burgers with some of the venison we have in the freezer.”  And that is when it was born, the Venison Greek Burger, I became infatuated with the idea for the rest of the week.  All day Thursday, all day Friday, I could not keep it off my mind.  Then finally Saturday came and the burger came to be.  It did not disappoint.  It was tasty, it was worth the thought and the preparation, and truth be told we ate a couple yesterday and are about to eat a couple more.

The Venison Greek Burger

Like so many other recipes, this is just a start, the Greek use any number of seasoning to create their own unique signature when making Gyro meat, which is what this is based off.  So this is more of a template that I used to get going and will likely add in different ingredients each time I make it from here on out.  There is a recipe for the meat, which was excellent and one for the Tzatziki sauce to go on top of the burger as well.

Greek Venison Burger Meat
Ingredients
1 lbs ground venison
1 egg
1 small onion
1 tsp ground oregano
1 tsp ground marjoram
1 tsp kosher salt
2 tsp fine feta cheese crumbles
2 gloves garlic, crushed
1/4 tsp ground black pepper

Instructions
Chop onion and then place in a food processor.  Blend in the processor until the onion is more of an unrecognizable consistent mash.  Remove from blender and place in a couple of pieces of good paper towel.  Squeeze out as much juice as possible.  Add onion as and the rest of the ingredients with the exception of the venison to a bowl.  Mix well.  Add in venison and mix until the seasoning is evenly distributed through the meat.  Form to patties, let set for 30 minutes and grill to desired wellness with light smoke from a few oak chips in the grill.

Should you have no venison you could substitute a half pound of ground beef (lean) and a half pound of ground lamb.

Tzatziki Sauce
Ingredients
1 1/2 c plain greek yogurt
1 cucumber
2 tbsp fresh lemon juice
1/2 tsp dill weed
pinch of kosher salt
pinch of ground black pepper
pinch of sugar
2 cloves of garlic crushed

Instructions
Peel cucumber, slice and half length wise and with a spoon remove the seeds.  Place the remaining cucumber in a food processor and blend until uniform (kind of like applesauce).  Place cucumber in a couple of paper towels and squeeze out the juice.  Combine the drained cucumber with the remaining ingredients and refrigerated overnight.

The sauce will be a little too garlicky the first day, it mellows over night, but keep the breath mints handy!

Once the burgers are cooked slap ’em on a bun with some lettuce (or spinach), tomato, onion, feta, tzatziki sauce and a dusting of ground sumac; these are wicked tasty.  Or as an alternative they are great without the bun but with everything else in a salad.  Either way give it a try, and remember the meat recipe is just a template customize, customize, customize!

Tagged with: , , , , ,