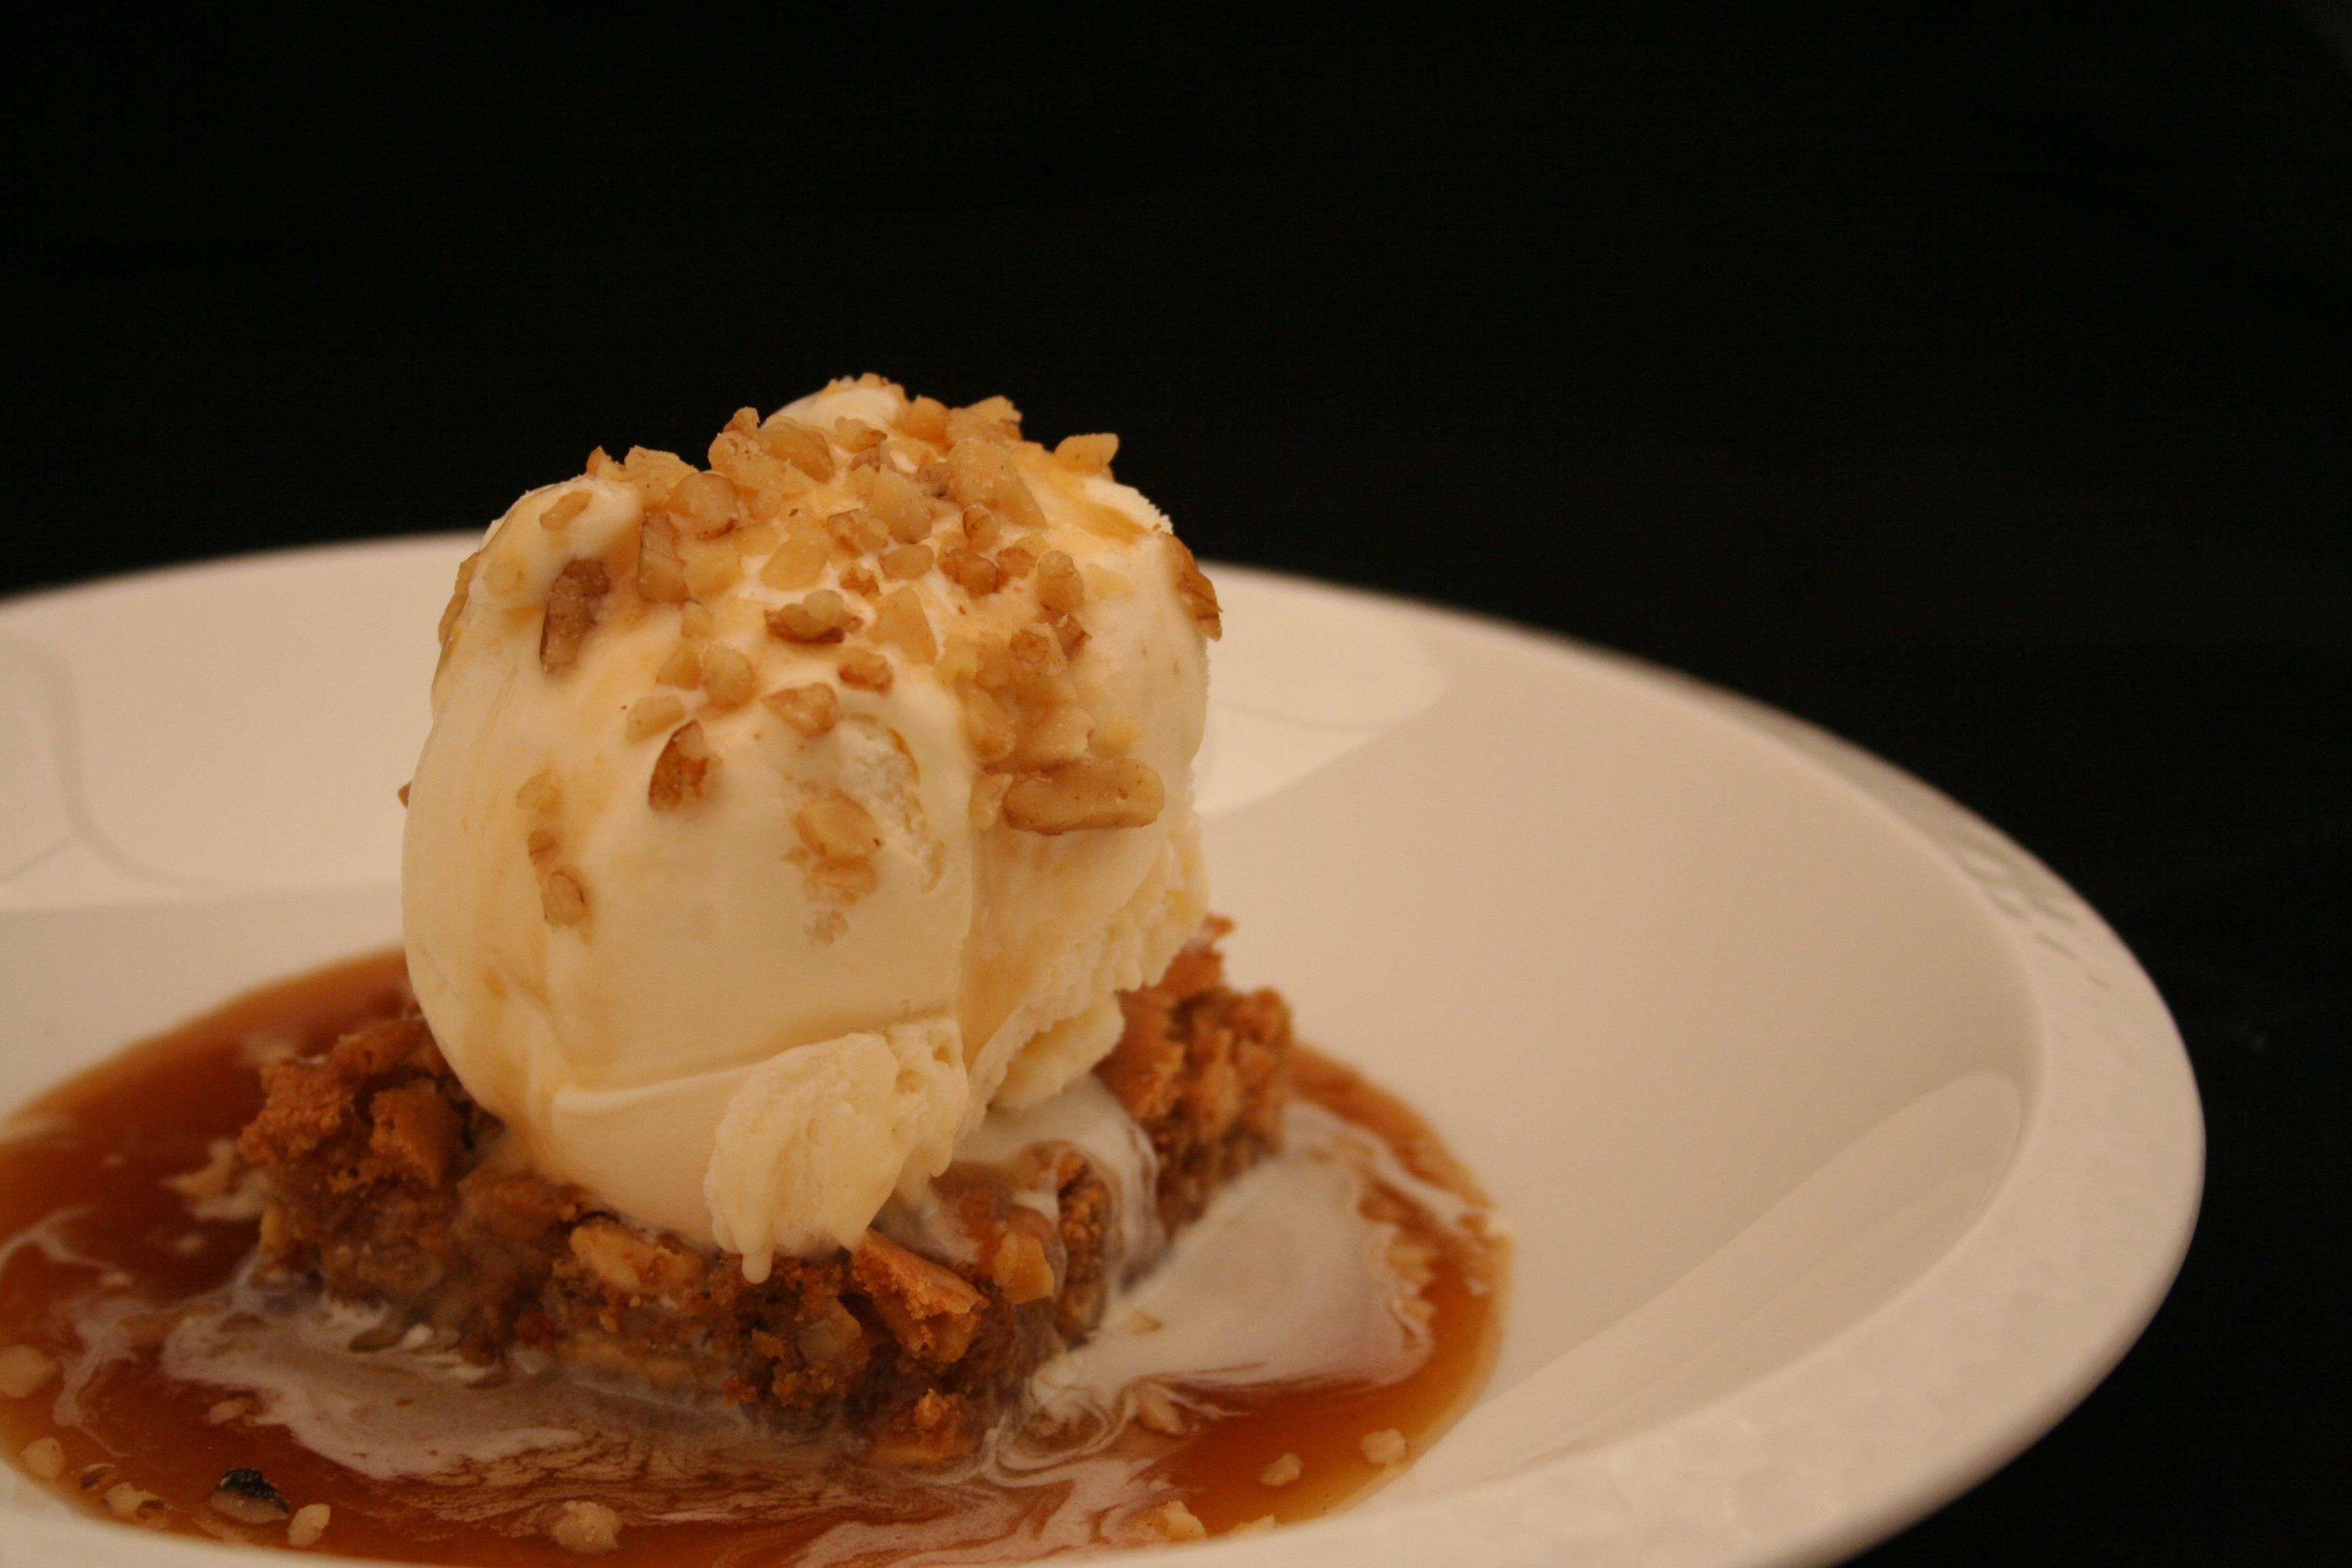
Not often do I venture into the realm of baking, not because I don’t enjoy baked goods but more because you leave too much to a recipe or a single ingredient.  Leave something out or put too much of something in you have just ruined your baking efforts and its time to start over.  You either have a piece of concrete or a massive bubble in your oven and unlike cooking you cannot rescue it at this point.  Call off the authorities this atrocity has happened and its time to move on.

Moving on, tonight’s baking ended in a much more pleasing manner.  The brownies cooked up nicely, the sauce albeit stubborn turned out and end result…a more than 1300 calorie (before the ice cream), Paula Deen would be proud…it uses nearly a half pound of butter, life shortening dessert that is worth the 10 miles it would take to run off those calories.  But I didn’t eat a whole piece, just enough to know its good and that is all I need.

Walnut blondie with ice cream and maple butter sauce

So now the details of how to make this beast of a dessert, make a double batch and you will need nearly a pound of butter and over three cups of brown sugar, this is not for the faint of heart.

Ingredients
1 c sifted flour
1/2 tsp baking powder
1/8 tsp baking soda
1/8 tsp salt
1/2 c chopped walnuts + extra
1/3 + 1/2 c butter
1 + 3/4 c packed brown sugar
1 egg, beaten
1 tbsp vanilla extract
1/2 c white chocolate chips
3/4 c maple syrup
4 oz cream cheese

Instructions
Preheat oven to 350°F.  Combine flour, salt, baking powder and baking soda and sift twice.  Add 1/2 c of chopped walnuts, mix well and set aside.  Melt butter, when melted add brown sugar and mix well.  Then add egg and vanilla and mix well.  Add flour mixture slowly, mixing well.  Add white chocolate chips.  Spread in a greased (with butter) 9 inch square pan.   Bake 20 to 25 minutes until done ( when a wooden tooth pick comes out clean).

While baking melt 1/2 c of butter and the cream cheese in a pan with maple syrup, stir in brown sugar until it is dissolved.  Once the brownies are done serve brownies topped with ice cream, drenched in maple butter sauce and sprinkled with walnuts.

It is important to note that real maple syrup is the key here, not the garbage you get at the store that is imitation, real stuff that was cook from sap that was drained out of trees.  That kind, its expensive and worth every penny.

Enjoy these babies and don’t tell your cardiologist about them or any other doctor for that matter, they may not approve.

Tagged with: , , , , , ,

Sun Dill PicklesSadly I have been neglecting my blog, don’t feel alone though, I have also been neglecting my cooking and my diet (meant merely as the consumption of quality food and bacon).  The last several weeks have been crazy busy and finally the combination of my garden and my parents garden while they are on vacation is forcing me to do some canning and cooking.  Thank goodness for fresh produce.

One of the recipes that has been passed down through my family like balding (I hope not) and an attitude are sun dill pickles.  Just like they attitude they are true to form every time.  You put the same stuff in the jar, you follow the same process, you get the same result.  Easy, actually they are really easy, but, also true to form I have tried a few things this year to make them last longer.  One problem we always have they spoil, well they don’t actually spoil they just turn mushy.  No one wants a mushy pickle, they do make great dill relish at this point I must point out.  The best dill relish ever actually.

So this year I am trying the typical alum in half of the jars (I have left the alum in the recipe as handed down) and grape leaves in the other half.  In my reading this year I found that grape leaves are supposed to keep things crisper.  Do they?  I have no idea but come middle of the winter I will crack open two jars of pickles one with each technique and be sure to follow up on here with the results.  Fearful of a funky taste I have tried a few pickles from the grape leaf jars and noticed no difference in taste.

Also new this year to the process in addition to the usual washing I have begun removing the a small chunk of the blossom end of the pick approximately 1/16-1/8″ off the end of each pickle.  I read several places that there is an enzyme in the blossom end of the pickle which makes them mushy…so just to be safe they are all gone.

So with all of that said here is the recipe, it is designed for a gallon of pickles, rarely do I do a whole gallon at once, the left over brine keeps nicely in the fridge until it is needed.

[dc_getRecipe id=”12″]

These are probably the simplest pickles ever and they are mighty tasty, they are no Claussen pickles (more about that to come) but they are great in their own light and did I mention simple to make?

Be sure to check back mid winter to see how the grape leaf – alum throw down shakes out, which will keep the pickles crisper, will either or will they both fall short.

Tagged with: , , , , ,

If that isn’t a mouthful, Korean BBQ Beef Short Rib tacos, I am not sure what is but figuratively and literally there were a mouthful and they were something special.  This was not an original creation but rather a stab at the KogiBBQ shortrib beef tacos they sell our of food trucks in LA.  I was lucky enough to get to sample one of these this past spring on a trip out there and it left such an impression I thought I would like to recreate it at home.  Well I failed to recreate it but I still came up with something amazing that had a flavor and texture set unlike anything I have cooked before.

We started out with the beef shortribs this was perhaps the easiest part.  It was providential almost, I recently began to subscribe to Bon Appetit magazine and the July 2011 edition had a recipe for a Korean BBQ Marinade.  The recipe was good, actually it was really good we tried it a couple of weeks ago on some shortribs just for fun and I think I would be evicted by my wife if I don’t make it again.  It was really good.  We did let our shortribs soak in this marinade for about 16 hours, and the flavor was good, it permeated all the way through but was not too strong.

Next came the condiments, I started by tossing some shredded romaine and cabbage with a Korean Soy Vinaigrette, arriving what was affectionately known as dirty lettuce.  This was really easy to make and I made the vinaigrette the morning of so it had some time to meld and mature.  You can find the recipe below.

Ingredients
2 c shredded napa cabbage
4 c shredded romaine lettuce
1/4 c soy sauce
1 tsp grated ginger
1 clove garlic (finely minced)
2 tsp rice vinegar
3 tsp chili powder
1/2 tsp cayenne
1/2 tsp ancho chile powder
generous squeeze of lime juice
dash of sesame oil
a sprinkling of toasted sesame seeds

Instructions
Combine all but lettuce and cabbage in a bowl and let sit refrigerated at least 8 hours.  Just prior to serving shred cabbage and romaine and toss with vinaigrette.  Only toss as much as you need otherwise it will get soggy.

The last condiment that needed assembly was the Cilantro-onion-lime relish and it was something crazy it was easy to assemble but added such depth to the overall combination of flavors it would be tragic to leave it off.  You can find its recipe below.

Ingredients
1/2 red onion minced
1 tsp rice vinegar
1/2 tsp white wine vinegar
1 tbsp chopped cilantro
juice of 1 lime
pinch of salt

Instructions
Mince onion and combine in a bowl with vinegars, allow to set for 5 minutes.  After five minutes drain, rinse and allow onion to thoroughly drain.  Add remaining ingredients to a bowl with onion, stir to combine.

There was one final condiment we topped these babies with to give them a bit more of a kick, a little bit of a punch in the side of the face, it was a little Sriracha Hot Chili Sauce, you know the stuff in the clear bottle with the green top that is absolutely incredible.

So once the short ribs were grilled, de-boned and shredded, it was assembly time.  We heated up a skillet with little heat in it and warmed our tortillas in there the then piled on the meat and condiments and enjoyed.  These are pretty good, they are worth the effort and are on the menu again soon.

If I pulled one learning from this it would be that corn tortillas may be a bit better than the flour ones for this.  So next time we know.

Tagged with: , , , , , , , , , , , , , , ,

There are few things more rewarding and relaxing then spending an afternoon looking out at a gorgeous view while tending to a dutch oven full of goodness.  It seems that is how this year’s installment of caveman cooking begins.  This year the challenge was not breakfast but spareribs; the only requirement I received was they had to be tender.  Mission accomplished.

Cooking in a dutch oven is not necessarily my forte, I mean it is primitive, but sadly my dutch oven is probably the least used weapon in my cooking arsenal.  Unlike the smoker, you can’t just set it and forget it (more or less), it requires constant devotion, and that presents a challenge at home when I usually do not have hours on end to babysit the pot.  Sadly.

Given the opportunity to give the dutch oven a try, I left the smoker at home and busted out the pot.  It is vacation, days are supposed to be spent doing the stuff you don’t have time to do at home like fishing, relaxing and yes, tending to a dutch oven.

Dutch oven with coals

To get started I had to do battle with the wind. First I dug a hole a few inches deep and a few inches wider than the dutch oven, then, grabbed the neighbors fire ring to act as a wind block.  Wind problem solved.

Dutch oven with the wind break

Next, I fired up 22 coals in the charcoal chimney and got ready to cook.  For every coal I put on the lid I put two underneath the oven in a checkerboard pattern.  From there, every 25-30 minutes, I added 6 to 8 or so fresh coals following the same distribution and rotated the oven half turn and the lid a half turn the other way.  There is a handy dutch oven temperature calculator you can find here.

Dutch oven BBQ Spareribs

After two and a half hours of this madness and the constant whiffs of amazing smells coming from the pot, it was time for phase two, the fire.  This was where we were to finish and give the ribs a nice outward texture.  While maintaining the coals on the pot, I had been building up a nice bed of cherry wood coals to finish the ribs on with a bit of BBQ sauce.

BBQ Spareribs on the fire

Once the ribs had taken on a nice set of grill marks and soaked up some cherry smoke, they were ready and tender!  So, when it was all said and done, there was really no recipe it was a cobbled together bit of whatever came to my mind goodness but here is my best stab at it.

Ingredients
1 1/2 tsp brown sugar
1 1/2 tsp chile powder
1 1/2 tsp sage
1/2 c apple cider vinegar
1/2 c apple juice
1/2 can Coca Cola
1 large onion (chopped)
4 cloves garlic (chopped)
1 tbsp oil
mustard seeds
rosemary
black pepper
2 bay leaves
bbq sauce
spare ribs (bones removed)

Instructions
Make a rub using brown sugar, chile powder and sage.  Mix thoroughly and rub into all the meat.  Set meat aside.  Combine remaining ingredients with the exception of the bbq sauce in the dutch oven with a cup of water add meat and top with a bit of bbq sauce.  Cook meat in the dutch oven until it falls apart over low heat (250-300°F), about 2.5 hours and finish over and open fire or on a grill with some more bbq sauce.  Let rest for about 5 minutes and enjoy.

After another successful yearly installment of caveman cooking, the novelty has not warn off.  Cooking with nothing but fire is rewarding, its natural, its primitive and its time consuming.  But at the end of the day, its worth it. Its a blast and you can almost taste the effort in the food.

Happy Independence Day! I have leftovers to eat!

If you are looking for more dutch oven recipes, get started over at Jen Reviews with 35 Incredibly Easy Dutch Oven Recipes for Camping, personally the cinnamon rolls wrapped in bacon are calling my name.

Tagged with: , , , , , ,

Okay.  So some things are not quite natural to me yet, like putting a bunch of stuff in a jar with no lid and letting it sit and come alive for a couple weeks, scraping the mold off the top (if it did mold, this doesn’t always happen) and then you are supposed to eat it?  Well the more I do it the more familiar it becomes and it is worth overcoming the mental hurdle this stuff is tasty.

Every spring my parents have an abundance of asparagus from their small garden plot out back, an abundance might be an understatement but it is way more than they could possibly hope to eat and still like it at the end of the season.  As a result I usually end up with a bit of it myself, which is fine with me, asparagus is my friend.  This year I thought I would try something a little different.  I tried pickling some asparagus, I tried three different methods and got three different results.  You will have to check back for the other two types of pickles as I have not yet tried all three.

Lacto-fermented 'pickled' asparagus

The first type of pickled asparagus that I got to try was lacto-fermented pickled asparagus.  It was perhaps the most intimidating of the three batches I did, but I had to know.  Lacto-fermentation is a natural process in which the naturally occurring lactobacilli on the surface and in the vegetables (in this case) convert the sugars and starches in the vegetables in to lactic acid.  This lactic acid inhibits putrefying bacteria and preserves the vegetables.  At first glance.  Scary.

The asparagus pickle recipe I used was adapted from a recipe found over at Awesome Pickle.  Because I was using a pint jar and had enough asparagus to fill the entire jar I adapted the recipe a bit.  I did however find the technique  they used to submerge the asparagus in the jar simple and effective.  You can view that technique at the bottom of the page linked above.

Ingredients
asparagus (enough to fill a 1 pint wide mouth jar)
2 cloves garlic
1/2 tsp coriander seeds
1/2 tsp black peppercorns
1 c water mixed with 3/4 tsp kosher salt

Instructions
Wash asparagus.  Trim asparagus to fit into a 1 pint wide mouth jar, heads down, with about an inch of head space.  Thinly slice garlic cloves and place them in the jar, add in the spices.  Pout in the water until it entirely covers all of the asparagus.  Use the method shown in the third picture here to keep the asparagus from rising up during the process.  Put the jar in a cool place dark place with a towel underneath and another towel draped over the top to keep the dust out and forget about it for a week or two.  Once its ready in a week or two remove the jar, remove any surface mold and store in the refrigerator.

I initially had hoped to try these before I headed out on vacation a week ago but for some reason they just didn’t seem ready.  So instead I just took off and left them be in the basement and another week later they were ready to go.  These little guys are pretty tasty and still had a good crunch so far.  We’ll see how they are by the end of the jar.  If you can get over the initial intimidation of allowing nature to run its course on a jar of veggies.  Lacto-fermentation yields a delicious product that I am told is easier for the body to digest.

Tagged with: , , , , , ,